How to Make Beats: Your Complete Guide to Beatmaking

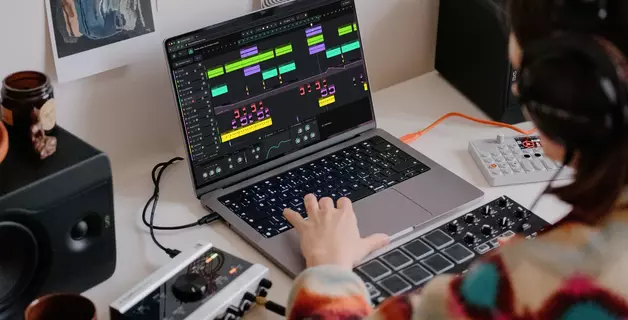
Beatmaking is the process of creating instrumental music tracks using digital audio software, drum samples, synthesizers, and other sound sources. You arrange rhythmic patterns, bass lines, melodies, and effects to create complete musical compositions.
Beatmaking has become accessible to anyone with a computer and internet connection. Modern digital audio workstations provide professional production tools without requiring expensive equipment or formal music education. Many producers start as hobbyists and develop professional skills through consistent practice and experimentation.
In this guide, you will learn:
- Essential equipment and software for beatmaking
- Beat structure and composition elements
- Step-by-step beat creation process
- Mixing and mastering fundamentals
- Practical tips for skill development
What You Need to Make Beats
Creating beats requires minimal equipment to start. Not all items listed below are required, but they simplify the workflow and accelerate skill development.
Essential requirements:
- Computer (desktop or laptop)
- Digital audio workstation (DAW) software
- Sound library or sample packs
- Headphones or studio monitors
Optional equipment:
- MIDI controller (keyboard or pad controller)
- Audio interface
- External storage for project files
Computer Requirements for Beatmaking
Modern computers meet the technical requirements for music production. The following specifications are sufficient for beatmaking:
- 4 GB RAM (8 GB recommended)
- Processor with 4 cores at 2.4 GHz
- 64-bit operating system
- 13-inch or larger display
- 500 GB storage (SSD preferred for faster performance)
Both Mac and PC systems work for beatmaking. Software compatibility varies by operating system, so verify that your chosen DAW supports your system before installation.
Digital Audio Workstation (DAW) for Beatmaking
A digital audio workstation is software that provides tools for creating, recording, and editing music. DAWs include virtual instruments, effects processors, and sound libraries needed for beat production.
Software for beginners and professionals share similar core functions. As your experience grows, your tool configuration may expand to include additional plugins, hardware integration, and specialized instruments.
Browser-Based DAWs
Browser-based DAWs operate through your web browser without installation. These applications run on cloud servers and store project files remotely, eliminating the need for local storage space.
Advantages of browser-based DAWs:
- No installation required
- Access from any computer with internet connection
- Lower cost compared to traditional software
- Automatic updates without manual downloads
- Cloud storage prevents data loss
Amped Studio is a browser-based DAW designed for beatmaking and music production. It provides:
- Complete DAW functionality in your browser
- VST3 plugin support (unique among browser-based DAWs)
- Collaborative project sharing
- Progressive web app (PWA) for offline access
- Built-in sound libraries and drum kits
For beginners, browser-based DAWs reduce initial barriers. You can start making beats immediately without purchasing expensive software or downloading large installation files.
Sound Libraries and Sample Packs
Each music style requires specific sound characteristics. Hip-hop drums differ from electronic music percussion. Rock guitar samples may not suit pop arrangements. Select sound libraries that match your intended music style.
Sample packs and sound libraries are available through online marketplaces and music production websites. Many DAWs include built-in sound libraries with their basic installation.
Amped Studio includes sound libraries covering multiple music styles in its free version. Premium subscription expands the library significantly. Additional sample packs for specific genres are available through the Amped Studio marketplace.
MIDI Controller for Beatmaking
A MIDI controller is hardware that connects to your computer and sends musical note data to your DAW. MIDI controllers include keyboards, drum pads, and devices with knobs and faders for parameter control.
MIDI controllers are optional but valuable. You can create beats using only your computer mouse and keyboard, but this workflow is slower and less intuitive than using dedicated hardware.
Benefits of MIDI controllers:
- Faster beat creation workflow
- More natural musical performance input
- Real-time parameter adjustment
- Improved rhythm and timing through physical interaction
- Better creative expression through tactile feedback
Even without prior musical training, MIDI controller skills develop through practice. Regular use improves rhythm awareness and makes the creative process more immediate and responsive.
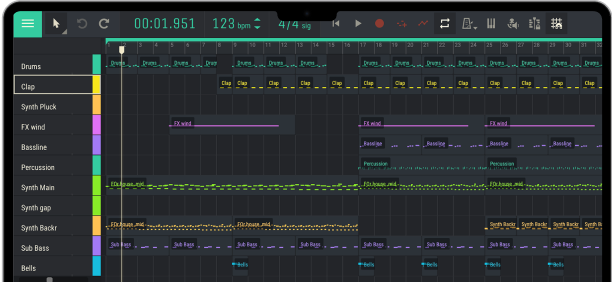
Beat Structure
Professional beats follow recognizable structural patterns. While finished arrangements may sound complex, they consist of distinct layered elements.
Standard beat components:
- Drums (kick, snare, claps)
- Percussion (hi-hats, shakers, cymbals)
- Bass line
- Melody (synthesizers, sampled instruments, vocals)
- Background effects and atmosphere
Understanding each component's role simplifies the creation process.
Drums
The kick drum is the foundation of most beats. It sounds louder than other elements and establishes the rhythmic pulse. Other drum sounds (hi-hats, snares, toms, claps) support the kick drum pattern.
Selecting the correct kick drum requires careful attention because it defines the track's character and energy.
In common rhythmic patterns (straight beats used in electronic dance music and pop), a snare or clap occurs on every second kick drum hit. This creates rhythmic contrast and forward momentum.
Many producers layer multiple drum sounds together. Adding clicks or rim shots with the snare creates width and variation. Sound layering produces the impression of complexity while maintaining simple underlying patterns.
Percussion
Percussion elements fill space between kick drum hits. Hi-hats, shakers, tambourines, and other percussive sounds add texture, rhythm variation, and dynamic movement to the drum pattern.
Percussion creates musical interest between the main drum hits. It provides rhythmic detail and establishes the track's mood and energy level.
Common percussion instruments:
- Hi-hats (closed, open, rolled)
- Shakers
- Wood blocks
- Tambourines
- Cowbells
- Rim shots
Percussion offers creative freedom. Experiment with different combinations to find sounds that enhance your beat.
Bass
The relationship between bass and kick drum determines much of a track's power and clarity. Many producers consider the bass and kick combination to represent 90% of a track's foundation.
Bass provides harmonic foundation. It can be a simple single-note pattern with occasional variation or a more complex melodic line depending on the music style.
Bass programming approaches:
Start by placing bass notes directly on each kick drum hit. This creates immediate rhythmic alignment. Then experiment by shifting bass note timing slightly forward or backward. Gradually adjust until you find a rhythm pattern that complements your drums.
Frequency management:
Bass and kick drum often compete in the low-frequency range. Select sounds where their fundamental frequencies do not overlap excessively. For example, a deep sub-bass works better with a punchy mid-range kick drum. A kick drum with extended low-frequency content pairs better with a bass that has more mid-range presence.
Melody
Melody makes your beat memorable and establishes its emotional character. Melodic elements distinguish your track from others and provide the musical identity listeners remember.
Melodic instrument options:
- Synthesizers (lead, pad, pluck sounds)
- Piano or keyboard samples
- Vocal samples pitched and arranged
- Sampled instruments (strings, brass, guitars)
- Chopped and rearranged audio loops
Melody creation can begin before or after bass composition. Some producers build entire beats around a bass line, constructing other elements to support it. This approach works well for hip-hop production where bass often drives the composition.
Melodic structure in modern production:
Many contemporary hip-hop and trap beats use 4-bar melodic loops with a variation at the end of the fourth bar. This variation creates anticipation and brings the listener back to the loop's beginning.
For rap and hip-hop, simpler melodies work better than complex ones. Vocal delivery in rap typically maintains consistent pitch rather than melodic variation. Overly complex instrumental melodies can conflict with vocal delivery and listener attention.
Reserve more melodic complexity for chorus sections rather than verses when producing for rap vocals.
Background Effects
Effects and atmospheric sounds add variation throughout the beat. Introducing new background elements prevents listener fatigue and makes each section feel fresh.
Background effect types:
- Ambient synthesizer pads
- White noise sweeps
- Reversed audio samples
- Vocal samples and ad-libs
- Riser and impact effects
- Textural noise and vinyl crackle
Effects can also be created through automation of existing track elements. Adjust filter cutoff, reverb amount, delay feedback, or other parameters over time to create movement and interest.
How to Make Beats Step by Step
Music production and beatmaking are accessible to anyone without formal education. Digital tools simplify the learning process and allow skill development through practice.
Step 1: Choose Your DAW
Select a beatmaking tool that matches your experience level and budget. Some DAWs offer simple interfaces for beginners, while others provide advanced features for experienced producers.
Amped Studio is a browser-based DAW that requires no installation. It runs directly in your browser, providing immediate access to beat creation tools. Amped Studio includes most desktop DAW features while eliminating download and installation requirements.
Step 2: Select Your Sounds
Within Amped Studio, the Drumpler device provides beat creation tools. Drumpler contains pre-organized drum kits ready for immediate use. The free version includes 17 drum banks. Premium users access additional banks.
Sound banks contain kicks, snares, hi-hats, and percussion instruments organized by style. All essential elements for beat creation are included.
Step 3: Create Your Drum Pattern
Open Amped Studio and create a new track for your beat. Each instrument can occupy a separate track for better organization and mixing. In this example, kicks and snares will use Track 1, while hi-hats will use Track 2.
Select Track 1 and add the Drumpler device from the Device Chain section at the bottom of the workspace.
Click the track sequence area and create a clip. Double-click the clip to open the Note Editor. Each key on the octave (12 keys) links to a Drumpler pad (12 pads). For example: C3 connects to pad 1, C# connects to pad 2, D connects to pad 3.
Enabling the virtual keyboard allows you to play drum pads using your computer keyboard. Note that playing notes in different octaves does not change sample pitch. All octaves repeat the default octave (Oct3). Adjust sample pitch in the individual preset settings for each sound in the Drumpler device.
The Note Editor is where you create beat patterns and melodies. Select a drum kit style to begin. For this example, we use the Funky Drum Kit. On Track 1, place kick and snare patterns.

Step 4: Add Percussion Layers
When the initial drum layer is complete, add another layer on Track 2 for hi-hats. Clone Track 1 settings, create an empty region, and program hi-hat patterns.

Step 5: Apply Effects
The drum loop is now complete but may sound dry without effects processing.
Add space and depth by applying reverb to each layer. Reverb creates the impression of acoustic space and makes the beat sound less mechanical.

Step 6: Refine Individual Sounds

Drumpler allows adjustment of each sample's parameters: Velocity, Level, Pan, Pitch, Start, and End. These controls provide detailed sound shaping capability.
Parameter adjustments can be recorded over time through automation. Amped Studio supports automation recording for sample parameters. Experiment with automation to create dynamic movement and variation in your beat.

Step 7: Build Your Complete Arrangement
After creating the initial beat version, add melodic layers. If the drum section needs additional elements, add more percussion or drum variations.
DAW workflow allows you to paste, delete, copy, and undo any action. Experiment freely with different ideas. The creative process benefits from trial and error.
Mixing and Mastering Your Beat
After beat creation, mixing and mastering prepare your track for distribution and ensure it sounds professional across different playback systems.
Mixing Fundamentals
Volume Balance: Set each element's volume level according to its importance in the mix. Kick and snare typically sound loudest, followed by bass, then melodic elements, with background effects at lower levels.
Equalization (EQ): Resolve frequency conflicts between instruments. Remove unnecessary frequencies from each sound to create space for other elements. For example, remove low frequencies from hi-hats so they do not compete with kick and bass.
Panning: Position instruments in the stereo field (left to right). Kick drum and bass typically remain centered. Other elements can be positioned left or right to create width and separation.
Effects Processing: Apply reverb, delay, chorus, compression, and other effects to enhance realism and character. Effects make digital productions sound more natural and three-dimensional.
Mastering Basics
Mastering is the final processing stage that prepares your beat for distribution. Mastering involves:
- Overall compression to control dynamic range
- Final EQ adjustments for tonal balance
- Limiting to achieve competitive loudness levels
- Stereo enhancement for width and clarity
Professional mastering requires experience and trained listening skills. Many producers use mastering services or plugins designed for automatic mastering when starting.
Tips for Beatmaking Success
Use Samples and Loops for Inspiration
Finding a starting point is often the most difficult part of beat creation. Browse sample libraries in Amped Studio or online sources to find interesting sounds. Place a sample on a track, create a rhythmic pattern, and loop the result.
Existing drum loops often suggest melodic or bass line ideas. You can build around the original loop, gradually replacing sounds with your own selections until the beat becomes entirely your creation.
Study Your Favorite Producers
Listen to music from producers you admire. Analyze track structure in detail. Identify which drums, instruments, effects, and sounds they use. Note how instruments are positioned and balanced in the mix.
Write down structural details to create a reference document for your own productions. Mark each track element and its timing. This analysis improves your understanding of arrangement and production techniques.
For practice, recreate sections of favorite tracks. Attempt to reproduce drum patterns, bass lines, melodies, and effects as accurately as possible. This exercise develops technical skills and ear training.
Complete Your Beats
Every producer accumulates unfinished beats. Creative momentum often fades after several hours of work. When you return later, the original inspiration may be lost. Many sketches remain unfinished permanently.
In early stages of development, prioritize completion over perfection. Finished beats, even if imperfect, build your portfolio and provide motivation to continue. Unfinished work can be discouraging and reduce motivation over time.
Complete beats demonstrate your progress and provide learning opportunities through listening and analysis.
Practice Consistently
The principle of 10,000 hours suggests that dedicated practice leads to expertise. Reading articles and watching tutorials provides theoretical knowledge, but practical skill develops through actual beat creation.
Dedicate at least 30 minutes daily to beatmaking. Monthly progress becomes noticeable with consistent practice. Your arrangements will improve in quality, complexity, and efficiency.
Learn New Techniques Regularly
Expand your skill set continuously. Study new arrangement techniques, instrument placement strategies, effect applications, and mixing approaches. Online resources provide extensive information on production topics.
Explore music styles outside your primary focus. Learning different genres expands your creative perspective and introduces new techniques. Random experimentation with unfamiliar styles often leads to unexpected creative breakthroughs.
Learn new instruments, effects, or synthesis techniques. New tools may provide unique sounds that distinguish your productions from others.
Your technical abilities and creative options expand over time. The production process becomes faster and more professional with accumulated knowledge.
Work Within Limitations
Unlimited options can overwhelm decision-making and slow progress. Many producers spend excessive time learning numerous tools instead of developing core skills.
Intentional limitations force creative problem-solving and skill development in specific areas.
Example limitations:
- Use only one drum sample pack for an entire project
- Limit tracks to a maximum number (8 or 12 tracks)
- Create beats using only three instruments or synthesizers
- Restrict yourself to stock DAW plugins without external effects
These constraints require deeper exploration of available tools. For example, if your kick drum sounds too resonant but you cannot select a different sample, you must learn compression and EQ techniques to shape the sound correctly.
Time spent solving problems with limited tools develops skills that accelerate future production. You learn techniques that would otherwise be avoided through simple sample selection.
Limitations push you beyond comfortable patterns. Skill development occurs at the edge of your current abilities.
Study Music Theory
Music theory knowledge prevents creative obstacles and technical problems. Understanding rhythm construction, chord progressions, and scale relationships improves your ability to create cohesive arrangements.
Learn how different sounds combine harmonically. Study melody writing techniques and rhythm pattern construction. Music theory provides a framework for intentional creative decisions rather than random experimentation.
Create Production Templates
Prepare reusable project templates with pre-configured routing, commonly used plugins, and organized track layouts. Templates eliminate repetitive setup tasks and allow immediate focus on creative work.
A well-designed template includes:
- Pre-labeled tracks for drums, bass, melody, and effects
- Frequently used instruments loaded and ready
- Common effect chains already configured
- Routing and bus configuration for mixing
Templates significantly accelerate workflow and reduce time spent on technical preparation.
Key Takeaways
- Beatmaking requires only a computer, DAW software, and basic sound samples to begin
- Browser-based DAWs like Amped Studio eliminate installation and storage requirements
- Standard beats consist of drums, percussion, bass, melody, and atmospheric effects
- Start with simple patterns and layer elements progressively
- MIDI controllers are optional but improve workflow efficiency
- Mixing balances volume levels, resolves frequency conflicts, and positions sounds in stereo space
- Consistent daily practice develops skills faster than intermittent intensive sessions
- Intentional limitations force creative problem-solving and deeper tool understanding
- Completing beats is more valuable than perfecting unfinished sketches when learning
FAQ
Creating basic beat patterns with drums and bass is accessible for beginners. Simple arrangements can be completed in minutes using pre-made drum loops and basic melodies. However, producing complex professional arrangements requires skill development, experience, and time investment. Expect gradual improvement over months and years of consistent practice.
Beat producers earn income through multiple channels: selling beats on specialized marketplaces where artists purchase instrumentals for their songs, working directly with specific artists on custom commissions, licensing beats for commercial use in advertising or film, and offering production services including mixing and mastering. Building a sustainable income requires portfolio development, marketing effort, and networking within the music industry.
Basic drum programming can be learned in several hours of practice. Reaching professional production skill typically requires years of consistent work. The 10,000-hour principle suggests that expertise develops after approximately 10,000 hours of deliberate practice. However, you can create enjoyable beats and share music long before reaching expert status. Focus on gradual improvement rather than arbitrary time goals.
Popular DAW options include Ableton Live, FL Studio, Logic Pro, and Cubase for traditional installed software. Browser-based options include Amped Studio, which provides VST3 plugin support unique among web-based DAWs. The best software depends on your workflow preferences, budget, and platform (Mac or PC). Many producers recommend starting with free or low-cost options to learn fundamentals before investing in expensive software.
MIDI keyboards are helpful but not required. Many successful producers create entire beats using only a computer mouse and keyboard. However, MIDI controllers improve workflow speed and provide more natural musical input. Drum pad controllers are particularly useful for beat creation as they allow rhythm programming through physical performance. Consider adding a MIDI controller after learning basic DAW operation.
Yes. Most beat producers work exclusively with laptops, headphones, and DAW software. Laptops provide sufficient processing power for beat creation without additional hardware. For better mixing accuracy, studio monitors are recommended, but headphones work effectively during initial learning stages. Portable setups allow beat creation anywhere with power and internet access.