Online Drum Programming: How to Program Drums in a DAW for Beginners

Programming drums means placing individual hits on a grid to create a drum beat. Unlike recording live drummers, this method gives complete control over timing and sound. Online drum programming in browser-based DAWs eliminates software installation – just open a tab and start creating beats.
This guide covers:
- Essential free drum programming software and step sequencer basics
- Core concepts (quantization, swing, velocity) for realistic grooves
- Programming drums across such genres as house, trap, and hip-hop with pattern examples
- Humanization techniques to fix robotic-sounding beats
Why Program Drums in an Online DAW?
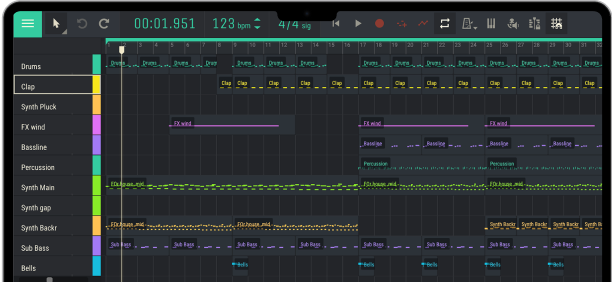
Browser-based platforms eliminate software downloads, license management, and audio driver configuration. Online DAW drum programming works on any device instantly – no installations, no compatibility issues.
This approach excels for quick sketching, remote collaboration, and learning core concepts without technical distractions. For drum programming, you need a step sequencer and quality samples – Amped Studio has the sequencer built-in, with drum samples available in the default Sound Library.
Essential Tools for Programming Drums
The Step Sequencer
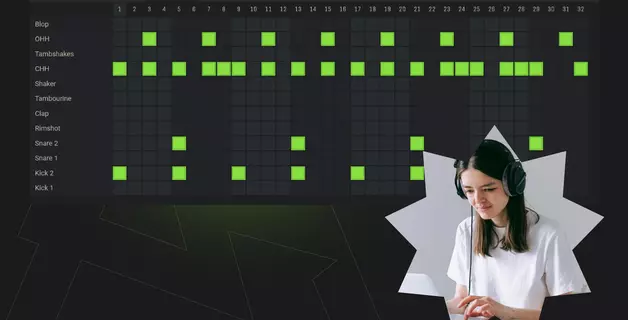
A step sequencer divides time into equal divisions (steps). Each step represents a rhythmic position where you can place drum hits. Most sequencers use 16 steps per bar, matching 16th notes in 4/4 time.
How it works:
Select a drum sound (kick, snare, hi-hat)
Click steps on the grid to activate hits
Adjust velocity (hit intensity) for each note
Loop the pattern and refine
Step sequencers excel at electronic genres because they make rhythmic relationships visible. You see exactly where kicks align with snares and how off-beat hi-hats create groove.
Free Drum Programming Software
Browser-based options:
Amped Studio - Full-featured online DAW with cloud storage and collaboration
Soundtrap - Social music platform where you share tracks and connect with other producers
Audiotool - Modular interface for producers who love vintage hardware routing
Desktop alternatives (free):
Reaper - 60-day trial, minimal restrictions
Tracktion T7 - Unlimited free version
GarageBand (Mac only) - Built-in drum designer
Choose based on your primary need. Online platforms prioritize accessibility and collaboration. Desktop DAWs offer deeper customization, plugins use and offline work.
For beginners, browser-based tools remove technical barriers. You can experiment with drum patterns immediately, then consider migrate to more sophisticated and feature-rich desktop software once you understand core concepts.
Core Drum Programming Concepts
Quantization: The Timing Grid
Quantization snaps MIDI notes to exact rhythmic divisions. When you program drums, quantizing to 16th notes locks every hit perfectly on-grid. This creates the mechanical precision essential for dance music genres.
Put simply, quantization is what differentiates a steady drummer from a sloppy drummer.
The quantization parameter determines grid resolution:
1/4 notes - Basic four-on-the-floor kicks
1/8 notes - Standard hi-hat patterns
1/16 notes - Detailed trap hi-hats and rolls
1/32 notes - Extremely fast double-time patterns
Quantization in practical application: If you place a kick slightly early, quantizing moves it to the nearest grid position. This "corrects" human imperfections – useful for tight electronic grooves, problematic for organic feel.
Most DAWs offer percentage-based quantization (50%, 75%). This retains some human looseness while still tightening timing. Experiment with different strengths depending on genre.
Swing: Controlled Imperfection
Swing delays every other hi-hat or percussion hit slightly. You hear the rhythmic bounce that swing (or shuffle) creates prominently in blues, jazz, and in house beats – it transforms “straight” mechanical 16th notes into “swung” patterns that groove.
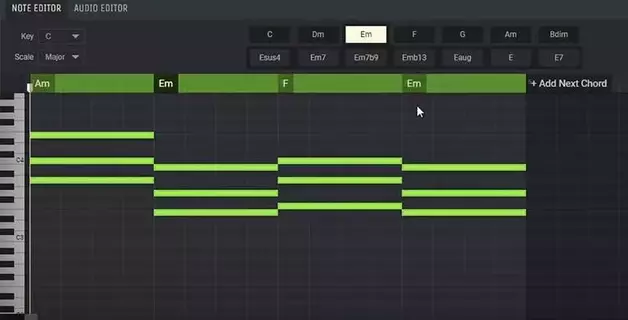
How to apply swing in Amped Studio:
Select your drum MIDI clip
Open the Note Editor (double-click the clip)
Click the Grid dropdown menu
Scroll down to find swing options (1/8 20% sw, 1/8 40% sw, etc.)
Choose a swing percentage – start with 20-30% for subtle groove
The even-numbered hits (beats 2, 4, 6, 8...) shift later automatically. Result: the pattern "bounces" instead of marching mechanically.
House and hip-hop rely heavily on swing, while such genres as trap, techno or EDM typically stick to "straight" 16th note grids emphasizing mechanical precision instead.
Velocity: Dynamic Expression
Every MIDI note has velocity (hit intensity). Higher velocity = louder, more aggressive sound. Lower velocity = softer, more subtle.
Beginner drum patterns often sound lifeless because every hit uses the same velocity. Real drummers vary intensity constantly – accenting beats, ghost-noting snares, adjusting dynamics phrase-by-phrase.
How to adjust velocity in Amped Studio:
Open the Note Editor (double-click your drum clip)
Enable the Velocity Panel (toggle button on the left)
Each MIDI note displays as a vertical bar
Click and drag bars up (higher velocity) or down (lower velocity)
Taller bars = stronger hits, shorter bars = quieter hits
Tip: If you are working in a genre where feel is more important than mechanical steadiness (such as techno), don't make every velocity bar the same height. Vary adjacent hi-hat hits by dragging some bars slightly higher or lower. This subtle variation adds the "breathing" quality that makes programmed drums feel human.
Focus velocity work on hi-hats first – these benefit most from dynamic range. Keep kicks relatively consistent for solid foundation.

Drum Pattern Examples by Genre
House: Four-on-the-Floor Foundation
Classic house drum pattern:
Kick on every quarter note (1, 2, 3, 4)
Snare/clap on beats 2 and 4
Hi-hats on 8th or 16th notes with subtle swing
Open hats between kicks (on the "and" in "1-and-2-and-3-and-4-and").
This pattern dominates house, techno, and most dance music. The relentless kick drives energy, while syncopated hats add movement.
Programming tip: Keep kicks at consistent velocity (tall bars, around 85-95% height). Vary hi-hat velocity to create the "breathing" effect characteristic of house grooves. Apply 12-15% swing for soulful house, 5-8% for tech house.

Trap: Hi-Hat Complexity
Modern trap drum programming:
Kick on beat 1, with occasional syncopated hits
Snare on beat 3 (often layered with clap)
Complex hi-hat rolls using 16th and 32nd notes
Trap distinguishes itself through intricate hi-hat patterns. Program rapid rolls leading into downbeats, mixing closed and open hats for texture variation.
How to program drum beats in trap style:
- Start with simple kick/snare foundation
- Add steady 16th-note closed hats
- Insert rolls (triplets or 32nd notes) before major transitions
- Use velocity automation to fade rolls in/out
The challenge: Balancing complexity with clarity. Overactive hi-hats may overcrowd the mix. Strategic placement – two 32nd-note rolls per 8 bars – creates impact without chaos.

Hip-Hop: Boom-Bap Groove
Classic hip-hop drum pattern:
Kick on beats 1 and 3 (sometimes displaced by 16th note)
Snare on beats 2 and 4 with ghost notes between
Hi-hats on 8th or 16th notes, often hand-played feeling
Hip-hop drums prioritize groove over precision. Slightly off-grid kick placement (5-10ms early or late) creates the "pocket" that makes heads nod.
Programming drums for hip-hop:
- Quantize kick and snare to 8th notes (not 16ths)
- Manually shift kick 1-2 grid increments left or right
- Add low-velocity snare ghost notes (short bars in Velocity Panel, around 30-40% height)
- Keep hats mostly quantized but vary velocity (medium to tall bars, 60-85% height range)
The key: Combine rigid and loose elements. Quantized hats provide stability while displaced kicks/snares create tension.

Humanization: Making Programmed Drums Feel Alive
Quantized drums often sound robotic, which is fine for genres such as techno, trap or EDM. But for most of other genres, even a bit of humanization makes the drum beats more alive and genre-appropriate. Even with velocity variation and swing, perfectly-timed hits lack organic quality. Professional producers humanize patterns through strategic imperfection.
Timing Variation
How to program drums with realistic timing:
Keep downbeat kicks/snares quantized (beats 1, 3)
Move off-beat elements 5-15ms early or late
Hi-hats benefit most from timing randomness
Never shift timing more than 20ms – beyond that sounds sloppy
Most DAWs offer "humanize" functions that randomly adjust timing. Use conservatively (5-10% humanization). Excessive randomization destroys groove rather than enhancing it.
Velocity Randomization
Beginner drum patterns often use the same velocity for each drum type. Real drummers never hit identically twice.
In Amped Studio's Velocity Panel, vary the bar heights for secondary elements:
Hi-hats: Make some bars taller, some shorter (±15-20% variation)
Percussion: More dramatic height variation (±20-25%)
Kicks: Keep relatively consistent (±5-10% variation for subtle variation)
Snares: Moderate variation (±10-15%)
Keep primary elements (kick, snare on 2 and 4) relatively consistent in height. Random variation should enhance the groove, not obscure the core rhythm.
Sample Variation
More advanced users, especially when looking to re-create live drum kit sounds in a DAW will use 2-3 slightly different samples of each drum hit, alternating between them. This mimics how acoustic drums never produce identical tones.
Bonus tip: Another additional advanced drum programming technique that allows for exact precision and control of the kick drum, which is the central element in a lot of electronic dance music, is layering kick drum samples.
- Main kick (loud, punchy)
- Sub kick (low-end weight) at -6dB
- Top kick (attack transient) at -12dB
Layering adds depth without requiring advanced mixing. Keep secondary layers quiet – they reinforce rather than compete with the primary sound.
Getting Started: Your First Pattern
Programming drums doesn't require expensive software or deep theory knowledge. Follow this workflow:
Choose an online DAW - Amped Studio provides instant access with no downloads
Load a drum kit - Start with house or hip-hop kit (fewer elements than rock)
Set tempo - 120 BPM for house, 140 for trap, 90 for hip-hop
Program kick first - Establish the foundation before adding other elements
Add snare - Typically on beats 2 and 4 across genres
Layer hi-hats - 8th or 16th notes depending on energy level
Adjust velocity - Open Velocity Panel, vary bar heights between hits
Apply subtle swing - Use Grid menu: 1/8 20% sw for house/hip-hop, straight grid for trap
Export and iterate - Listen on different devices, refine what doesn't work
Don't overcomplicate. The best drum patterns for electronic music often use 3-4 elements maximum. Kick, snare, hi-hat, one percussion accent. Simplicity leaves room for other mix elements.
Conclusion
Online drum programming democratizes music production. You don't need expensive software or hardware to create professional beats. Browser-based DAWs provide immediate access to the tools required: step sequencers, quality samples, and MIDI editing.
The concepts covered here – quantization, swing, velocity variation – apply universally. Whether you work in Amped Studio, Ableton, or FL Studio, these principles remain constant. Master them once, apply them everywhere.
Try Amped Studio to begin programming drums immediately – no downloads, no configuration required. Create, collaborate, and refine your rhythms entirely in your browser.
The difference between amateur and professional drum programming isn't complexity. It's attention to subtle details: velocity curves that breathe, timing offsets that groove, and sample selection that complements rather than competes. These skills develop through practice, not theory.
Open your DAW. Place four kicks on the grid. You've started programming drums.
FAQ
Browser-based tools like Amped Studio remove technical barriers. You don't install anything – just open the site and start creating. Desktop options like Reaper offer more features but require configuration. Choose based on whether you prioritize immediate access (online) or advanced capabilities (desktop).
Vary velocity by adjusting bar heights in the Velocity Panel – make some hits taller, some shorter. Apply subtle timing offsets (5-15ms) to off-beat elements. Use 2-3 different kick samples alternating throughout your pattern. Add swing using Grid menu (1/8 20% sw or 1/8 40% sw). Humanization combines multiple small imperfections rather than one dramatic change.
Step sequencers display a grid where each column represents a rhythmic step. Click to activate drum hits. Piano rolls show pitch vertically and time horizontally – better for melodic parts. For drums, step sequencers provide clearer visualization of polyrhythmic relationships. Many producers use both: step sequencer for initial programming, piano roll for velocity editing.
No. Step sequencers let you click notes into a grid using your mouse. MIDI controllers speed up workflow but aren't required. Many professional producers program entirely with mouse and keyboard shortcuts.
House: Four-on-the-floor kick, moderate swing, steady 16th hi-hats. Trap: Syncopated kicks, complex hi-hat rolls, minimal swing. Hip-hop: Displaced kicks, ghost snares, moderate swing. Start with genre templates, then modify velocity and timing to match your vision.
Quantization snaps MIDI notes to exact grid positions. This corrects timing imperfections, creating the locked-in precision essential for dance music. Use 100% quantization for techno/house, 50-75% for hip-hop/R&B. Over-quantization sounds robotic; under-quantization sounds sloppy.
Start with 3-4: kick, snare, hi-hat, one percussion element. Electronic genres thrive on simplicity. Add elements only when they serve the groove. Overcrowded drum sections compete for attention and muddy the mix.