How to Make Music for Beginners: From First Sound to Finished Track

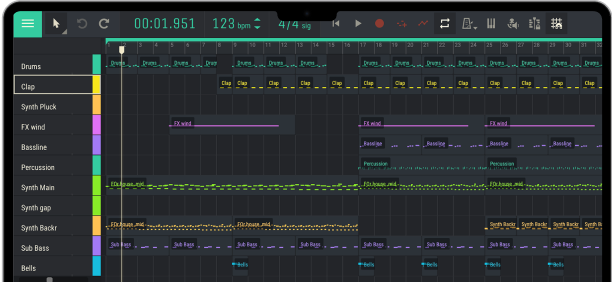
If you're wondering how to make music, the starting point is simpler than most guides suggest: a computer, headphones, and a DAW (digital audio workstation — the software you use to build tracks). You don't need hardware instruments yet, and an audio interface, or studio monitors are optional. A DAW gives you everything required to arrange sounds, play them back, and produce a complete piece of music using only software.
The real challenge isn't equipment — it's knowing where to start. Many beginner guides try to cover music theory, gear recommendations, mixing, mastering, and distribution all at once, which is too much for someone who hasn't produced a single bar of music yet. The result is weeks of research and zero hours of creating.
This article takes a different approach. Instead of trying to cover every stage of music production at once without covering any step properly, we'll focus on what to learn first, what to ignore, and the real milestones that separate total beginners from people who can create music with confidence:
- What you need to start and what you don't
- How to pick music making software without overthinking it
- Your first sessions: building a single musical element, then making two elements work together
- What to skip entirely as a beginner — and when those things start to matter
- How to improve once you've completed your first piece
If you already know the basics and just want to start producing, open Amped Studio in your browser — no downloads, no account required. If you're a complete beginner, keep reading — this guide will walk you through every step.
Key Takeaways
- You need a computer, headphones, and a DAW. Everything else can wait.
- The first real milestone is not finishing a full track — it's making two musical elements work together (a bassline over chords, a melody over a beat, a percussion layer over a drum pattern).
- Don't try to learn theory, mixing, and mastering before you've produced anything. Learn them gradually, as specific questions come up in your work.
- Browser-based DAWs like Amped Studio remove the need for installation and setup — you can start producing in the time it takes to open a browser tab.
- Finishing rough, imperfect tracks teaches more than any amount of tutorial-watching.
What Do You Need to Make Music? Less Than You Think
Every "how to start making music" guide opens with a shopping list: audio interface, studio monitors, MIDI keyboard, microphone, cables, acoustic treatment. This is bad advice for someone who hasn't made their first beat yet. You don't know what kind of music you want to produce, so you don't know what equipment you'll actually use.
The real minimum:
A computer — desktop or laptop, Mac or PC. If it runs a modern browser smoothly, it's powerful enough.
Headphones — whatever you already own. Earbuds work for now. Studio headphones become important when you're mixing seriously, and that stage is months away.
A DAW — the software where you build, arrange, and shape tracks. Some are free. Some run in your browser with no installation at all. Every modern DAW gives you enough instruments, effects, and tools to produce a complete piece of music.
That's it. Three items.

What you can buy later, when you actually need it:
A MIDI keyboard is useful for playing melodies in real time, but every DAW has a piano roll where you draw notes with a mouse. You don't need a keyboard to compose. An audio interface is necessary for recording vocals or live instruments — but if you're working with software instruments and samples, there is nothing to record externally. Studio monitors improve the accuracy of what you hear, but they require acoustic treatment to work properly, and neither matters while you're focused on composition and arrangement.
How to Choose Music Making Software
Picking a DAW is the first decision that genuinely matters, and it's also where many beginners get stuck. There are dozens of options, each with users who will argue theirs is the best. The reality is that they all do the same fundamental things — record, sequence, arrange, mix — and the skills you build in one transfer to any other.
Here's a quick decision framework:
If you want the fastest start, use a browser-based DAW. You can make music online without downloading or installing anything. Amped Studio runs entirely in your browser with built-in instruments, drum machines, effects, and a sound library. There is nothing to configure, and projects are saved to the cloud automatically. Open a tab and start producing.
If you're on a Mac, GarageBand is already installed and is surprisingly capable for a free program.
If you want a full desktop DAW, FL Studio, Ableton Live, and Logic Pro are the three most popular choices. Each offers free trials or demo versions. All three have large tutorial libraries on YouTube. Any of them will serve you for years.

The worst thing you can do at this stage is spend weeks comparing DAWs instead of producing anything. The differences between programs matter far less than the act of choosing one and learning it. You can always switch later — and when you do, you'll understand your own needs much better.
Step by Step: Your First Music Making Sessions
This is where our guide differs from most others. We are not going to compress the entire process of composing, arranging, mixing, and mastering into a few paragraphs. That kind of overview looks useful in theory but becomes impossible to follow the moment you open your DAW.
Instead, here are the real milestones of learning how to create music — the stages where your understanding grows and your skills develop noticeably.
Stage 1: Build One Element That Works on Its Own
Before you can make a track, you need to produce a single musical element that sounds intentional — not random. This is simpler than it seems, and there are two common starting points.
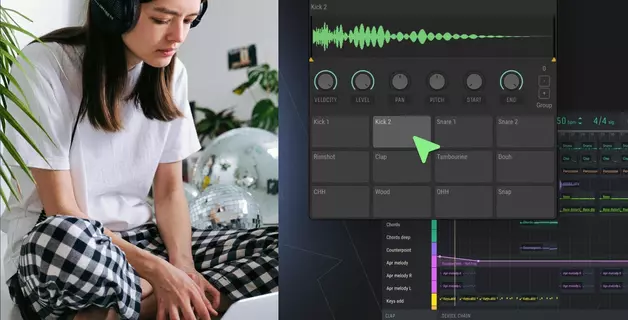
Starting point A: A drum pattern.
Open your DAW's drum sequencer or drum machine. You're working on a grid — typically four beats per bar. Focus on three sounds: a kick on beats 1 and 3, a snare or clap on beats 2 and 4, and hi-hats running in eighth notes (two per beat). This combination is the rhythmic backbone of most pop, hip-hop, and electronic music. Four bars of that pattern, looped, gives you a foundation to build on.
What separates a decent pattern from a stiff one: velocity variation. In real drumming, not every hit lands with equal force. Try making your hi-hats slightly louder on downbeats and quieter on offbeats. Lower the second kick's velocity so it sounds like a ghost note rather than an equal accent. These small differences add a human quality that makes the pattern feel alive rather than mechanical.
For a deeper look at beat creation techniques, rhythm programming, and sound selection, see our step-by-step guide to making beats online.
Starting point B: A musical hook.
A hook is whatever makes someone want to keep listening — and in modern production, it does not have to be a traditional chord progression. It could be a synth melody, a chopped vocal sample, a bass riff, or a rhythmic pattern played on a single note. The goal is to create something short (2–4 bars) that sounds intentional and makes you want to hear it again.
A few approaches that work without theory knowledge:
- Use a built-in chord builder. Amped Studio's Chord Creator lets you build a harmonious chord progression by auditioning different options in a visual interface — no music theory required. Everything stays in key automatically, so you can experiment freely until the progression sounds right.
- Build a melodic riff. Draw a short, repeating pattern in your piano roll — a two-bar loop is enough. Rhythm is your friend: start with notes evenly spaced on the grid, then insert shorter notes between those intervals for variation. Favor neighboring notes over big interval jumps — one or two wider leaps per phrase add drama, more than that sounds chaotic.
- Start from a sample. Amped Studio includes a Sound Library you can browse by genre, mood, or instrument. Find a loop that grabs your attention, drop it into your project, and build around it. This is how a large amount of electronic and hip-hop music begins — producers find a sound that inspires an idea and build the track outward from there.

Any of these approaches gives you the same result: one musical element that sounds right on its own and makes you want to add something on top of it. That's your building block, and creating it is the first real step toward learning how to create music.
Stage 2: How to Layer Sounds Over Your First Beat
This is the milestone most beginner guides skip entirely, and it is arguably the most important one. This is where making music for beginners stops feeling like random experimentation and starts feeling like intentional composition.
The concept is straightforward: take the element you built in Stage 1 and create a second element that complements it. The goal is not complexity — it's musical relationship. When two elements work together and the result sounds bigger and more complete than either part alone, you've reached a real milestone. That moment — "these two parts belong together" — is the core experience of music production.
If you started with a harmonic or melodic hook, add a bassline under it.
The bass is what gives your hook weight. The universal starting point: find the lowest note in your chord or riff, place it in the bass register (octaves 1–2 on the piano roll), and time it to land with the kick drum. When bass and kick hit at the same time, the low end becomes solid and anchored — that's the foundation of nearly every genre. Start with just that: root notes, synchronized with the kick.
Once the root notes feel solid, try adding rhythmic variation. Instead of holding each bass note for the full bar, try shorter notes with gaps — this creates bounce. Or add a passing note between chord roots: going from one root to the next, insert a neighboring note along the way. These small details turn a static bassline into something that moves the track forward. Once it feels right, you can also add variation using the same approach from Stage 1 — insert notes between your evenly spaced hits, staying within the same key you identified earlier.
If you started with a beat, layer a complementary rhythmic element.
Take your drum pattern and add a percussion loop or audio sample from your DAW's sound library. The key word is complementary — choose something that fills the gaps in your existing pattern rather than doubling what's already there. If your main beat has a strong kick and snare, a shaker or conga loop with syncopated rhythms between those hits adds groove without clutter.
Drag an audio loop onto a new track. Listen to how it interacts with your MIDI drums. Try three or four different loops. When you find the one where the combined groove sounds more compelling than either part alone — that's the moment. That's producing.
If you're ready for a third element, try a melody.
A melody is a sequence of single notes — the part someone hums after hearing your track. Use the same approach from Stage 1: keep all your notes within the key you've already identified for your chords or hook. If you haven't determined your key yet, now is the time — ask a chatbot or scale finder which key your existing notes belong to, then draw your melody using only those notes.
Three practical guidelines: favor small movements (neighboring notes rather than wide jumps, with one or two wider leaps for drama), repeat then vary (write a 2-bar phrase, copy it, change one or two notes in the copy), and leave gaps (silence between phrases gives the melody room to breathe). You can study how to compose music in more depth later — for now, "it sounds good over these chords" is a perfectly valid creative standard.
Stage 3: Turn Your Loop Into a Short Arrangement
You now have a loop — maybe 4 or 8 bars with two or three elements that work together. This is where most beginners get stuck. They keep refining the loop instead of extending it into something with a beginning, middle, and end.
The simplest arrangement method: don't write new material — subtract and add layers from what you already have.
Your loop with everything playing is your most energetic section — the chorus or drop. To create a verse, remove elements: mute the melody, reduce the drums, simplify the bass. For the intro, strip it down further — just chords and a hi-hat, or just the beat alone. The outro reverses the intro — gradually remove elements until silence.
A practical structure for your first arrangement:
- Intro (4 bars) — one or two elements, establishing the mood
- Verse (8 bars) — reduced arrangement, building anticipation
- Chorus (8 bars) — full arrangement, all elements playing
- Verse (8 bars) — back to reduced
- Chorus (8 bars) — full arrangement again
- Outro (4 bars) — gradual wind-down
That's 40 bars. At 120 BPM, that's roughly 80 seconds — a short track, but a finished one. A finished piece is more valuable than an unfinished masterpiece when you're starting out. You can create longer, more complex music once you've proven to yourself that you can complete something.
One detail worth your attention even on your first arrangement: transitions. A one-beat silence before the chorus, a drum fill in the last bar of a verse, or a rising noise sweep that builds energy over two bars — these small signals tell the listener that something is about to change. They're the difference between sections that flow naturally and sections that change abruptly without preparation.
What to Skip as a Beginner (and When It Matters)
This section is opinionated by design. The topics below are all important eventually, but they actively slow you down if you focus on them before you've produced your first few tracks.
Formal music theory makes you faster and more versatile, but it does not make you more creative. Some of the most influential electronic and hip-hop producers have minimal formal training. Learn theory gradually, driven by questions from your own work — "why does this note sound wrong here?" is a far better entry point than memorizing all twelve major scales before writing anything. If you want a faster path, let AI help you learn. Amped Studio's AI Assistant can generate chord progressions and melodic ideas that you can study, modify, and learn from — immediately applicable to your own tracks.
Mixing and mastering are deep disciplines that professional engineers spend years developing. For your first tracks, keep mixing simple: adjust the volume faders until you can hear every element clearly. EQ, compression, stereo imaging, and limiting solve problems of polish, not problems of creation. You need to create before you have anything to polish. Mastering — the final step of preparing a mix for distribution — is even further down the road, and irrelevant until you're consistently producing tracks you're happy with.
Expensive plugins and sound libraries are unnecessary at this stage. The synths, drum kits, and effects included in any modern DAW — including free and browser-based options — can produce professional-sounding results. Buying third-party plugins before you've fully explored your stock tools is solving a problem you don't have yet.
Acoustic treatment (studio foam, bass traps, diffusion panels) improves the accuracy of what you hear in your room. It matters when you're mixing on studio monitors and making decisions about frequency balance. It is irrelevant while you're learning on headphones and focused on writing music. Learning how to make music at home does not require a treated room — it requires creative focus and the willingness to start.
Perfection is the most important thing to postpone. Your first ten tracks will not sound professional. They're not supposed to. Every track you finish teaches something that no tutorial or article can replace. The difference between someone who improves and someone who doesn't is almost never talent — it's the number of completed projects.
How to Get Better Once You've Started
After you've finished your first piece — even a rough, short one — the question becomes: how do I improve?
Finish More Tracks
This is the most important habit you can build. Set a constraint: one beat per day, or one short track per week. Prioritize completion over quality. Quality develops through repetition. Learning how to make your own music that sounds good is a skill built through dozens of finished attempts, not one perfect project.
Listen With Purpose
Pick a song you admire. Play it through headphones and ask specific questions: How many layers can I count? Which elements are added or removed between the verse and chorus? How does the bass relate to the kick? What happens in the last bar before a section change?
A practical extension: import a reference track into your DAW while working on a new project. Place it on a separate audio track, lower its volume, and compare it with what you're building. This is not copying — it's training your ears against a known reference so you develop taste alongside skill.
Assign Each Project a Focus
Don't try to improve everything at once. For one track, concentrate on making the drums feel human. For the next, experiment with automation to create movement. After that, practice making the bass and kick work together rhythmically. Focused practice produces faster results than trying to improve everything at the same time. Once you feel comfortable with the fundamentals, try applying them to a specific genre — our guide to making house music, for example, covers genre-specific drum patterns, basslines, and arrangement techniques.
Collaborate Early
Working with someone else — even another beginner — exposes you to different workflows, different creative instincts, and different approaches to solving problems. Cloud-based DAWs make this particularly easy. In Amped Studio, you can share a project link and collaborate without anyone installing software. Even exchanging rough demos and providing each other with honest feedback accelerates learning for both sides.
Conclusion
How to make your own music comes down to a clear sequence of priorities: choose a DAW, learn to build a single musical element that works, then learn to make two elements work together. That second step — where a bassline connects with a chord progression, where a percussion layer transforms a basic beat into a groove — is where music production stops being abstract and starts making sense.
You don't need instruments, expensive gear, or years of theory study to begin. You need a computer, headphones, and the willingness to start before you feel fully ready. Tools like Amped Studio let you make music online directly in your browser — no downloads, no setup, just a blank project and your ideas.
The hard part was never the tools or the knowledge. It's the discipline to start, the patience to finish, and the willingness to listen critically to your own work and then do it again. Every track you complete — even a rough, short, imperfect one — teaches you something that brings the next one closer to the sound in your head. That is what learning how to make music is really about. Start today.
Frequently Asked Questions
A computer, a DAW, and headphones — that's the minimum. Browser-based DAWs like Amped Studio remove the installation step entirely: open your browser, create a project, and start producing. MIDI keyboards, audio interfaces, and studio monitors all solve specific workflow problems, but none of them are prerequisites. Buy gear when a real limitation appears, not before.
Every DAW includes virtual instruments — synthesizers, drum machines, samplers — that you control with a mouse in a piano roll grid. You draw notes on a timeline, and the software plays them back. No physical instrument is required. This is the standard production method for electronic, hip-hop, and pop music. If you're wondering how to make music without instruments, the answer is: the same way most modern producers work — entirely inside software.
Open a free DAW with a drum sequencer. Place a kick on beats 1 and 3, a snare on beats 2 and 4, and hi-hats on every eighth note — that's a usable beat in under a minute. Vary velocity values on individual hits to add human feel. Most free DAWs (including browser-based options like Amped Studio) include drum sound libraries with dozens of kits to experiment with.
Not as a prerequisite — you can produce a complete piece with a borrowed chord progression and a melody that stays within one scale. Theory becomes genuinely valuable when you want to understand why certain combinations sound good, when you need to solve harmonic problems faster, or when you want to write outside familiar patterns. Learn it gradually, guided by questions from your own production work.
With a computer, headphones, and a DAW — the same way you would produce anywhere. There is no meaningful difference between producing at home and producing in a professional studio at the beginner stage. Room acoustics don't matter until you're mixing on monitors. External gear doesn't matter significantly until you're recording acoustic sources. You can start with what you have, where you are.