Audio Editor Online: Essential Editing Tools in Amped Studio

Audio editing has come a long way. What once demanded bulky professional gear, razor-sharp precision, and hours of effort can now be done instantly with an online audio editor.
Back in the analog tape era, even simple tasks like copying a section of music meant making multiple copies and splicing reels with a razor blade and tape — no undo, no margin for error. A small mistake meant starting over. Studios were part lab, part operating room.
Today? It’s highlight, copy, paste. Done. You flub a line or want to repeat your catchy chorus one more time? No problem. With a free online audio editor like Amped Studio, that once-tedious magic is now at your fingertips — right in your browser. Let’s walk through how to make the most of it — fast, free, and with no installs or learning curve.
Why Creators Use an Online Audio Editor
Why do people actually need editing tools? Because recordings in the real world are messy, and nobody delivers a flawless take every time. Here are a few common scenarios creators face regularly:
- Voice cleanup: So, you start up an online voice recorder to do a narration for a video and end up with a bunch of “umm”s, pauses, and coughs in your recording? Next step is to slice away the rough spots, and smooth the flow. Podcasters, narrators, educator, and anyone working with speech recordings will find Amped Studio a simple and powerful online voice editor to polish your audio.
- Quick demos: A musician catches a spark of inspiration, grabs a guitar, opens an online sound editor, drops in a drum loop for rhythm, and lays down the idea before it fades. They do a couple of vocal takes, cut out the missed notes, and keep the best parts — without booking studio time.
Whether you’re working with music or speech, editing always comes down to a few core actions: cut what doesn’t belong, rearrange what does, and polish the rest.
And for creators who want to do all of that instantly without downloading bulky software Amped Studio offers one of the best online audio editor workflows available today. Whether you’re cleaning up dialogue or working out song ideas or simply looking for a website to edit music for free Amped Studio delivers — without the steep learning curve or the hefty price tag.
Get to Know Amped Studio’s Workspace
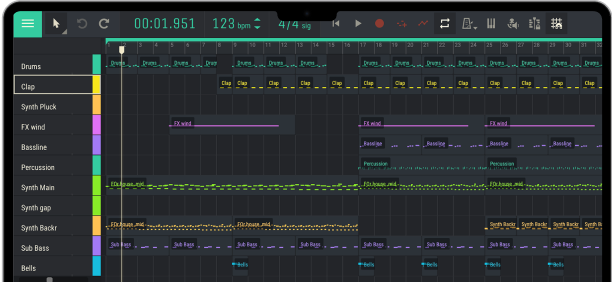
Amped Studio opens up with a clean, browser-based layout that feels immediately familiar — especially if you’ve spent any amount of time in DAWs before. As a free audio editor, it packs a surprising amount of functionality into a streamlined interface. Whether you’re working on a song demo or tweaking a voice recording, this online audio editing tool gives you the workspace you need to move fast and edit with precision. Let’s take a closer look at the layout and get quickly oriented.
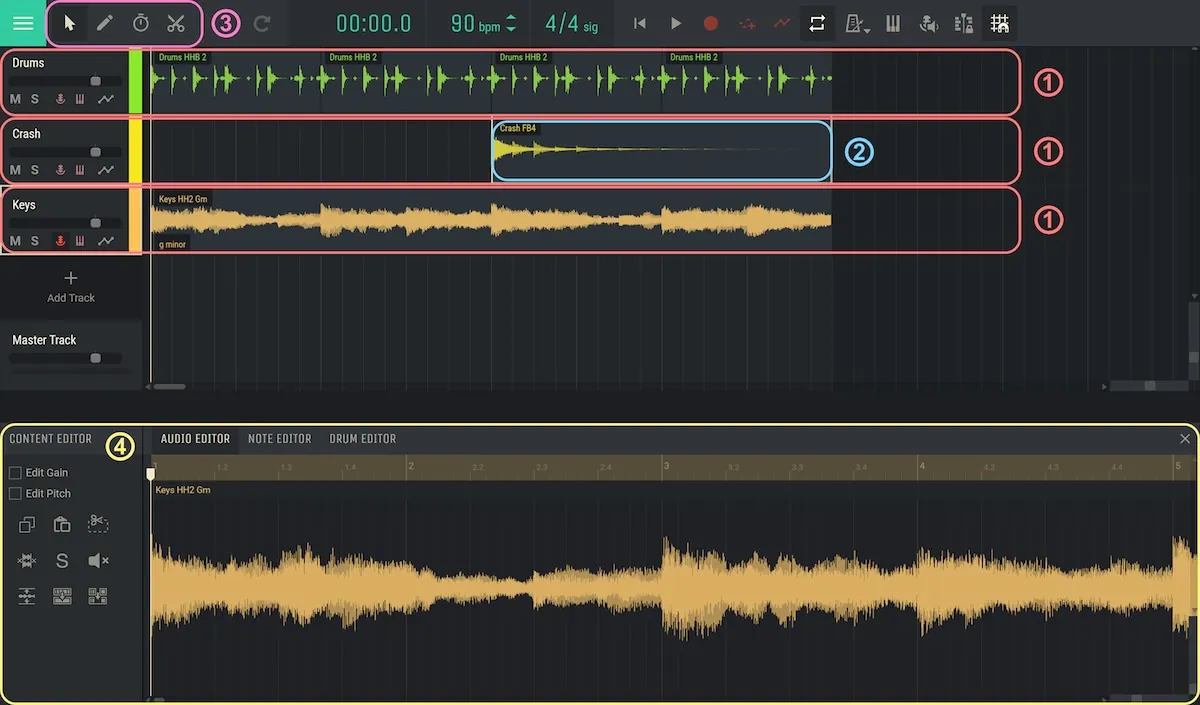
- Tracks – These are the horizontal rows in the arrangement where you place sounds. One track might hold your lead vocal, another your guitar riff, another a drum loop.
- Regions – Any recording, loop, or one-shot sample you add to a track shows up as a region. Regions are the blocks you move, copy, cut, and transform to build your project.
- Toolbar – A row of tools across the top of the workspace. Each icon unlocks a different editing move: select, draw, stretch, split. These tools are the foundation of shaping sound in Amped Studio.
- Content Editor – Double-click on a region and you zoom in to its waveform. Here you can do more detailed work: trimming silence, normalizing levels, or even reversing the audio.
Toolbar Tools for Basic Audio Editing
The toolbar contains the tools you’ll use constantly. Each one serves a different role in editing, and together they cover nearly everything you need for day-to-day work.

Arrow Tool
- Purpose: Use it to select, move, and resize regions. Since every loop, sample, or recording you bring into Amped Studio appears as a region, the Arrow Tool is your main way of working with them.
- Scenario: Adjusting the length of an audio clip, or simply moving around the building blocks of your project — these basic tasks all rely on the Arrow Tool. It’s the foundation of arranging in Amped Studio.
Pen Tool
- Purpose: More frequently used for MIDI editing (covered in detail in our MIDI Editor Online article), the Pen Tool also handles audio automation letting you draw changes in volume, pan, or effects over time.
- Scenario: Say you want reverb on just one vocal phrase, not the entire track. Add an automation lane for the reverb’s Mix parameter, then use the Pen Tool to raise the amount of reverb for the desired duration.
Time Tool
- Purpose: Stretches or compresses the duration of a region, changing how fast or slow it plays back without changing the pitch of the audio.
- Scenario: Sometimes you want the last note of a vocal phrase to linger longer than it was sung, other times you need speech to hurry along, like those rapid-fire disclaimers at the end of radio ads. The Time Tool lets you stretch or compress audio at will, no second take required.
Split Tool
- Purpose: Cuts a region into two parts at the exact point you choose.
- Scenario: What if your best vocal take has a stray cough in the middle? The Split Tool lets you slice around the problem area to remove it cleanly.
These tools are the modern heirs to scissors and splicing tape — except for time-stretching, which analogue studios could only dream of. Plus, with a free music editor online like Amped Studio, every edit is non-destructive — and a whole lot less nerve-racking than cutting tape.
If you’re more of a visual learner, this video shows exactly how these tools work — waveform by waveform, click by click.
Working with Regions in Amped Studio
Regions are the building blocks of your project, whether you only work with audio or also use MIDI and other DAW functions Amped Studio provides. Every vocal take, loop, or one-shot sample appears on the timeline as a region. Once you understand how to handle them, arranging becomes second nature.
- Create and Move Regions – Drag loops from the User Library or record directly into a track, and a new region appears. Use the Arrow Tool to place it where it belongs.
- Copy and Duplicate – Need to repeat a section of your song? Copy and paste the region (Ctrl+C, Ctrl+V) or use Ctrl+D to duplicate instantly.
- Delete – Something does not work in the mix? Highlight it and press Delete.
- Rename and Color-Code – Right-click a region to rename it and assign colors to keep verses, choruses, and instruments organized.
- Looping – Select a region and set it to loop so it plays continuously while you work, letting you refine ideas without restarting playback each time.
These basic operations are the backbone of any song editor online. By moving, looping, and organizing regions, you shape your music quickly and intuitively.
Audio Editing Functions in the Content Editor
Double-click a region to open it in the Content Editor. Here you’ll see three tabs:
- Audio Editor with advanced audio waveform editing options. We will break it down in detail below. If you decide to go beyond basic audio editing and start making your own music in Amped Studio, the Note and Drum Editors will become essential, but we won’t be covering them in this article.
- Note Editor – used for MIDI editing.
-
Drum Editor – used for editing drum patterns.

Amped Studio audio editor window
To work with audio, let’s focus on the Audio Editor tab. This is where you’ll find the advanced audio editing tools that go beyond basic copy, paste, and cut.
-

-

-

-

-

-

- Reverse – Plays the audio backward. A common creative trick at the song arrangement stage is to reverse a cymbal crash or any other sample or synth tone with a long fade-out tail into a swelling riser effect. To access this function, right-click the waveform in the Audio Editor window and click “Reverse Audio Clip”.
- Edit Pitch – Raises or lowers the pitch of a region in semitone steps. Works for both subtle corrections and creative sound design.
Together, these tools make Amped Studio more than just an online mp3 audio editor. They give you the power to clean, transform, and commit your recordings, bridging the gap between rough takes and finished audio. Whether you’re producing music or polishing a podcast, Amped Studio makes a strong case for being the best sound editor software you can use — especially considering it’s entirely browser-based and free to start. With a guide like this at your side, you’ll find editing in Amped Studio not just doable — but refreshingly simple. Now that you’ve got the essentials, you’re ready to jump in and start editing with confidence.