How to eq vocals


A few simple tips will help you give your voice a professional sound. We will explain how to competently process vocals in a simple audio editor, and share the effects that musicians use.
Amped Studio includes a full list of tools and functionality that allows you to screen vocals and comprehensively process them at a professional level, which makes it possible to obtain excellent results in terms of sound quality.
What is vocal processing?
Processing (aka mastering of a vocal part) is needed to prepare for mixing the track, that is, for combining the voice with other tracks, for example with a guitar part or a beat. During the process, performance errors and extraneous sounds are corrected. If necessary, cut out unnecessary fragments and apply effects.
Excellent performance and good recording conditions make the task easier, but do not eliminate mastering. Correct processing emphasizes the timbre of the voice, sets the appropriate mood and highlights the right moments of the song. In addition, some effects can only be created artificially – using software. For example, without an editor you cannot achieve “robotic” singing, and without a tube amplifier plug-in you cannot create the sound of a vinyl record.
Basic vocal processing chain
Vocal processing, also called mastering, is necessary to prepare a track for mixing, combining the voice with other audio tracks, such as a guitar part or beat. During the process, performance errors are corrected and extraneous sounds are removed. If necessary, unnecessary fragments are cut out and effects are added.
While quality performance and good recording conditions make the task easier, they do not eliminate the need for mastering. Competent processing emphasizes the timbre of the voice, creates the right mood and highlights important moments of the song. Moreover, some effects can only be created artificially using software. For example, “robotic” singing cannot be achieved without an editor, and tube amplification or the sound of a vinyl record cannot be achieved without a special plug-in.
Checking all material
Listen to all the recordings and evaluate their relevance to the main idea. Note errors and shortcomings (background noise, congestion, etc.) so you can correct them later. If there are too many defects, make additional takes.
In the future, you can combine different fragments, for example, use a chorus from one file and a verse from another. This way there is no need to re-record the entire part.
Fixing Vocal Sync Issues
The vocal track must be synchronized with the tempo and key of the instrumental parts. If the vocalist sang out of tune, the problem can be solved with the help of auto-tune, while maintaining a natural sound. Correcting the tempo is more difficult. Changing the speed of voice playback (pitch) significantly affects its sound, which is noticeable in the example below. Try splitting the part into separate audio clips and manually moving them along the timeline to keep them in sync with the tempo. If this does not solve the problem, you will have to rewrite the unsuccessful fragments.
Cleaning from sighs, noises and clicks
Each sound affects the perception of the composition, and any unnecessary elements can ruin the track. Too loud sighs, clicks and other noise can be easily removed. If the noise drowns out the voice, for example, a car alarm went off during recording, it will not be possible to completely eliminate such a defect. In this case, it is better to make a new take.
A separate problem is background noise and electrical interference, which manifests itself as a characteristic hiss and hum. This interference is caused by hardware problems such as low-cost components, poor connector contacts, or insufficiently shielded cables. A slight level of noise is always present and is almost unnoticeable when listening. More pronounced interference can be eliminated during mastering. However, too much noise reduction makes the sound flat and eats up volume. Therefore, you will either have to put up with the artifacts or modernize the studio.
Normalizing vocal volume
This means leveling the volume (dynamics) to a certain level, usually 0 dB. This simplifies further mixing: the vocalist will not be too quiet compared to the instruments and, at the same time, will not be overloaded (clipping will not occur when the dynamics exceed the permissible maximum and distortion appears). Normalization is important not only when processing vocals, but also when recording podcasts.
Compression
Eliminates short bursts for a more even volume change. After compression, the sound becomes quieter, so repeated normalization is required. Please note that excessive compression (using high settings or repeated application) degrades the sound quality, making it look “pinched.” Since other effects can affect the dynamics, it is important to carefully consider the sequence of processing, for example, performing compression last.
Reverb and delay
Reverb in music is an effect similar to echo, but without obvious repetitions of sound. Such repetitions are created using a delay. Both effects are often added with a little intensity to make the sound more natural. Excessive delay and reverb are used intentionally, for example to create the effect of sounding in a cave or an empty hall.
It’s not easy to get rid of echo when mixing your voice. Special functions are not able to completely eliminate it, or cause unwanted distortion. Therefore, recording is usually done in a small room with a sound-absorbing coating. A more affordable option may be to use a cardioid (unidirectional) microphone.
Equalization or frequency processing of vocals
The equalizer boosts or suppresses certain frequencies, allowing you to adjust tone and remove unwanted tones.
There are two types of equalizers: parametric and graphic. Parametric equalizers affect only a selected range of frequencies and are typically used to customize tracks. Graphic equalizers also affect nearby frequencies, making them ideal for final tuning of an entire composition.
Vocal EQ Checklist
Key Tip: Listen – Identify – Correct
I usually start by listening, then diagnose (to identify possible problems) and finally correct deficiencies or add missing elements. This allows me to complete the mix faster and, if everything is ok, move on.
Sometimes, after I’ve already started mixing other sounds in the mix, I can discover a problem in a previously processed track.
The most common mistake new engineers make is expecting perfect settings the first time. Experienced professionals understand that they will return later to correct any problems. Usually their decisions are not final. It’s like taking an exam: you finish the paper and then review each answer.
So always follow this three-step formula. If you listen and don’t find anything wrong, don’t get discouraged or feel like you need to add EQ. Only use it if you are 100% sure that there is a problem that needs to be fixed.
Be bolder
This means that if you need to cut or boost by 10 dB, do so if you are happy with the result. On the Internet you can find strange rules like “you cannot increase the sound by more than 3 dB.” But if it sounds good even with a 20dB reduction, go with it.
Perhaps the person proposing these rules is recording in excellent conditions, and any increase or decrease in volume by more than 3 dB seems excessive to him. However, most performers work in less than ideal conditions.
Trust your ears: if it sounds good, then it should be so.
Avoid the Solo button
When using a vocal EQ, try to avoid the Solo button unless you’re trying to find an annoying frequency that’s hard to detect when the whole mix is playing. But once you find a specific frequency, make EQ adjustments while the entire track is playing to understand how that frequency affects the rest of the mix.
The average listener doesn’t appreciate the vocals in Solo mode – they listen to the entire song as a whole. So avoiding the Solo button takes discipline, but once you get used to it, you’ll start to get significantly better results by experiencing the song through the listener’s eyes.
Subtractive equalization
When it comes to subtractive EQ, you want to focus on unwanted frequencies that conflict with other sounds in the mix or interfere with the clear sound of vocals. These are frequencies such as hum, boom, mud, boxiness and harshness (including sibilance).
When vocals lack clarity, the problem is often in the lower mids. If it sounds too thick and masks the low frequencies, sub or bass frequencies are usually the culprit. In some cases, the voice may be too bright or harsh, then this can be corrected by reducing the high-mid range.
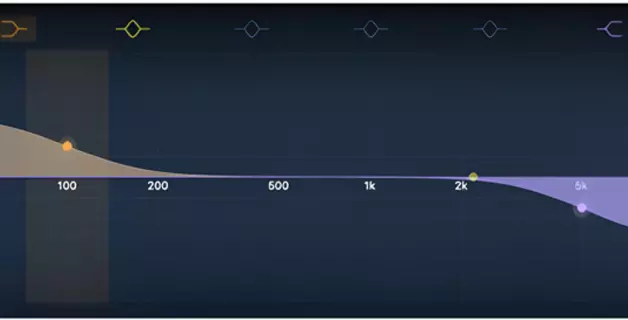
Listen carefully, identify the problem, and then adjust the frequencies until you achieve the desired result. Here’s a vocal EQ cheat sheet for making precise adjustments:
- Rumble: 80 Hz and below;
- Boominess: 80 Hz – 200 Hz;
- Mud: 250 Hz – 500 Hz;
- Boxiness: 350 Hz – 600 Hz;
- Honky: 900 Hz – 1.5 kHz;
- Nasal: 1.5 kHz – 2.5 kHz;
- Harshness: 3 kHz – 6 kHz.
Use this equalizer chart to find problem frequencies without the guesswork. Walk across the spectrum to find the sweet spot and eliminate any unwanted frequencies.
However, don’t fix what isn’t broken. For example, if the vocals already sound too thin, trying to remove dirt will likely only make the situation worse. There must always be a good reason for cutting a particular frequency.
Compensate by Preamplifying Frequencies
Before moving on to gain, I highly recommend applying compression after surgical EQ. This will provide greater control and flexibility.
If you boost a sound first and then apply compression, the compressor will respond to the boosted frequencies by reducing them while boosting the quieter parts. This will be the opposite of what you wanted to achieve by boosting certain frequencies.
However, this is a general rule. You should do what works best for the particular song. There is no one-size-fits-all approach to music mixing.
However, in most cases, compression should be used before additive EQ.
Frequency boost
Many new engineers struggle with subtractive EQ, but the additive side usually comes easier for them. When it comes to boosting frequencies, the key is to understand what the vocal is missing and then boost the right frequencies to help the voice break through the mix.
For example, if vocals sound dull, boosting the treble will make them shine. If your voice seems too thin, adding bass will give it weight. And boosting the high mids can add clarity and presence when vocals can’t cut through the mix.
So, we listen, we diagnose the problem, then we improve. Here’s a cheat sheet for boosting frequencies in a vocal EQ:
- Warmth/Fullness: 90 Hz – 200 Hz;
- Lyric Clarity: 800 Hz – 1.5 kHz;
- Definition: 1.5 kHz – 3 kHz;
- Presence: 4.5 kHz – 9 kHz;
- Brightness: 9 kHz – 11 kHz;
- Air: 12 kHz and above.
This chart is a good starting point when you want to improve your vocals and make them stand out more in the mix.
Before after
It’s important to do A/B testing to see if an EQ makes your vocals sound better or worse. You should also listen carefully to how equalization affects other elements of the mix. Make sure you don’t create a masking effect, especially if there are guitars or keyboards in the composition, as they often clash with the voice.
Use the level matching feature to compare the sound before and after equalization at the same volume. Great equalizer plugins, such as FabFilter Pro-Q3, offer an automatic boost feature. Use this to avoid distortion caused by volume changes when EQing vocals.
Know your tools
Knowing your tools will help you achieve the best results and eliminate guesswork. Nobody wants to be confused when choosing an equalizer.
For a subtractive equalizer, a standard plugin or transparent equalizer is often sufficient. Additive EQ may require a color plugin to add higher harmonics. However, in some cases, a transparent equalizer produces better results.
Avoid oversaturating the mix, otherwise it will sound weaker compared to commercially successful compositions. The biggest mistake newbies make is adding plugins that emulate analog audio everywhere. After studying the manual and your tools, you will realize that sometimes such emulations are not necessary.
Take the time to learn the instruments so you can get the most out of them without compromising the sound.
Saturation (harmonization)
Harmony adds slight distortion at peak volume levels, softening it. As a result, the sound becomes more “velvety”, atmospheric and pleasant to the ear. Previously, this effect was achieved thanks to the peculiarities of tube equipment, but today the “warm tube sound” is simulated using plug-ins, filters and devices.
Adding Atmosphere
Additional sounds, such as footsteps, wind or rain, can enrich the composition, adding emphasis and serving as a kind of transition. For example, if the song is about trains, you could add the sound of wheels and a train whistle before the chorus.
How to style your vocals?
Special effects help stylize the sound of a musical composition. Using examples, we will look at how vocals are processed for famous performers.
Autotune
Autotune was originally developed to correct inaccuracies in melody and voice. When used sparingly, it aligns the tonality of the acapella (vocal) part with the instrumental part. Higher values create a characteristic voice distortion.
Delay
Forms a repetition of sound. Combined with reverb it creates an echo effect. By changing the parameters, you can achieve a sound reminiscent of a well, a cave, an empty room, and much more.
Distortion
Distortion gives the sound an overdrive effect, adding distortion at different frequencies of the melody. As a result, the sound becomes harsher and rougher.
Sample
Plugins with this effect generate virtual tracks, where each is processed with unique distortions in a certain frequency range. These tracks are then combined with the original to create a rich and complex polyphonic sound.
Expansion and Panning
When mixing vocals and instruments, they are always placed in space: each element is shifted (with a certain value) to the left or right channel, or remains in the center. Without this, it is difficult to distinguish each batch. Some plugins will improve upon this technique. For example, a track is processed so that it sounds simultaneously from the right and left (stereo widening effect). The position of sound in space can change: the source “rotates” around the listener or “moves” along a different trajectory (panning).
Reverse Vocals
In this case, the audio recording is played in reverse order (reverse). Plugins can complicate this effect by adding reverse at regular intervals, shifting frequencies, adding distortion, and combining it all with the original raw track.
Frequency shift
The sound in a given frequency range is shifted and distortion is added to it. Sometimes it reminds me of auto-tune.
Telephone effect
This effect combines equalizer and distortion. All frequencies outside a narrow range are cut off and then light distortion is applied. The result is a sound reminiscent of old corded phones.
Robot
A vocoder (either a standalone device, a plug-in, or a synthesizer function) modifies human speech, giving it a robotic sound while preserving the manner of the original. With certain settings, the vocalist’s timbre remains recognizable. The effect is achieved through a complex combination of filters and signal generators.
Start creating beats and songs in minutes. No experience needed — it's that easy.
Get started