How to learn guitar at home

Having the skill of playing musical instruments has always been considered a sign of education for a long time. The guitar has always been popular, known for its affordability and versatility. It harmonizes with almost all styles of popular music. Consider how to choose, hold, tune and master the guitar to play your favorite songs.
How to choose a guitar for a beginner
Many people believe that any instrument can be used to learn how to play the guitar, whether it be a classic Spanish model or a modern electric guitar equipped with the latest technology. In fact, although they share some similarities, there are enough differences in detail that automatically separate guitarists by their preferences.
The choice of guitar should be based on the style of music you plan to play.
Classical guitar
For those who are looking for a tutorial for beginners “how to play the classical guitar”, it is recommended to choose a guitar with a wide neck and nylon strings. For example, the FLIGHT C-120 classical guitar might be a great choice. This instrument provides fingertip comfort, while the wide, soft-stringed neck makes it comfortable to play complex chords and play classical pieces.
Acoustic guitar
For popular music, it is recommended to use an acoustic guitar with metal strings, also known as a “pop” guitar. It is important not to confuse it with the classic models, as they have some differences. Unlike classical Spanish guitars, pop models are designed to be fitted with metal strings and played with a pick. However, they can also be played with the fingers, as the string spacing provides sufficient comfort. When choosing this type of guitar, consider the FLIGHT D-435, which is great for picking and chording style playing.
Electric guitar
Those who prefer hard guitar riffs and melodic solos should look into electric guitars. The sonic characteristics of electric guitars are quite different from all types of acoustic guitars, so switching from a classical guitar to an electric guitar can be even more difficult than choosing an electric guitar in the first place. The Denn ST100 electric guitar gives the aspiring guitarist the opportunity to try various popular sounds and further develop their own style.
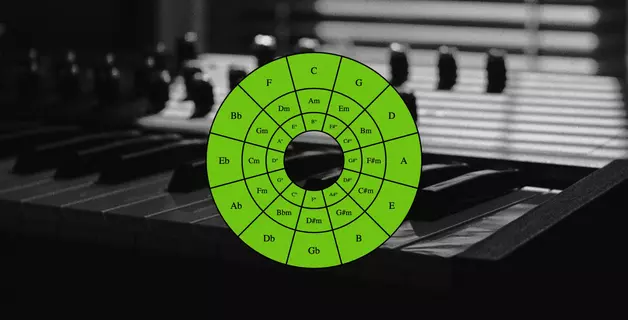
How to tune your guitar
Despite differences in construction and other aspects, all types of guitars are tuned in the same way. This is especially true when it comes to standard tuning, which is the most common option for a guitar where the thinnest and thickest strings are tuned to E. Beginners in the early stages of learning are unlikely to need any other tuning since most popular guitar songs are written in this standard tuning.
By tuner
There is an easy way to tune a guitar, which is to use a special device that displays the note being played. These devices are called tuners and come in a variety of types: some are neck-mounted (called “pins”), others require a wire or built-in microphone.
In either case, the tuner will determine the note. Tuners are chromatic and non-chromatic. Chromatic tuners detect the specific note the instrument is currently playing and show its accuracy. Non-chromatic tuners, on the other hand, focus on a given guitar tuning and indicate how closely the sounding string is tuned to the desired sound. The first type is more convenient for those who often change the tuning of the guitar, but both options are suitable for beginners.
Fifth fret
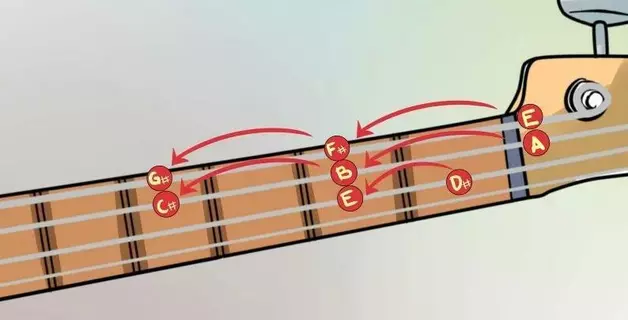
Unlike using a tuner, this method requires the guitarist to have an ear for music, even if they don’t know how to play the instrument. Common guitar tunings are arranged in such a way that almost every open string (not clamped at any fret) should sound in unison (that is, the same) with the next string, clamped at the fifth fret. The strings on the fretboard are counted from the thinnest (the first one, which is at the bottom when viewed from above) to the thickest (the sixth string on a six-string guitar, which will be closest from above).
However, there is one exception when tuning – the third string, which must form unison with the second string when pressed at the fourth fret, not at the fifth.
Thus, for this tuning method, you will need patience and an exact note to start from. In principle, you can select any note on the fretboard and tune the string accordingly, but it will be easier if you have the exact note for the open string. For example, you can use the sound of a telephone dial tone, which is a clear high-octave A note corresponding to the open fifth string. Once the 5th string is in tune, you will need to hold it at the 5th fret and tune the 4th string to the same note. Then play the sixth string at the fifth fret and tune it to the open fifth string, and so on. Don’t forget that the third string needs to be pressed at the fourth fret in order to achieve unison with the second string!
How to hold a guitar correctly
If there is a correct answer to the question of how to start playing the guitar, then it has to do with proper seating. When it comes to classical guitar, the classical fit is the best option. To do this, the guitar is placed with the lower notch on the left leg, which should be higher than the right one. Some people use a stack of books to raise the instrument, but custom stands are also available. As a result, the neck is closer to the eyes, and the top is positioned so that the hands can be comfortably placed in the classical position.
Acoustic guitars with metal strings and electric guitars can also be played this way, however they are more commonly played on the right foot with the left foot free. This position can make it difficult to see the neck and take some getting used to the classic left hand position on the neck, but it is more mobile and closer to the position a guitarist would take when playing standing up. By the way, there are no universal rules on how to play the guitar while standing – every guitarist eventually finds the best option that suits him.
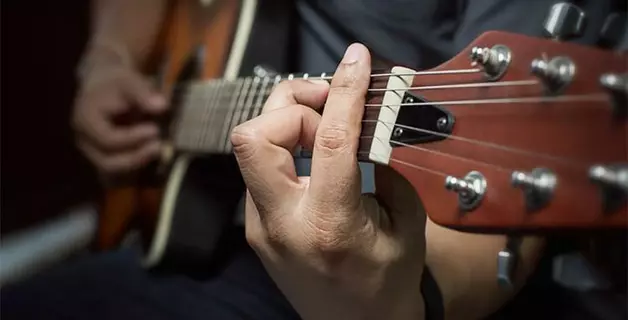
How to pick up the neck and tighten the strings
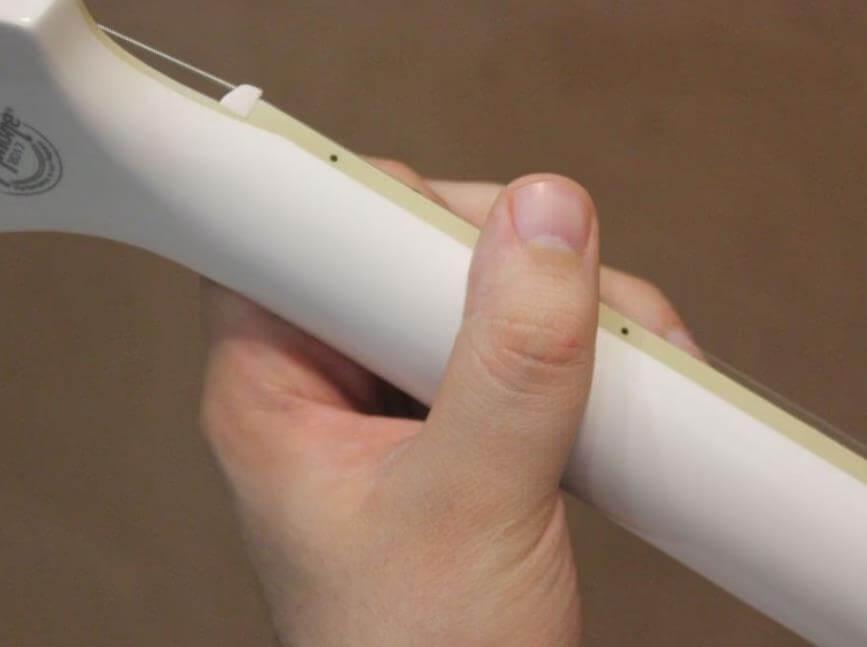
There are two main options for setting the hand on the neck. The classic position assumes that the thumb is completely hidden behind the neck, its end is located approximately in the middle of the neck. Thus, the brush protrudes forward, which allows the hand to move freely along the neck. This is useful for playing complex non-barre chords and fast melodies, and can be used on all types of guitars. However, other hand positions are not allowed on the classical guitar.
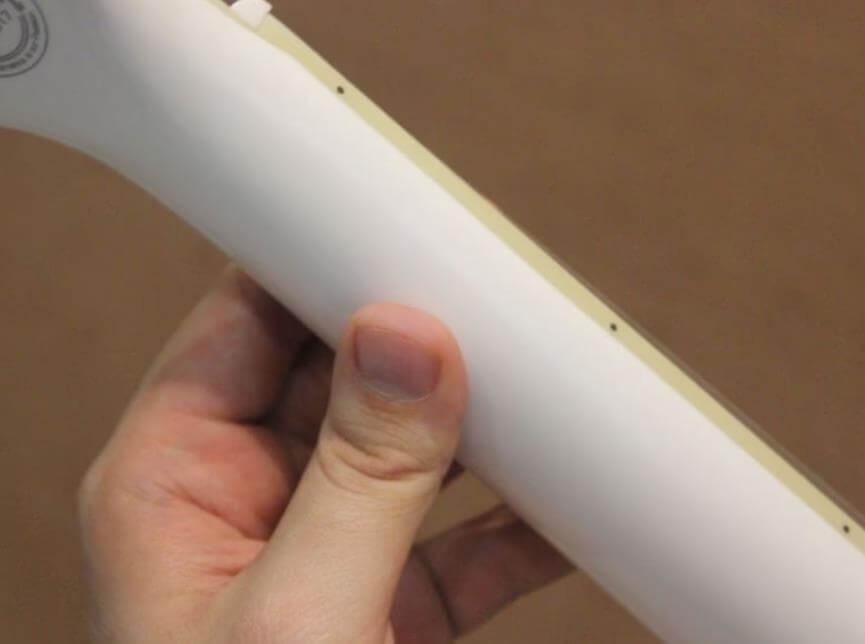
From blues music, another way of setting the hand has evolved, which is known as the “blues setting” or “rock” setting, sometimes jokingly referred to as the “monkey” or “shovel” setting. The essence of this technique is that the thumb is placed on top of the neck, depending on the size of the brush, this can be the tip of the finger or its middle. This position of the finger provides a secure grip on the neck, which is important for performing the string pulling technique and makes it easier to pinch barre chords. However, this may limit the mobility of the arm. This way of setting the hand is equally suitable for pop acoustics and electric guitars.
When it comes to guitar playing, it’s impossible not to notice that experienced guitarists can combine both of these approaches as needed.
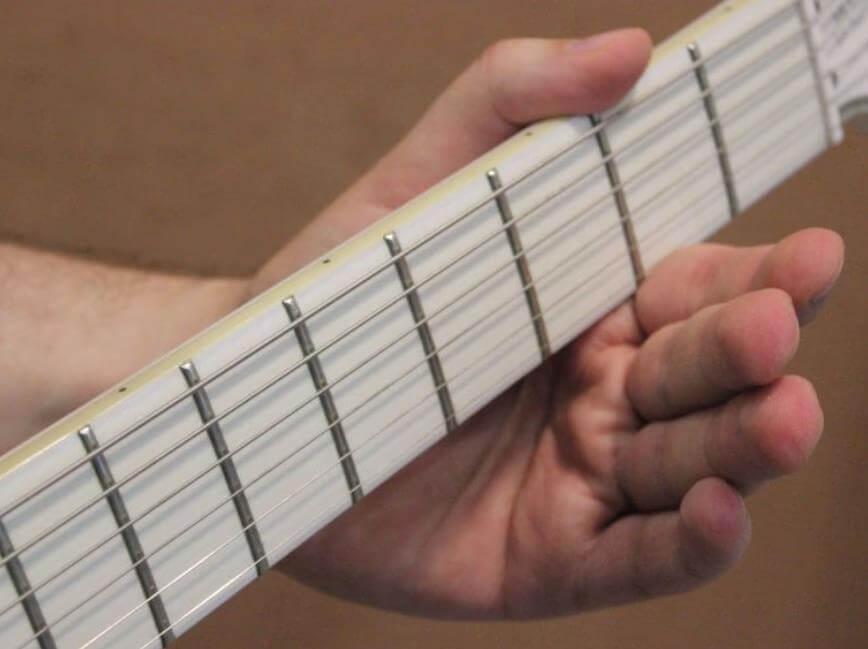
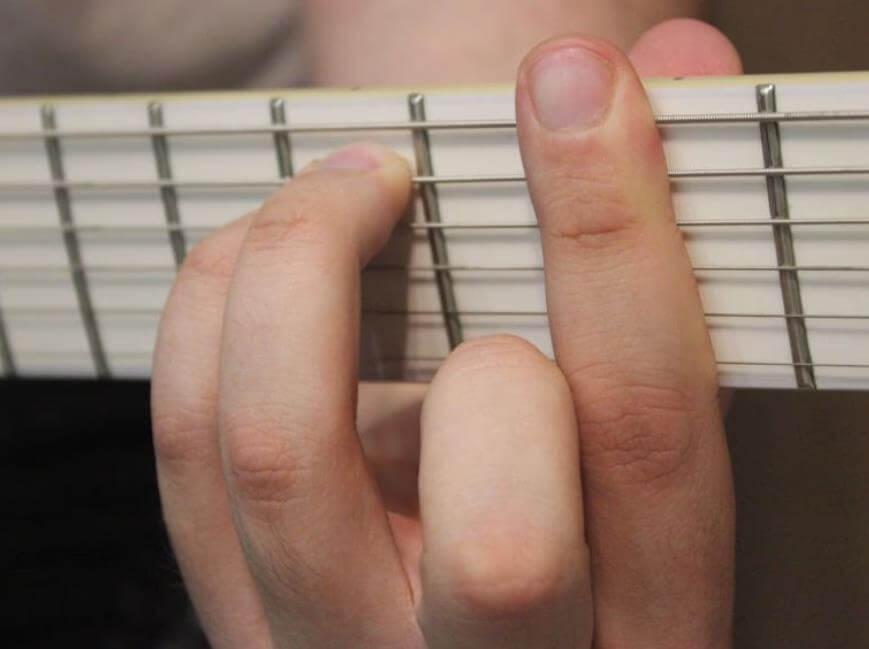
However, when it comes to clamping the strings, there is no controversy on any type of guitar. The string should be clamped right at the fret (metal strip). This is how you can achieve the purest sound of a note without additional noise and overtones.
What are chords and how to play them
Chords are combinations of three or more notes played at the same time. If the same notes are played consecutively, then this is called an arpeggio or brute force. If you are interested in playing the 5-string guitar, then learning the basic chords becomes a must as it will allow you to play the most popular songs.
How to read chord fingerings
The idea of fingering patterns is always the same, although their appearance may vary slightly. They are read from left to right, top to bottom. The vertical lines represent the strings: the thickest string (sixth) is usually on the left, and the thinnest (first) is usually on the right. The dots and lines indicate which strings are pressed with one finger or with a barre.
If the chord is shifted along the fretboard, then additional frets may be shown on the left, indicating which position on the fretboard the hand should be shifted to. Chords also often use open strings (i.e. strings that do not need to be clamped) – these are indicated by an empty circle at the top. If an open string should not sound, but on the fingering it is between the sounding strings, then it is indicated by a cross.
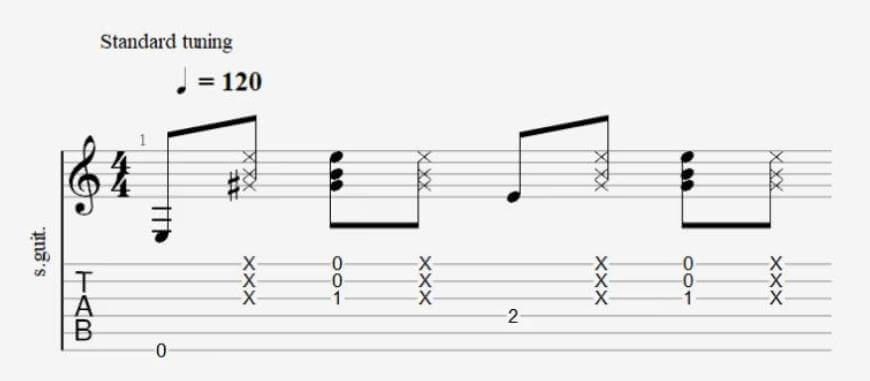
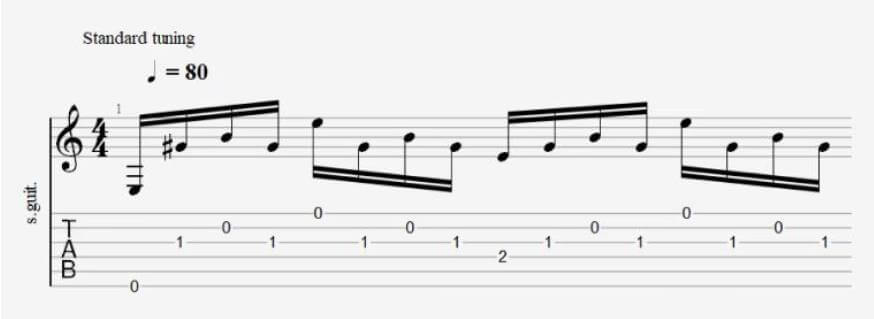
For ease of use, tablature is also used – this is a special kind of musical notation for the guitar, where the stave is combined with six additional strips representing the strings. Since most notes on the guitar can be played in different places (unlike the piano, where there is only one key for each note), guitarists prefer this type of notation.
All this is very simple: six lines symbolize the strings, with the thickest at the bottom and the thinnest at the top. The numbers indicate the frets that need to be clamped, and the open strings are indicated by the number 0.
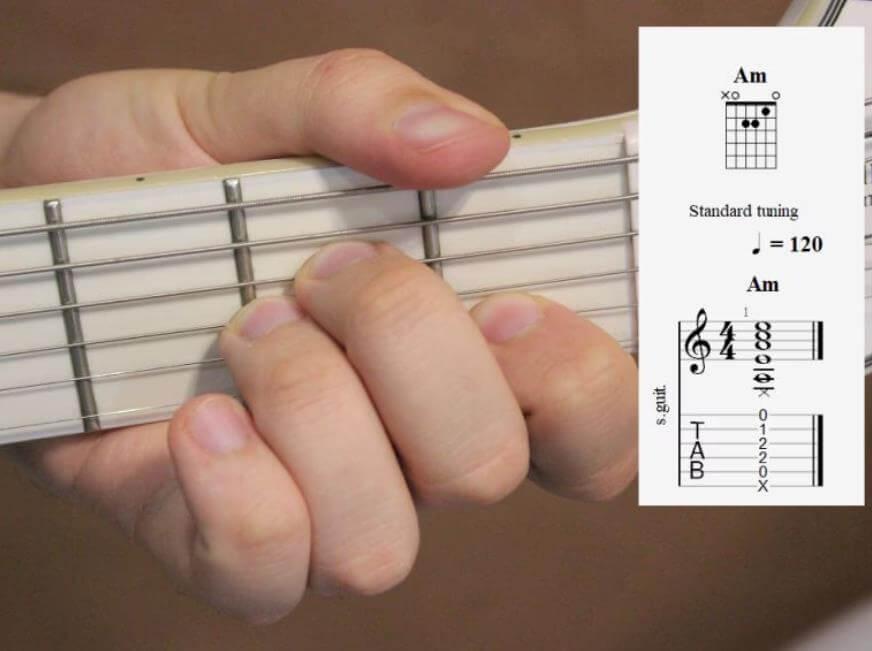
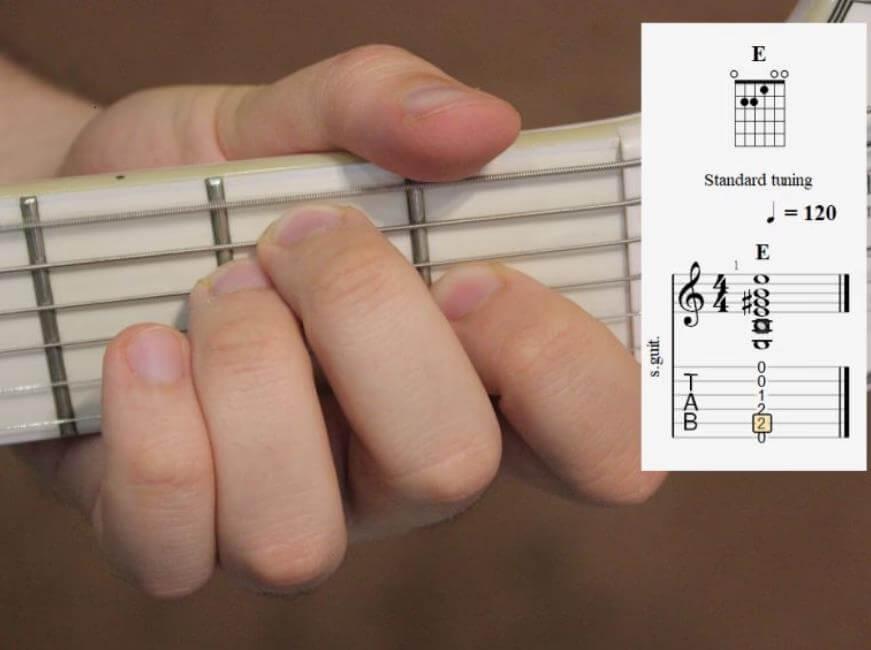
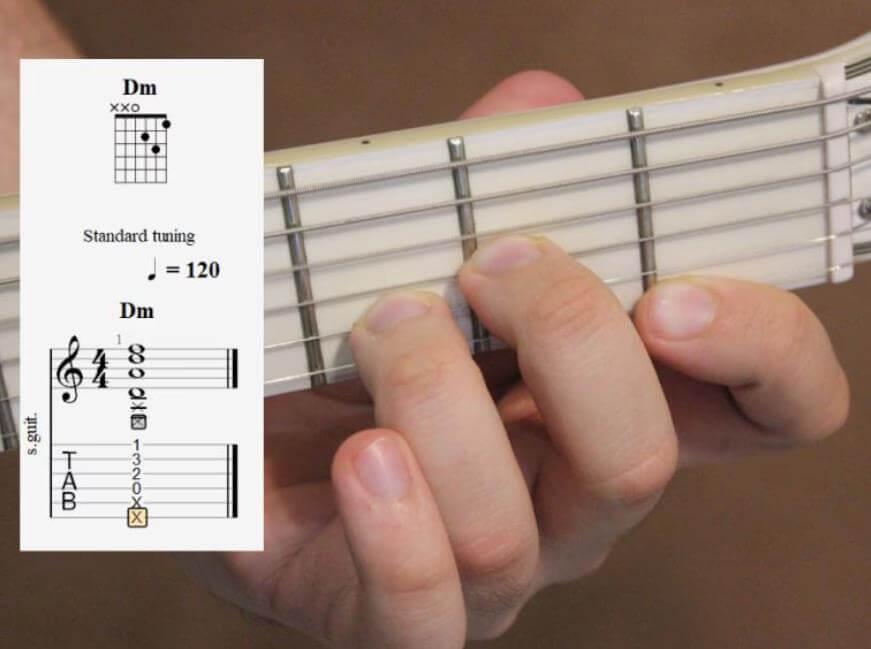
How to hold and rearrange Am, E and Dm chords
These chords, also known as “three popular chords in the world of crime” – Am, Dm, E, are used in the performance of many songs and allow you to play all songs that are in the key of A minor.
All three chords have similar fingerings and require almost the same hand placement. To hold these chords, you need to use three fingers: index, middle and ring. The index finger is placed on the highest note (that is, on the thinnest of the strings to be pressed, the extreme right in the fingering of the chord), and the other two fingers are placed one above the other and pinch the remaining strings. There is also one bass string that is sure to sound, which is located above the last finger – in this case, this is the tonic that determines the base of the chord.
If you want to learn how to play the guitar on your own and are wondering how to master these three chords, you will also have to master the permutation of the positions of these chords. It’s pretty simple: you just need to move your hand to the low or high strings and everything else will remain the same. The only exception is the Dm chord, which requires moving the ring finger one fret to the right.
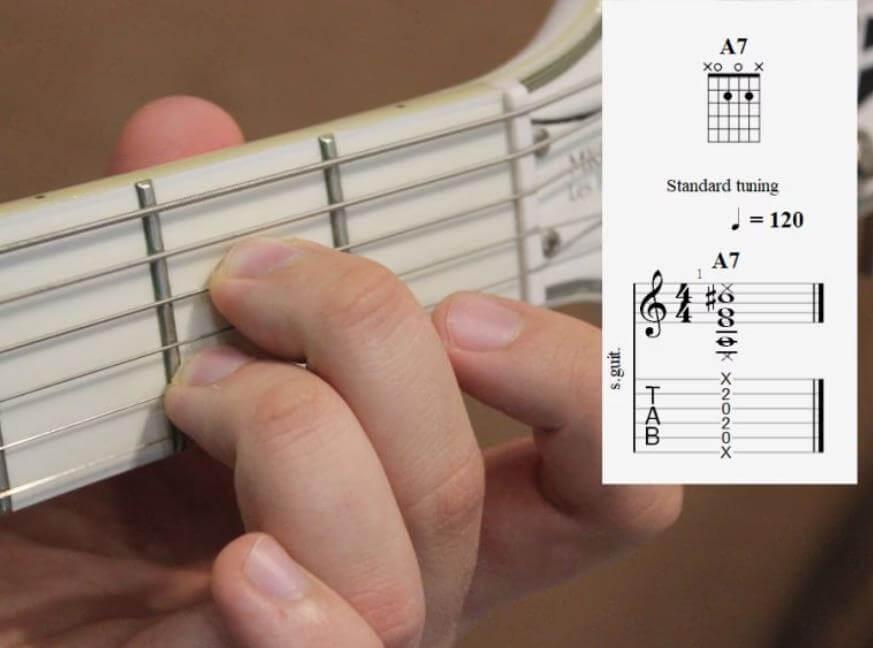
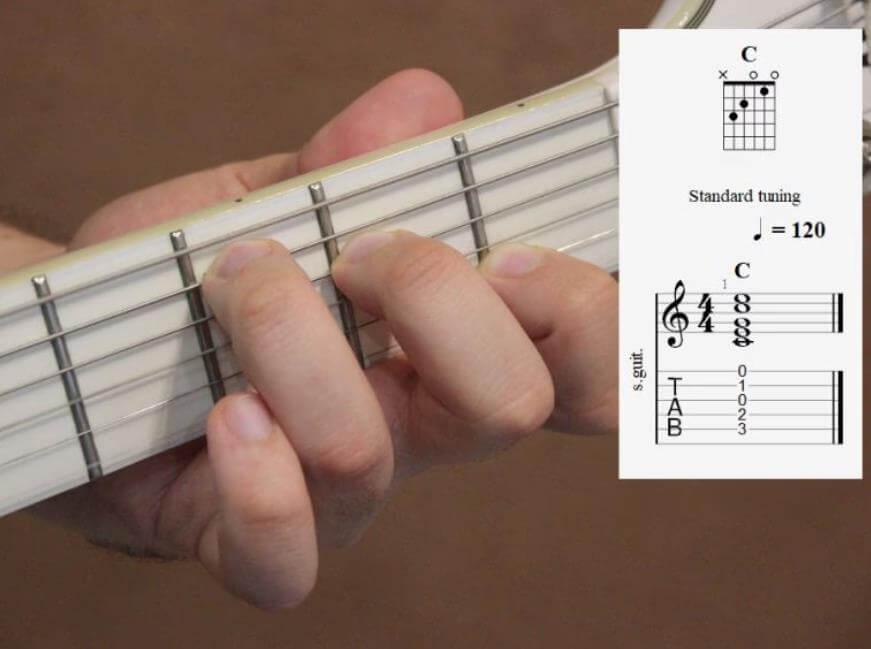
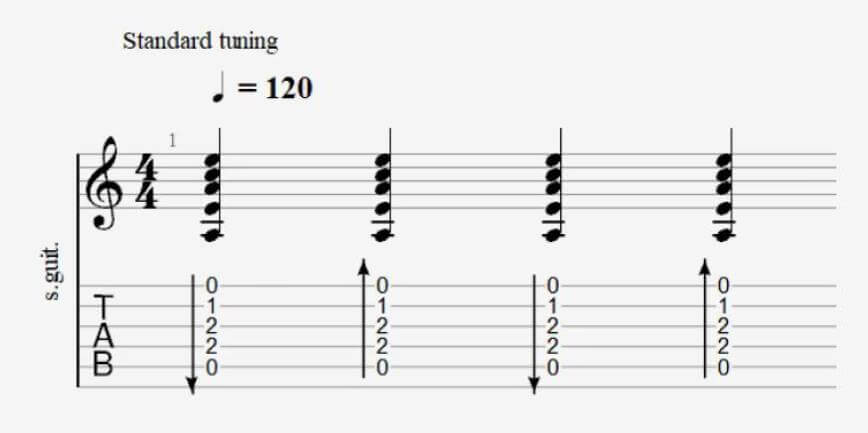
How to Pinch and Rearrange A7, C, and G Chords
Among backyard guitarists, these three chords are considered more difficult, although they are not really difficult. It does not require step-by-step instructions – after several attempts, the fingers will automatically take the desired shape.
The A7 chord can be played using just two fingers – the middle and ring fingers (as usual, they are the ones that pinch it). They are located on the second fret on the fourth and second strings, respectively, and all other strings, except for the sixth, remain open.
The C chord is popularly known as the “ladder” and follows the “three criminal” chords in popularity. To clamp it, three fingers are enough, which are located diagonally above each other.
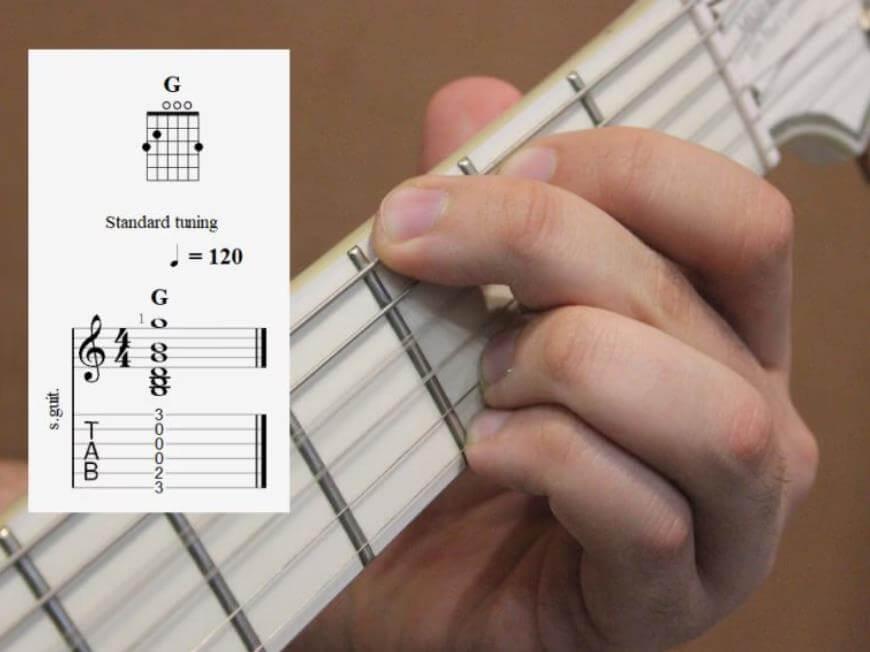
The G chord is not used as often, so it is not necessary for those who want to learn how to play the simplest guitar chords. However, it is a simple and beautiful chord that can be used in various popular songs.
How to hold and rearrange Em, D and H7 chords
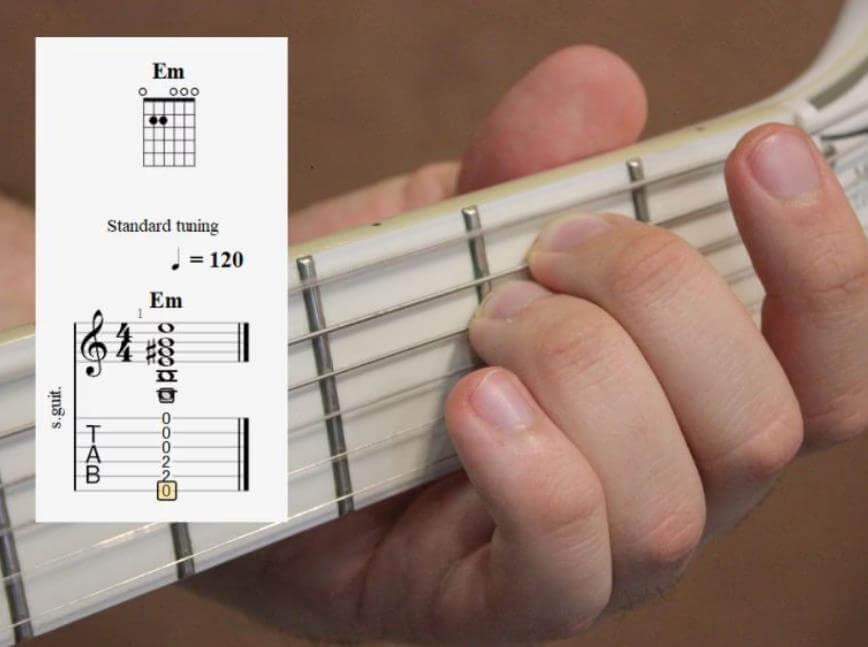
The Em chord is also as popular as the “Three Fouls” and is even easier to clip. It is enough to put two fingers on the second fret of the fifth and fourth strings, leaving the rest open. It can also be moved along the fretboard, but for this you need to add a barre on all six strings at one fret in front of two fingers clamped.
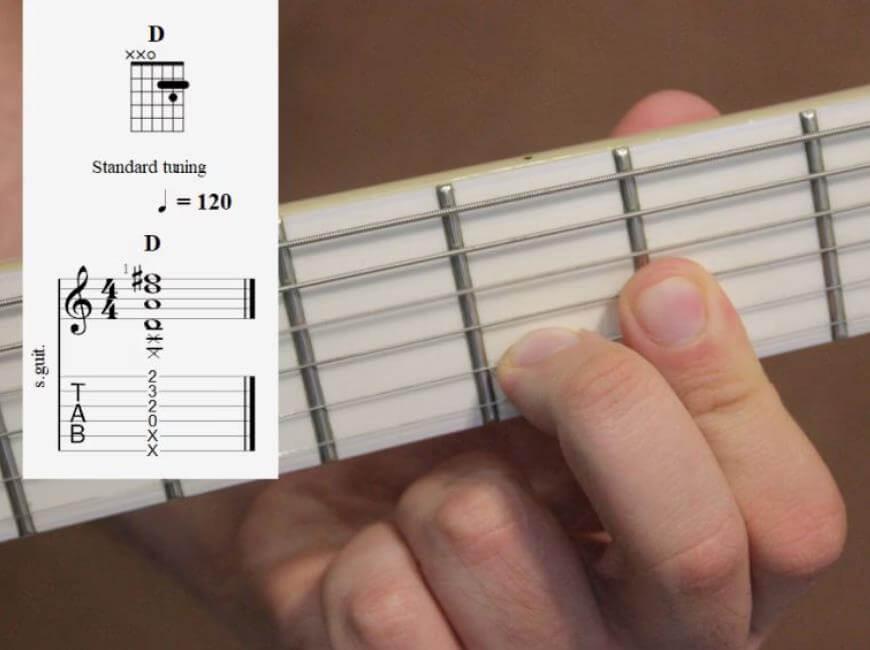
The D chord is also often used along with the “three criminals”. Although its fingering is more complex, it is not difficult to learn how to play it on your own. However, moving this chord across the fretboard can be difficult even for experienced guitarists, as it requires moving four fingers at once in an awkward position. Because of this, it is usually only used on the first frets.
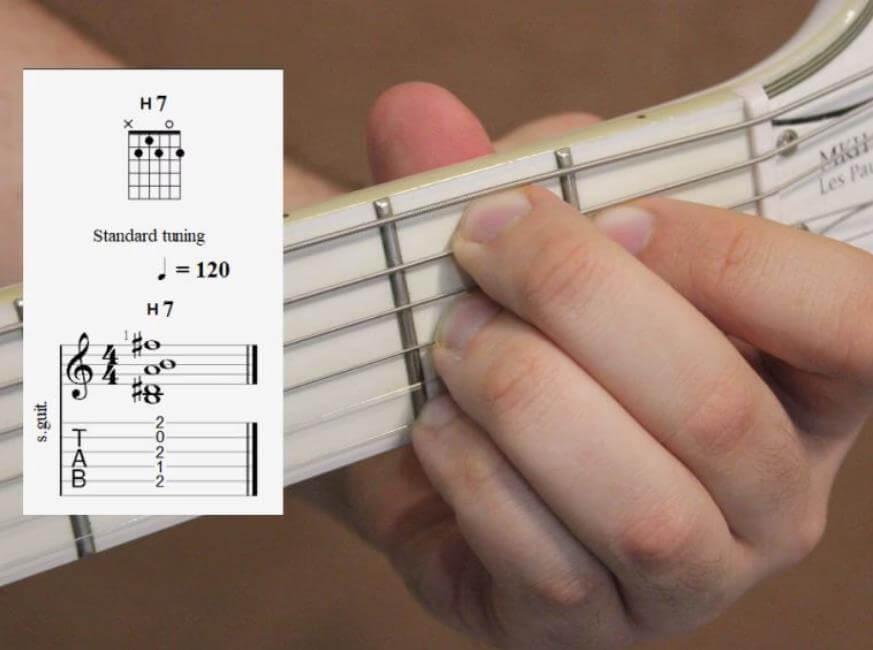
The H7 chord is probably one of the most unpopular we’ve reviewed today, but it sounds amazing. The unpopularity is due to its complex clamp: all four fingers are required, which are cleverly placed under each other. In this case, it is important to avoid touching the second string, which should remain open and sound.
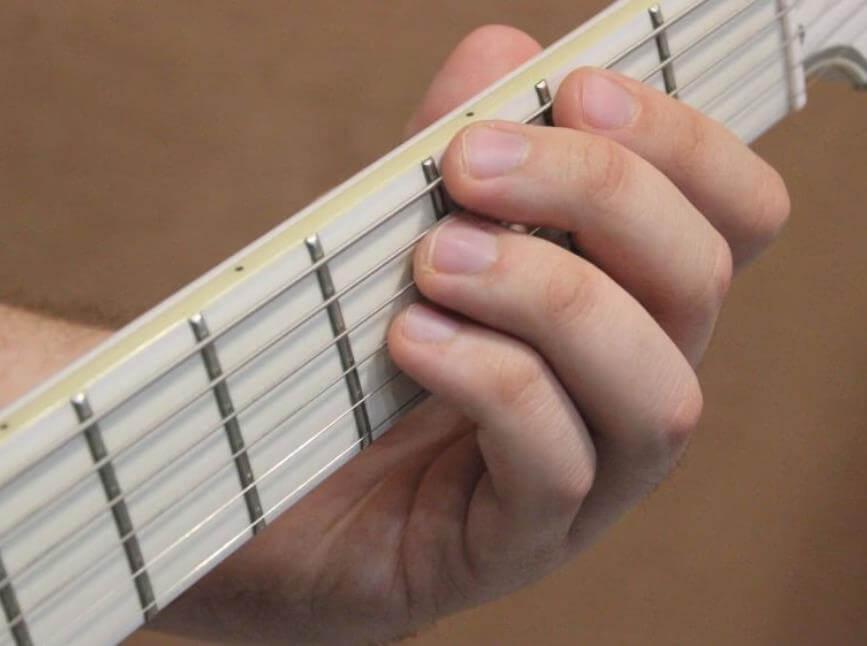
How to barre chords
The rules for playing the guitar include the use of chords that require playing more than four strings at the same time. In such situations, the barre technique comes to the rescue – a method in which several strings are clamped with one finger at the same time.
For beginners on the guitar, the word “barre” is troubling, and when trying to play it, the metal strings leave nasty marks on the fingers that take some getting used to. Here you need to be patient, but over time everything will definitely work out!
You should start clamping the barre by clamping three strings in turn – upper and lower. The ball of the finger is placed parallel to the fretboard in such a way as to span three strings in one motion.
As skills develop, you can move on to clamping all six strings. Here the main difficulty is to make sure that the depression between the finger knuckle and its main part does not stretch the string and does not distort the sound. It is not possible to properly pull the string to the fingerboard with this part of the finger, so care must be taken to ensure that all strings are evenly clamped.
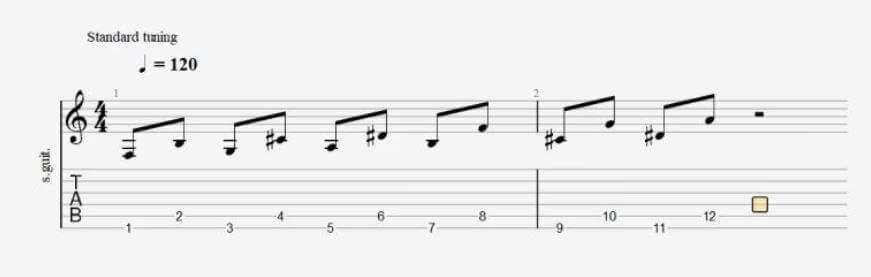
How to play melodies on one string
Playing chords is not the only thing a guitarist does. Sometimes you can diversify the sound by adding a melodic line, for which just one string is enough.
To practice playing melodies, you can start with simple songs that are popular among beginner guitarists. Despite the fact that the famous melody “Grasshopper Sat in the Grass” is often perceived with humor, it is an excellent opportunity for training beginner guitarists.
If you want more serious melodies, you can learn the tunes from Linkin Park’s “Numb” and Deep Purple’s “Smoke on the Water”. They differ in that single notes can be replaced by simple chords, giving the melody a new sounding character.
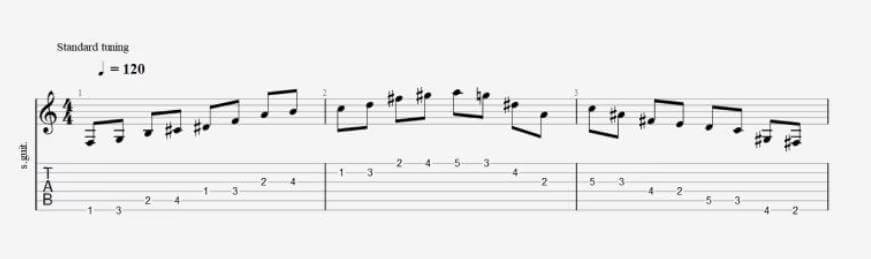
Exercises for playing melodies
“Snake”
To practice playing melodies, there are useful exercises that can be very useful. For example, frequent repetition of the “Snake” exercise will help improve brute force skills.
The essence of this exercise is to play notes on the fifth and sixth strings, moving up to the 12th fret. Then you should repeat the same movements in the opposite direction, starting at the 12th fret and moving to the beginning of the fretboard.
“Spider”
The advanced “Spider” exercise is a great workout for developing fingerpicking skills all over the bar. It is recommended to do it if you are not interested in “how to play the guitalel” – a small guitar, about the size of a ukulele, not a classical instrument. On such a compact neck, the execution of complex structures can be difficult.
The essence of the exercise lies in the vertical movement along the fretboard, where pairs of fingers are alternately used on different strings. First, the index and ring fingers are used, then the middle and little fingers, and so on, changing the order of the fingers alternately.
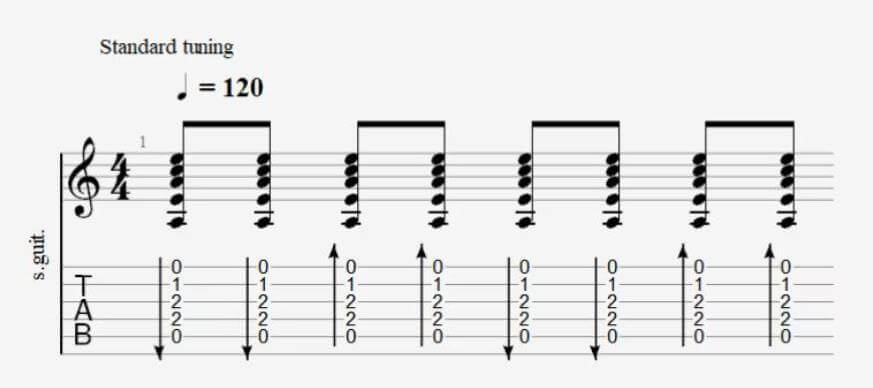
Learn combat and busting
To create song dynamics and make it easier to explain different ways of playing, guitarists have developed a variety of strumming and picking techniques that allow popular songs to be quickly adapted to backyard guitar playing.
There are three main types of string strikes: upstroke, downstroke, and muffled strike. Guitar techniques are made up of various combinations of these strokes to achieve a variety of sounds. Strikes are performed with the relaxed right hand, and both fingers and a plectrum can be used.
Learn to play a simple fight
It is recommended to start with the simplest guitar accompaniment, consisting of successive down and up strokes. This playing style is the most popular and is often used in intros, but due to its monotony it can be tiring, so you should move on to other techniques later.
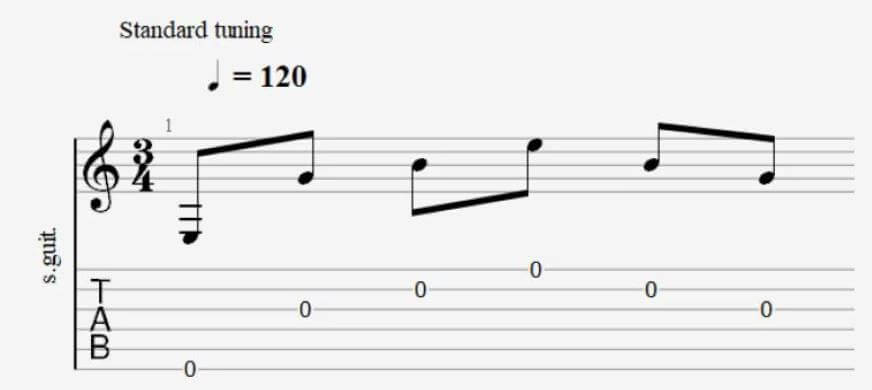
Learn to play a variety fight
There is a way to play using string muting that adds more dynamics. In this type of combat, the pauses that are observed between blows are especially important. To better understand this technique, it is recommended to listen to these compositions.
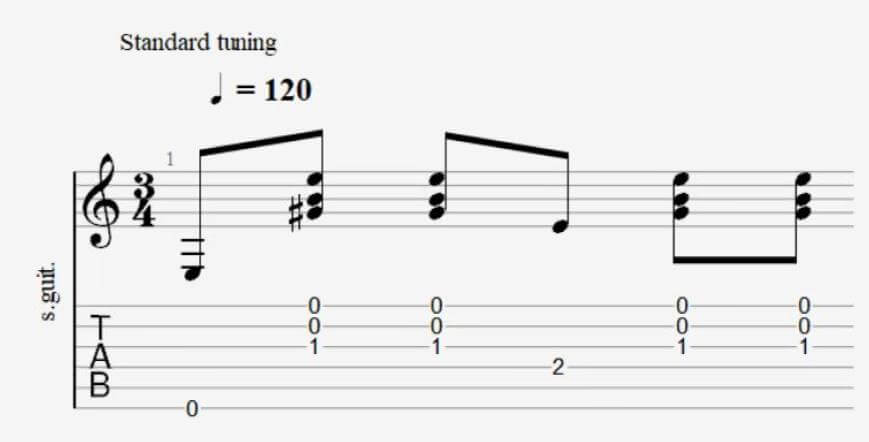
Learn to play Bust 1 “Six”
This plucking pattern is a staple of the guitar curriculum, as it is used extensively in so many songs. It involves playing a low bass note on one of the lower strings, as well as five notes on the upper strings, which form the basis of the melodic line. To practice this pattern, you can use the intro from the song “Nothing Else Matters” by Metallica, which, in fact, consists of this fingering on open strings.
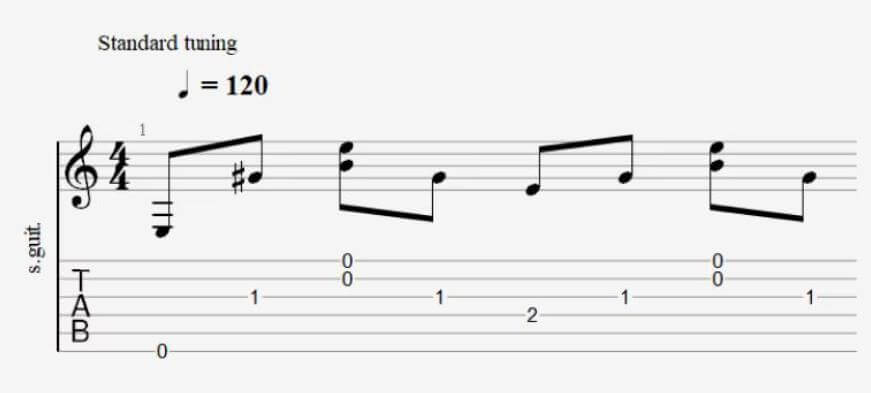
Learn to play bust 2 “Waltz”
“Waltz” enumeration is a variation on the “Six” theme, however, in this case, the notes are not taken separately, but are small chords played in accordance with the waltz rhythm “one-two-three, one-two-three”.
Learn to play Bust 3 “Four”
Fingering “Four” is suitable for ballads and lullabies, and is a combination of elements from “Waltz” fingering and other fingering techniques.
Learn to play Bust 4 “Thieves”
“Blatnoy” busting is one of the easiest ways to play the guitar, but its popularity remains high, especially in Soviet songs. It is based on the playing of bass notes and the use of small chords on the lower strings, which gives it a dynamic and lively sound.
Learn to play Bust 5 “Eight”
This enumeration is not only the most beautiful, but also the most difficult of all. It is an extended version of the “Six” search. Mastering this technique can take a lot of time, but the result is worth the effort.
Guitar Techniques
Rock
Different musical genres are characterized by unique guitar playing techniques that give songs a special sonic character. For example, in rock style, it is impossible to do without the skillful use of string muting. This technique is primarily intended for electric guitar, but can also be used on acoustic guitar.
To mute the strings, the right hand must be placed where the strings come out of their bindings and begin to vibrate after being struck. The edge of the palm presses down on the strings, creating a powerful and tight sound known as “palm mute” or “palm mute”. On an acoustic guitar, this adds a softness to the sound, which can also be used to embellish the guitar part in combination with various picks and playing styles.
Blues
To give your playing a touch of the blues, you can practice the “slide” technique. This effect is achieved when the finger slides across the string, moving from one fret to the next. Try moving your finger from the third fret to the fifth without lifting it from the string and you will hear the “slide” effect. To achieve a beautiful sound, it is important to hit the string at the beginning and at the end of the movement – so this technique will sound beautiful and distinct.
Solo
You don’t have to rely solely on fast cuts to play guitar solos. In fact, melodic solos are even more popular. To perform them, it is worth mastering two techniques: tightening and vibrato.
Stretching allows you to change the pitch of a string by moving it up or down the fretboard. This technique requires practice with a tuner so that the braces hit exactly the right notes and sound beautiful.
Vibrato allows you to sustain a note and slow its decay, adding a swing effect to it. There are several ways to use vibrato, and guitarists usually find their own unique way of influencing a string. Also, the vibrato technique changes as you move along the neck: the behavior of the first string will be different from the behavior of the sixth.
To perform vibrato, it is necessary to create vibrations around one note by small tightening of the string, returning it to its original position. In this way, the sound will oscillate gently, creating the characteristic vibration from which the name of this technique is derived.
Improvisation
Improvisation on the guitar is the highest skill level of the guitarist. However, great improvisers are not born, they become such, starting with small steps. You can develop your skill in improvisation endlessly: study various arpeggios, scales, melodic phrases. But it’s worth starting with the simplest – creating sequences from familiar chords and melodies, using the notes of these chords.
Just take a few chords, play them in some kind of rhythm, and you will already start improvising. This will be your first step.
Then move on to creating a melodic line. Write down your chord progression and try to come up with a simple melody for it. You can use individual notes from chords that you have played before. At the initial stage, the melody does not have to be complex. It is enough to repeat the same note several times in a circular manner.
Thus, starting with simple steps and gradually applying new elements, you will be able to develop your skill in improvisation on the guitar.
Pro Tips
The guitar, beyond the classical understanding, is a relatively young instrument with a history of about a hundred years. Even the electric guitar, which appeared relatively recently, has already exceeded 50 years, so the formation of a clear and strict school has not yet taken place. Because of this, professionals recommend that students, after mastering the basics, find their own way and find new ways to improve the sound that no one has invented before.
In addition, mastering the guitar requires patience and perseverance. Repetition of the studied material and regular practice of exercises and songs using a metronome will gradually bring noticeable results.
The regularity of classes is also an extremely important factor. In order to progress quickly and successfully master the instrument, it is better to practice for half an hour every day than to spend four hours of practice once a week.
What’s next
For many who have mastered the guitar and learned to play their favorite songs, a natural question arises: what’s next? And here, an unlimited ocean of opportunities opens up before them to improve their game and create their own music.
To do this, it is recommended to master the basic scales and learn the pentatonic scale, which is a special kind of scale with some missing notes, along with melodic modes. In addition, it is useful to learn how to build chords yourself and come up with your own options for playing. This will open up the possibility of creating beautiful and catchy melodies, and then developing parts for other instruments and turning them into full-fledged songs.
Start creating beats and songs in minutes. No experience needed — it's that easy.
Get started