How to master a song at home

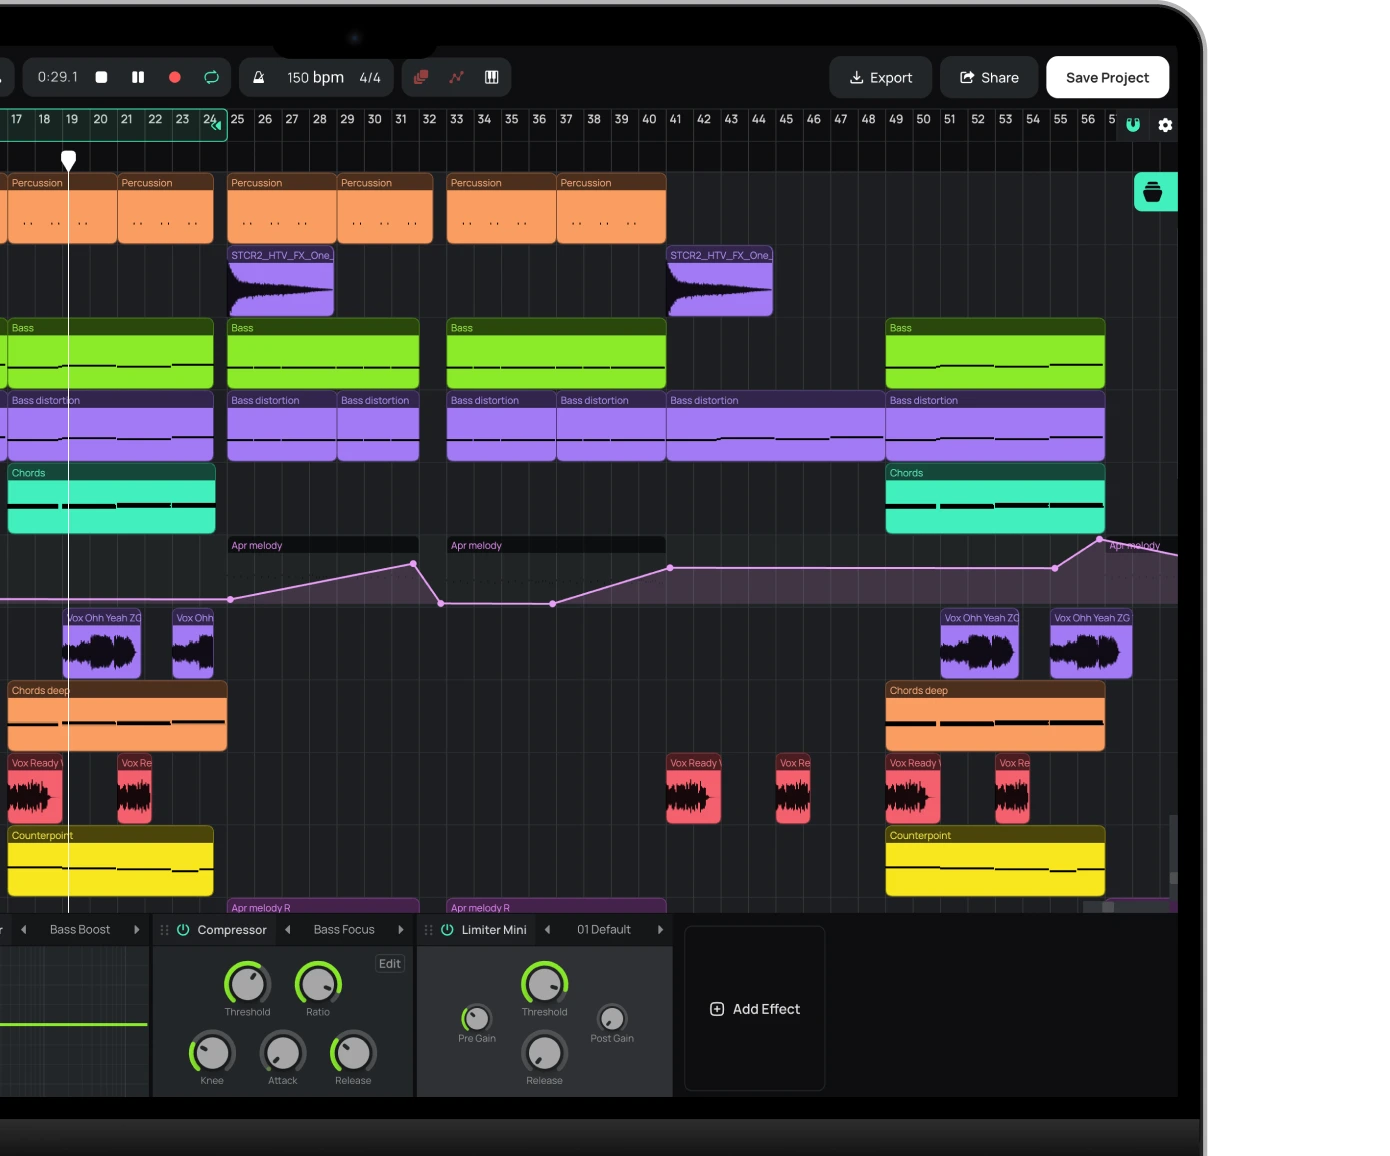
This article will look at using software processors to improve your mix. Although the above image shows the mastering settings in Amped Studio, we will focus on the general principles and possibilities of using software processors in the mastering process.
Everyone wants the best sound quality
Mastering, or finishing, is the last step in creating audio. This is the final high quality version of your audio, after which the creation of CD media and compressed mp3 files begins. If you have not just a good, but a great composition, I still recommend entrusting it to professional mastering engineers. The truth is that specialized studios have the necessary equipment, a dedicated mastering room and high quality monitors that most of us only dream of. Moreover, it is always useful to have another pair of ears capable of giving an objective assessment of the material.
However, most of those reading this article want to try their hand at mastering to improve the sound of CDs they give to friends, or to achieve a quality demo sound recording. Perhaps you’re aspiring to become a sound engineer yourself, creating material for a radio show, or writing music for a small budget short film where the cost of professional mastering isn’t justified. Thanks to software plugin developers, we can turn your home computer into a real mastering workshop. Your result, of course, will not be as good as that of an experienced mastering engineer with equipment worth tens of thousands of dollars, but with enough practice and a developed ear for music, you can significantly improve the quality of your audio material.
It’s time to begin
You’ve probably already tried mastering yourself in your home studio. You have experimented with compression, limiting and EQ to process your mix. And you are right.
Decide on two environments for listening to your material. Obviously the first environment is your room where the computer is located. The second listening environment may be the living room, where the speakers of the acoustic system are located at a considerable distance from each other. This will allow you to hear music outside the studio environment. Speakers a few meters away from you in your living room will sound completely different from monitors a foot away from you in your control room. The goal is to achieve equally good sounding material in both conditions.
Audio file format
After mixing your mix, you need to have an uncompressed stereo file, preferably high resolution and no clicks. Use 24-bit encoding, and if possible, render the mix at 88.2 or 96 kHz sample rates (or higher if your hardware and software supports it). This will allow you to start mastering from a high quality source file. When mastering, it is recommended to use the same DAW that you used when mixing. If you have been using Amped Studio, keep using it. If you plan to use another mastering program, make sure the audio file format is compatible with that program. Currently, no modern program will have problems with 24-bit .wav- or .aif-files with a sampling rate of 96 kHz.
The workflow in most programs will be very similar. You will have a mixer with a fader for your audio file and a fader for the output master channel. On the master channel, you will use various mastering processors connected in a certain sequence.
Notice the Amped Studio volume meters in the image on the left, which show the basic mastering settings. The file is played through the mixer channel without processing. You can add processing using processors, but there is a risk of congestion of the channel, which should be avoided. Therefore, all processors are connected to the master channel, and at the end there is always a limiter that severely limits the volume level. Hard limiting keeps the volume meters from falling into the red zone. In this way, you will be able to achieve the sound volume corresponding to commercial audio recordings.
Volume
Usually your mix will have a fairly low volume. Although individual peaks can reach as high as 0.09, the average loudness level is well below this value. Note that after processing by the three plug-ins, the volume of the sound reaches 0.1, and if I wanted, I could set the limiter to a value of -0.05. This will be your volume. If I play such an audio file in my player, it will sound at the same volume as the commercial tracks.
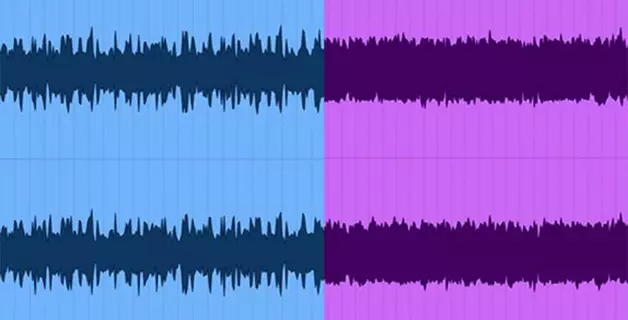
However, everything is not so simple. The example provided actually sounds like rubbish because I’ve destroyed all the audio dynamics. In the image below, we see the audio file before the limiter was applied.
Now consider the audio file after applying the limiter (image below). Notice how it became square. However, none of the peaks reach 0 dB, so technically, in terms of loudness, there are no errors here.
This is an example of the wrong approach. Of course, you won’t listen to me and once you hit the limiter, you’ll immediately try something similar. So go ahead, try it until you see for yourself that such a sound is simply terrible. When working with a limiter, you will always have to find a middle ground between two extremes, and this is the point. You need to decide how much to limit the mix based on your idea of a good sound.
In the picture below you see the UAD Precision Limiter, which in my opinion is the best software limiter available for home studio owners. These are very conservative settings for one of my master projects at a certain point in time. Notice that I’ve increased the level by 3dB, which makes the whole mix 3dB louder. The output level is set to -0.10 to avoid peak clipping. With these settings, the final audio file is almost the same as the original mix, it’s just louder, and there is only a slight loss of dynamics. This is the second extreme. When working with pop songs, you will have to choose between the maximum volume and the dynamics of the song, and the decision should be based on your own perception of the sound, and not just on the sound waveform on the screen. When working with classical music, it is recommended to keep the dynamics as much as possible. And when mastering death metal, your final audio file can look almost square. The more you limit the mix, the louder the quiet parts of the song will sound, and with the maximum limit, the entire song will sound loud. Beginners often ask the question, is there an ideal limiter setting? Yes, it exists, and it is somewhere between the two extremes I described above.
Tonal balance
This is an example of the wrong approach. Of course, you won’t listen to me and once you hit the limiter, you’ll immediately try something similar. So go ahead, try it until you see for yourself that such a sound is simply terrible. When working with a limiter, you will always have to find a middle ground between two extremes, and this is the point. You need to decide how much to limit the mix based on your idea of a good sound.
In the picture below you see the UAD Precision Limiter, which in my opinion is the best software limiter available for home studio owners. These are very conservative settings for one of my master projects at a certain point in time. Notice that I’ve increased the level by 3dB, which makes the whole mix 3dB louder. The output level is set to -0.10 to avoid peak clipping. With these settings, the final audio file is almost the same as the original mix, it’s just louder, and there is only a slight loss of dynamics. This is the second extreme. When working with pop songs, you will have to choose between the maximum volume and the dynamics of the song, and the decision should be based on your own perception of the sound, and not just on the sound waveform on the screen. When working with classical music, it is recommended to keep the dynamics as much as possible. And when mastering death metal, your final audio file can look almost square. The more you limit the mix, the louder the quiet parts of the song will sound, and with the maximum limit, the entire song will sound loud. Beginners often ask the question, is there an ideal limiter setting? Yes, it exists, and it is somewhere between the two extremes I described above.
The picture above shows the Cambridge EQ from the UAD-1 collection. It shows a curve that I used for one of my mixes. Note that low frequencies are reduced from 50 Hz and below to avoid overly deep bass. Then the bass boosts a little in the 60-80 Hz range, and weakens a little at 400 Hz. The high frequencies at the top of the range are smoothly attenuated to make the sound more pleasant to the ear. The Cambridge EQ is ideal for beginners, not only because of its great sound, but also because of its clear frequency curve. To start mastering your material, you need to be clear about the frequency curve and know that each frequency can be boosted or cut. You also need to be aware that certain frequencies can ruin a mix and be able to eliminate them. Any frequency band over-boosted can ruin the mix, resulting in a terrible sound.
Here is another example that uses the UAD Precision Equalizer. In this case, I want to give the whole mix a brighter sound. Note the narrow band boost at 68Hz to boost the bass, and a substantial 4dB cut at 315Hz. High frequencies around 4 kHz are slightly boosted, and at 17 kHz they are attenuated by 1 dB. Mainly adds brightness to the mix by attenuating the booming 315Hz frequency by 4dB. By adjusting just this frequency, I can make the mix lighter or heavier. How would you act in such a situation? This is perhaps the hardest part of mastering – choosing which sound you like best.
One of my preferred EQs is probably the Pultec EQP1A. It has a pleasant sound that you will immediately appreciate as soon as you start adjusting its parameters. This EQ can be used in both the mixing and mastering stages and is great for processing a variety of instruments, including vocals. It has an amazing ability to both amplify and attenuate the same frequency at the same time, which may seem strange at first glance, but actually opens up interesting possibilities for us.
On the left side are the controls for low frequencies, and on the right – for high frequencies. With the attenuator you choose which frequencies to cut or boost. In the picture you can see that the bass is boosted at 60Hz and everything below that frequency is cut off. The treble is boosted by 8kHz, which could have made the sound too harsh with a different EQ, but not with the Pultec! This equalizer must be in your plugin collection!
Compression
Compression is another tool that mastering engineers use to achieve a rich sound. The compressor increases the volume of quiet sounds and reduces loud peaks, making the mix more balanced. Proper compressor tuning allows you to change the mix in such a way that all instruments sound very dynamic, even if they were originally recorded without such expressiveness. If you are interested in learning more about compressor operation, you can read more information here. Mastering engineers are often committed to compressors, as there are moments in every mix where dynamic processing is important.
Another type of compressor used in the mastering stage are multi-band compressors. In fact, they are processors that divide an audio track into three or more frequency ranges and apply compression to each of them separately.
Start creating beats and songs in minutes. No experience needed — it's that easy.
Get started