You’ve just finished recording your amazing composition and it looks like it’s going to be an amazing song. You played it at the highest level, recording and mixing were done professionally. You eagerly burn your new music CD and proudly show it off to your friends. However, after listening to your “masterpiece” on a “branded” disc, you realize that something is wrong with the sound…
What’s wrong with my Song?
The song volume is not loud enough. It seems pale and inconspicuous compared to other audio recordings on CDs. Trying to remix tracks at different volume levels doesn’t solve the problem, and your composition just gets louder, but doesn’t stand out;
The sound of the song is dull. Other CDs sound bright and vibrant. You tried raising the treble on the equalizer, but it made the sound harsher and added unpleasant highs;
Instruments and vocals sound flat, without depth or richness. Commercial recordings usually have a thick sound achieved through compression. With this in mind, you begin to apply compression and turn the adjustments on the equipment. Now your mix sounds a little better: the vocals are richer, but the drums still lack dynamics. This is better, but not perfect yet;
Bass sounds flat and lacks depth. You decide to boost the bass and turn it up on the EQ, but the result is just more noise and fuzziness in the lower frequencies of the mix. The “meat” never appears;
You hear every instrument in your mix, but they all sound scattered and wrong. Your competitors in the recording world create more precise spatial audio that you can’t achieve by simply adjusting the position in the stereo image for individual tracks;
You’ve applied reverb to individual tracks, but they still sound like a collection of instruments scattered at different points. In other recordings there is a kind of common point that brings all the sounds together. This is not just a summation of the reverb of individual tracks, but a “fit” for the entire mix.
If you have no experience in mastering but have access to the Ozone program, you’re in luck. Ozone gives you the tools to achieve exactly the sound you want. Let’s figure out how to do this. While definitions of mastering vary, the purpose of this guide is to prepare your mix for final mastering before burning to CD.
In general, mastering includes the following stages and tasks. Your goal is to create a great initial mix (usually as a stereo file) and add the final but very important touches to it with the help of Ozone.
Think of mastering as the final touch to your mix, the difference between your mix sounding good and a professional master mix. This process may use a band equalizer, a multiband compressor, a harmonic exciter, a volume maximizer, and so on. This process is sometimes called “premastering”, but for the sake of simplicity we’ll call it mastering. Ozone is designed to completely cover this stage of production and give your project the same professional or “commercial” sound you intended when mixing into a stereo file.
Who is OZONE?
Mastering Effects System
From a technical point of view, Ozone is a plugin, but in practice, Ozone provides several modules that provide a complete processing cycle during the mastering process (or, more accurately, “premastering”, since Ozone is only involved in processing, but not in creating the CD, file conversion, etc.). In addition, Ozone includes a system for visually monitoring important aspects of the sound, tools for creating “snapshots” of different parts of your mix, comparing them, and the ability to restore the order of mastering modules within the system.
64-bit Audio Processing
During the audio processing process, Ozone is capable of performing hundreds of calculations for each single audio sample. In a digital system, each of these calculations is limited to a finite precision determined by the number of bits used in the calculation. To avoid rough rounding and errors, Ozone performs each calculation using 64 bits.
Analog Simulation
Ozone is the result of extensive research into analogue modeling, which means the development of digital processing algorithms capable of emulating the features of analogue equipment. Although it is technically impossible to completely digitally replicate analog equipment using only two digits – 1 and 0, Ozone provides compression, equalization and harmonic distortion functions that are in very close agreement with the characteristics of analog devices.
So what constitutes the “character” of analog equipment? There are many papers and articles written on this topic, and there is still no definitive answer to the question of whether the behavior of analog devices can be fully explained. In general terms, analog audio processing involves some nonlinear aspects that a mathematician would consider unconventional and not amenable to rigorous mathematical analysis. However, many people believe that musical sound is more important than mathematical formulas.
An example of such aspects is, for example, the slight phase delay that an analog equalizer introduces into the processed audio. Creating a digital equalizer free of this delay is not technically difficult. However, despite greater accuracy, it may not sound as lively.
This problem becomes especially acute when working with compressors and the tube saturation effect we experience in true tube guitar combos. All of these analogue characteristics come together to create musical warmth, rich bass, brightness, depth and sweet sound. Ozone was developed to recreate these features of analog audio processing.
Measurement and Processing (DSP)
Some sound engineers can do without measuring instruments. It is enough for them to simply hear and understand what they are working on. They can hear the sound and determine its frequency, or hear the level and know when to apply compression. However, for others, including us, each module in Ozone combines audio processing controls with visual feedback via appropriate measurement tools.
When working with equalization, you can observe the entire spectrum of the signal. In the case of compression, you see the signal as a histogram of levels. By expanding the stereo base, you can monitor the phase of the signal. This doesn’t replace your ear sense, but think of it like using a speedometer while driving a car. When you first started learning to drive, you constantly looked at the speedometer. Over time, you developed an instinct and became less dependent on visual control of speed. However, from time to time, you still glanced at the speedometer and were surprised at how fast you were going. Using Ozone you can go through a similar process.
User Interface (UI) Efficiency
The mastering process can be long and tedious. You might be surprised by the lack of any physical buttons in the Ozone program. It is pure software that is not tied to the outdated hardware paradigm of computers from past decades. We’ve spent countless hours making the Ozone as easy to use as possible, while still looking like a compressor from the 1960s.
Basic settings FOR MASTERING
Programs and physical equipment
One important aspect is that during the mastering process you will definitely focus on improving your mix. Programs such as Wavelab, Sound Forge and Audition are designed to work with single stereo files. However, you can process your stereo mix in a multi-channel editor as a single stereo track and master in that format.
We recommend that you refrain from combining the mixing and mastering process into one step, as is perhaps done, for example, in Samplitude v7. You can use Ozone as a master effect in your multi-channel project, but there are two practical problems. Firstly, Ozone requires more CPU resources than regular plugins. Your mixing editor is processing your tracks and trying to manage Ozone at the same time, which can cause your CPU to overload and your computer to freeze.
Secondly, it’s too easy to be tempted to do everything in one session: mixing, mastering, re-arranging and maybe even re-recording. This may be a good idea, but it’s worth remembering that a computer is not as reliable as hardware devices. We recommend separating the recording/mixing and mastering stages. Focus on the overall sound of the mix first, asking yourself, “How would this synth sound with a different tone or chorus?” Then, once the mixing is complete, create a single stereo file and master it as the final step in processing your composition.
Mastering Effects
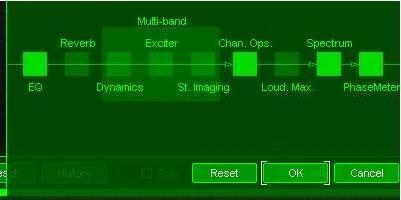
The mastering process typically uses a limited set of specific effects. Compressors, limiters, and expanders are used to control the volume dynamics of the entire mix. Multiband dynamic effects are used to adjust the dynamics of specific frequencies or instruments, such as adding punch to a bass guitar or warmth to a vocal, as opposed to single-band compressors that cover the entire frequency range of the mix. Equalizers are used to correct tonal balance. Reverb can add fullness to the sound of a mix, complementing reverb effects that may have been applied to individual tracks. Stereo field shaping effects can adjust the width and spatial characteristics of the sound field. Harmonic excitation effects can add presence or “brightness” to a mix. Volume boosters can increase the overall volume of a mix while controlling peaks to prevent clipping. There are many ways to order these effects, and there is no one “correct” order. In Ozone, by default, the master effects are ordered as follows (signal path in Ozone):
Multiband stereo field formation (Multiband Stereo Imaging);
Loudness Maximizer.
This order can be customized by you at your discretion. In fact, you can experiment with different signal processing routes. The only exception that we can recommend in all cases is that if you are using a Volume Booster, then it should be at the end of the processing chain.
Seven sentences during mastering
Before you dive into a mastering session, here are seven rules to keep in mind from time to time:
Find a colleague who can also master your mixes. In most project studios, the same person plays multiple roles: performer, producer, sound engineer, and master engineer. However, it’s always helpful to have someone who can listen and evaluate your mixes and mastering. Or find someone you craft for and switch ideas. Remember, you are always too close to your own music. You may notice details that others will miss, and you may miss things that others will notice;
Take regular breaks and listen to other CDs. Refresh your ears with other musical materials;
Change your location while listening. Studio monitors are directional and the sound can change greatly depending on your position. Move around the room and listen to music from different points;
Listen to your mix on different speakers and systems. Record several versions of the mix and listen to it on your home stereo or in your car. Don’t get too caught up in the small differences, but pay attention to the overall sound of the mix across different systems;
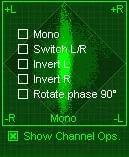
Check how your mix sounds in mono. Make sure that the sound is preserved when the phase is reversed on one of the channels. People can listen to your music in a variety of ways, and this will help you see the quality of your work as a sound engineer. Ozone provides a quick mono compatibility check using the “Channel Ops” button. You can quickly switch the mix to mono, change the phase of the left and right channels to check.
Listen to the monitor at normal volume levels, but check the mix at higher volumes from time to time. When you listen to music at low and medium volume levels, you hear more midrange frequencies (where the ear is most sensitive) and less low and high frequencies. This is due to the so-called Fletcher-Munson effect, which means that different frequencies are perceived differently depending on the playback volume level;
When you are sure that everything is done, put aside your work and go to bed. Listen to your mix again the next morning.
Equalization (EQ)
A good starting point in the mastering process is an equalizer. Although most people know how equalizers work and what they can do, it can still be difficult to achieve balance in the mix as a whole.
What is the Purpose of EQ in the Mastering Process?
When we strive to make our mix sound great, we work hard to achieve “tonal balance.” You’ve no doubt already taken care of each instrument, carefully adjusting the equalizers in the process of preparing and combining all the tracks into one mix. Now our task is only to improve the overall sound, giving it a more natural sound. This may be easier said than done, but there are general techniques that can help you achieve acceptable tonal balance.
EQ Principles
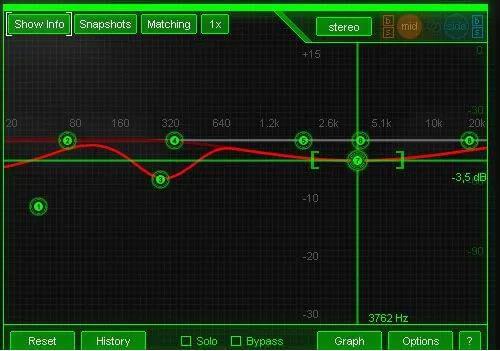
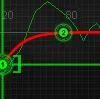
Here we will introduce you to the basic principles of equalization before delving into this scientific field. There are many different types of equalizers, but their common purpose is to boost or cut certain frequencies or frequency ranges. We’ll focus on parametric equalizers, which provide the greatest level of control over each frequency range. Parametric equalizers typically consist of several bands. Each band is a separate filter, allowing you to raise or lower frequencies within its range. By combining different bands, you can create a virtually endless number of EQ configurations. For example, in the image below you can see the equalizer screen in the Ozone program. There are 8 sets of arrows representing the 8 stripes. One of the bands is selected at around 3762 Hz and reduced by -3.5 dB. The bright red curve shows the overall effect of all frequency ranges, while the darker red curve reflects the curve of the selected frequency range indicated by the cursor.
We’re avoiding the in-depth details of adjusting parametric EQ parameters, assuming you have an understanding of them. We also won’t dive into the EQ control options, as it’s quite simple and intuitive. If you are more comfortable working with numbers rather than visual graphical representations, then the Ozone program also has corresponding functions.
Let’s start the correction from the “Middle” of the Mix
Listen and try to identify any anomalies that may arise. Start with the mids (vocals, guitar, keys, etc.) as they are usually the “heart and soul” of the song. Do you hear “mud” or fuzzy sound? Perhaps the sound is too rich or barrely? Or is the sound too harsh? Compare your mix with other songs or commercial CDs. Almost all anomalies can be described as follows:
If there is excess dirt or fuzziness, try lowering frequencies in the 100 to 300 Hz range (Band 2 defaults to 180 Hz in Ozone). Reduce the level a few decibels, and if this does not help, look for the problem during the mixing stage;
If the sound seems nasal or barrel-like, reduce the frequencies in the range of 250 to 1000 Hz (Band 3 defaults to 520 Hz in Ozone). Remember to adjust the level within 3-6 decibels, avoiding too steep adjustments as they may indicate an error during the mixing or recording stage;
If the sound is too harsh, it may be caused by frequencies in the range of 1000 to 3000 Hz. Try lowering this band a few decibels (Band 4 is set to 1820 Hz by default in Ozone).
We hope that applying one or two bands in these areas will help improve the midrange sound. Remember that you can highlight specific ranges by using the Alt+click key combination to highlight and evaluate them. In some cases, you can also start by raising the level in a certain range to highlight it, and then lower it to more accurately hear problems in that area.
The most natural sound is usually achieved with wide bands (Q-factor less than 1.0). If you are using too narrow a filter or too high a decibel value and your attempts at correction are not producing any improvement, go back to individual tracks and try to find and fix the problem there.
Also remember that your ears will quickly adjust to changes in EQ, and you may think the difference is more pronounced than it actually is. Comparing before and after small changes to the EQ can help prevent the levels in the bands from being adjusted too radically.
EQ Principles
When comparing your mix to commercial versions at this stage, you may be tempted to increase the bass with the EQ. However, it is worth resisting this temptation. Don’t worry, your mix will still get the low-frequency sound it needs, but we plan to do this using multi-band compression at a later stage in mastering. We think it makes sense to use an equalizer as a filter for frequencies below 30-40 Hz. Some audio fans may express concern about this, arguing that we can hear frequencies as low as 20 Hz and that some musical information may be lost. People generally think of “bass” as being between 50 and 100 Hz, but… sound in the 20-40 Hz range can usually be smoothly reduced to 0 decibels. The benefit of this is that you can get rid of unnecessary low-frequency rumble and noise that could overload your volume levels.
Remember that in the case of bass and any EQ changes, every action causes an opposite reaction. If you increase one frequency, it may mask another. Conversely, a decrease in one frequency may give the impression of an increase in another. Every EQ change you make can affect the perception of the overall tonal balance of the entire mix. Bass guitars and kick drums can cover a wide range of frequencies. For example, the “boom” of a bass drum may center around 100 Hz, but the attack is typically in the 1000–3000 Hz range. So sometimes you can get a clearer “bass” sound by concentrating on a higher attack frequency, as opposed to the area around 100Hz which can create “mud”.
High
Finally, let’s pay attention to the high frequencies in the mix.
Don’t be surprised if the sounds seem a little dull or muffled when you compare your mix to a CD. You can correct this by increasing the high frequencies with low Q (wide frequency range) between 12-15 kHz. But there is another way: do not change anything in the equalizer and add brightness and ringing using a multi-band harmonic excitation device;
Be careful when increasing levels in the 6000-8000 Hz range. This can add some “presence” to your sound, but can also cause annoying sibilant or hissing sounds in vocals. (see section on multiband dynamics for “de-essing” or sibilant control);
Noise reduction is a big topic, but sometimes you can reduce extraneous tape noise or other noise by cutting out the high frequencies in the 6,000 to 10,000 Hz range. (You can eliminate or reduce noise using multi-band gating or specialized third-party noise reduction tools);
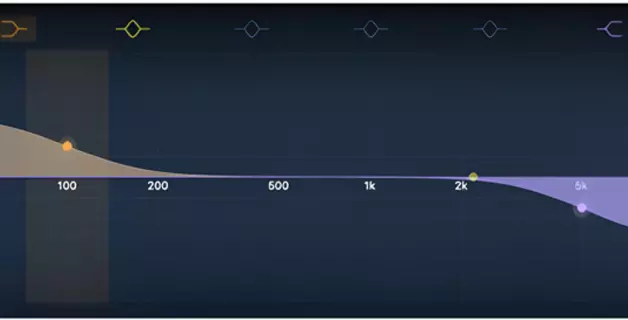
Pay attention to the overall tonal balance – the high frequency spectrum, which gradually decreases.
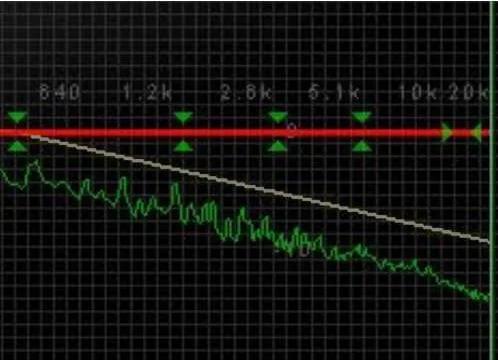
Pay attention to the “spectrogram” of the sound, this is an image that is characteristic of almost all commercial mixes. The song used in this case is “Hate to Lose Your Loving” by Little Feat. However, if you have Ozone, try analyzing a few CDs and you might be surprised to see how the frequencies follow the same slope. This characteristic is so important that we included it in Ozone. If you don’t see this line on your screen, simply click on the “Snapshots” button in the EQ section and select “6 dB guide”. The sloping gray line will be your reference for comparing the high frequencies in your mix.
EQ with visual feedback
A spectrum analyzer gives us the ability to see and hear sound simultaneously, which greatly improves our perception of different frequency regions and is an important tool for sound engineers. In Ozone, the spectrum analyzer is represented as follows: the green line displays the spectrum or FFT (Fast Fourier Transform), calculated in real time in the range from 20 Hz to 20 kHz – the limit of human hearing.
Peak Monitoring: Allows you to track and store peaks in the spectrum. (Note that in Ozone you can reset the peak display by clicking on the spectrum image);
Average or Real Mode: If you are concerned about peaks or narrow frequency bands, you can control the spectrum in real time. To compare mixes and visualize the overall tonal balance, select this mode;
FFT Size: Without going into mathematical detail, just remember: the higher the FFT size value, the more accurate the frequency information provided by Ozone. An FFT size of 4096 is usually a good choice, although a higher value can be set if necessary for improved detail, especially when working with low frequencies.
Overlap and Window: These are the selection options. Typically, overlay settings of 50% and windows in Hamming mode give good results.
Summary:
Try reducing the signal level in a given frequency range, instead of increasing it;
A change of more than 5 decibels may indicate a problem that is difficult to correct with an equalizer. In this case, consider reverting to multi-channel mixing;
Use as few stripes as possible;
Apply smooth parametric EQ curves (wide frequency range, low Q);
Remove all frequencies below 30 Hz to get rid of rumble and noise in the low-frequency range;
Consider using multi-band dynamics processing (multi-band compression) to add depth to the mix, rather than boosting the low frequencies with an EQ;
Try to highlight the instrument(s) by raising the level of their attack frequencies or harmonic frequencies, rather than increasing the fundamental “lowest” frequencies. Extreme increases in the fundamental frequencies of each instrument can make your mix look cluttered;
Consider using multi-band harmonic excitation instead of increasing the treble portion with EQ to add brightness and liveliness. This advice, like everything else in this guide, is subjective and depends on context. Try comparing harmonic excitation to gently raising the EQ in the 12-15 kHz range;
Trust your ears and eyes. Compare your mix with others using both senses.
Mastering reverb
What is the purpose of reverb in mastering?
If you have created what you consider to be a satisfactory reverb space on individual tracks, the result will be a single sonic canvas. In this context, there is no need to add reverb at the final mixing stage. However, in certain situations, a little mastering reverb can add the final harmony to the entire composition. For example:
If recording live in an acoustically unsuitable room where unpleasant decay or room resonances may occur, adding a layer of reverb to the final mix can help eliminate many room acoustic issues;
A short reverb can add a sense of volume to a mix. In this case, you are not trying to significantly change the volume of the mix, but rather creating a brief, low-level reverb that complements the sounds of the composition;
Sometimes the mix lacks a sense of spatial cohesion. Each track or instrument seems to be in its own space, but they are not combined into one soundscape. In such cases, the mastering reverb can serve as a kind of “varnish” that blends the tracks together.
Principles of Reverb
In simple terms, reverb simulates the reflection of sound off walls, creating a rich echo or delay of the original signal. When sound bounces off walls, there is a time delay before it reaches our ears. Additionally, as the signal is delayed or reflected, the number of these reflections increases but their intensity decreases, creating what is called a “dissolving” sound, as opposed to a clearly visible echo.
There are many types of reverbs such as plate, spring, reversing and gate reverbs. In the context of mastering, we typically classify reverbs into two main categories: studio and acoustic. This is not a strictly technical division, but rather a functional one.
An acoustic reverb simulates a real acoustic space. It is ideal for placing individual instruments (or audio tracks) in such a virtual acoustic space. You can clearly hear “early reflections” from the original signal bouncing off nearby walls and then fading away with later reflections. This way you get an accurate representation of the instrument’s location in this virtual space.
On the other hand, studio reverbs are artificial models of space, and although they cannot completely recreate the sound of real spaces, they are widely used in commercial studios. They don’t exactly imitate real spaces, but they do provide a variety of effects that add richness and beauty to the song. With them, you don’t create an image of the actual location of the musicians playing in a real acoustic space, but rather fill the space of your mix or track with sound.
Using reverb in Ozone
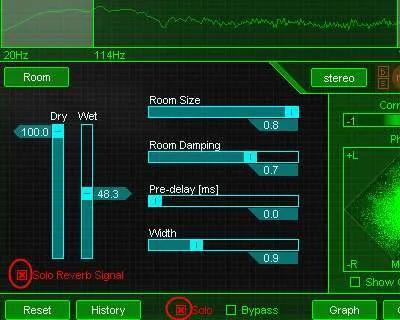
Ozone includes a “studio” reverb that uses a 64-bit algorithm designed to create a rich, dense sound. This reverb has been specifically designed with a minimal set of control parameters to ensure optimal performance. There are no specific reverb control effects, which might be useful when working with individual tracks, but they are not required for already mixed tracks. Think of this reverb as a “cover” for the reverb in your finished mix. To better understand the sound of the reverb in Ozone, you can load a song and solo the reverb module (so you’ll only hear its effect).
First, increase the WET parameter, which controls the amount of reverb mixed into your mix.
The Room Size parameter, in an “acoustic” sense, determines the size of the virtual room in which your mix is placed. However, given that our “studio” reverb has no absolute analogy to a real room, a more accurate technical definition might be “decay time”. Larger values for this parameter provide longer reverberation times;
If you want to polish up the sound of your mix with reverb, then it might be worth trying values in the 0.3 to 0.6 range. A general tip is that if you already have reverb on the individual tracks (and intended for it to be heard in the final mix), then try setting the reverb space size in Ozone to be slightly larger than the reverb on the individual tracks. You can always adjust the level of the mastering reverb using the WET slider, and a longer decay time on your mix will bridge the reverb sounds, which should ideally improve the quality of the mix. Typically we use WET values ranging from 5 to 15 (with DRY set to 100);
Another interesting effect can be achieved by using a small virtual room size, around 0.1 to 0.3, and raising the WET slider slightly to 20 or 30. In some cases this can create a richer sound by adding a short reverb or doubling the mix. However, this can also make some mixes less quality, so it makes sense to leave the room size setting around 1.0.
Room Width. The mastering reverb in Ozone is, of course, a stereo reverb. It does not reproduce the exact same reverb signal in the left and right channels, as this will sound unnatural. Instead, it creates a spacious and “spread out” sound by returning slightly different signals to the left and right channels. The “Room Width” slider allows you to control this variety. In acoustic terms, you can think of this as the width of the space, or at least the width of the reverberated signal:
In most cases, it is enough to use the “Room Width” range from 1.0 to 2.0;
By increasing the “Room Width” you will hear more reverb. In this case, try decreasing the “Room Size” value. This may seem strange, but let’s try it: for example, if you set “Room Width” to 3.0, you will hear the desired effect. The ideal balance is at least a balance between these two parameters.
Damping. In a real room, sound decays gradually, but not all frequencies decay at the same rate due to the acoustic properties of the walls of the virtual space. Different wall materials have different absorption properties, and the Damping parameter allows you to control the damping of high frequencies in the reverb signal. Low values will make the reverb sound bright, while higher values will make the reverb sound less bright. We usually set the “Damping” value in Ozone to be between 0.5 and 0.8.
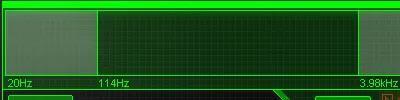
Frequency balance of reverberation. High and Low Cutoffs (High and Low Pass Filter). You may have noticed that our mastering reverb has a spectrum with two vertical lines (see image). These lines are not the same as what we see on other modules, they represent the frequency cut filters of the reverb signal in this module. You can move the lines left or right, changing the frequency range of the reflected signal that is returned and mixed into your mix. The area between these lines represents the range of the reverb signal.
Please note that when you move these lines, allow a few seconds for the filters to fully process the signal. Ozone uses analogue modeling of cutoff filters, and it takes a while after moving the lines to hear the fully processed result.
When it comes to setting the cut filter, it’s important to remember that the mastering reverb in Ozone already has its own treble attenuation based on our setup, so you don’t always need to adjust the treble manually. However, by moving the right line to the left, you can reduce some unwanted artifacts such as sibilance in vocals, since the reverb-treated high-frequency signal can accentuate these artifacts. We usually start with 100 Hz on the left and 5 kHz on the right.
Pre-delay
Reverb delay.
General tips for using reverb in mastering
Like any effect, it can be easy to get carried away with reverb.
Remember to periodically turn off the mastering reverb to evaluate the true character of the dry mix. It’s important to remember that reverb should create a feeling, not just be heard in the mix (and this isn’t just true for the mastering process);
If you need to add more reverb, note that you have several options to choose from. You can increase the mixing level of the “WET” (the reverb signal into your mix) and also increase the size of the virtual space (the length of the reverb). You can also change the width of the virtual space. Adjust each parameter individually, and remember to use the “History” (or “A/B/C/D”) window to determine which parameter was most effective;
Change the location of the reverb in the mastering chain. By default it is located before multiband modules. Try moving it after the multiband compression module to achieve a different effect. In this case, you are adding reverb to an already compressed signal, rather than compressing the reverberated signal. You might like the sound of a compressed mix with added “air” on top;
Compare your mix with commercial songs. A lot depends on the sound you want to achieve;
If you are using a wide reverb (with a room width of 2.0 to 3.0), pay attention to the phasing. Use the options (especially the mono switch) to check if the integrity of your mix is lost in mono.
Multiband effects (hereinafter referred to as MP)
A standard compressor or stereo base extender can be useful tools for processing your mix. But your options become much more interesting when you work with multi-band effects. Here you can apply processing in individual frequency ranges. This means you can dynamically compress just the bass in the mix, or only expand the stereo image in the midrange.
Ozone includes three multi-band effects: a dynamics processor, a stereo display control, and a harmonic exciter. What is the concept behind these devices? Multiband effects have been used for many years in computer hardware. Engineers realized long ago that they could “filter” low frequencies with an EQ, send the filtered EQ output through a compressor, and then mix the compressor-processed signal back into the mix. Software products of this kind eliminate many of the difficulties of using multi-band effects, and compete mainly with each other. Essentially, the program breaks your mix into frequency domains, processing them independently, and then combining them back together again. To sound natural, the project must have very high precision to compensate for errors, splits, processing and recombining. Ozone was developed to perform this treatment and maintains a completely natural and transparent sound.
Using MP effects in Ozone
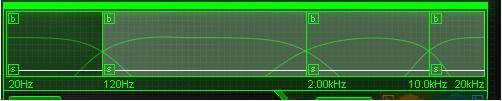
Before you dive into the world of multi-band effects, the first thing you should do is listen to your mix and determine where to set your crossover points. Load your mix and activate one of the multiband modules, such as the Multiband Harmonic Exciter. At the top of the screen you will see a spectrum divided into four bands. The vertical lines represent the crossing points.
The same crossover points or ranges are used in all three MP modules and this is done to minimize phase shifts and distortion.
MP installation
So where exactly should you set the frequency bands? The concept here is quite simple: you need to experiment with splitting your mix so that each frequency region covers the important frequency components of your mix. For example, our typical settings look like this:
Range 1: This range is set from 0 to 120 Hz and focuses on enhancing the meat of bass instruments and drums;
Band 2: This range is between 120 Hz and 2.00 kHz. This area typically represents the fundamental frequencies of vocals and most “mid” instruments, and can be called the “warm” zone of the mix;
Range 3: 2.00 kHz to 10 kHz, often containing cymbal sounds, higher harmonics of instruments, and “sss” sounds in vocals. This is the area that people typically perceive as “high” and adjust on their players;
Band 4: The highest frequency range, 10 kHz to 20 kHz. This range usually gives the mix an airy feel. It is important to remember that instruments can have harmonics and harmonics that can extend over several octaves. Your job is to experiment with dividing the mix into frequency bands. Listen to your mix by clicking the “M” button for each band in turn. Now you can hear exactly what frequencies are contained in each highlighted band. Experiment with their settings to highlight or refine the areas you want in your mix. Don’t forget that your computer and program require 1-2-3 seconds to “think” about your changes.
Basic principles of MP
If you can discern the “components” of your mix covered by each of these bands, then you’re on the right track. But if you’re not sure where exactly to install them, don’t worry. Once you start applying processing in each of these bands, your intuition for tuning them will develop. The basic principles here are quite simple:
Multi-band effects are applied independently on four separate bands;
Each band should represent a musical area of your mix (bass, midrange instruments/vocals, air, etc.);
You can adjust the intensity of each of these zones;
You can adjust each frequency range to highlight one of the remaining bands in the mix.
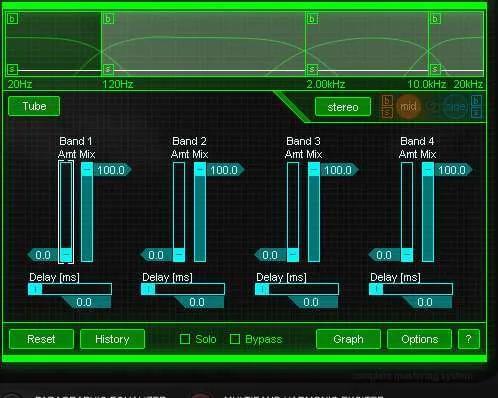
MP harmonic excitation device
Let’s start by looking at the Multiband Harmonic Exciter. It’s an easy-to-follow effect that takes on enormous power when used as a multi-band effect. But let’s first understand the basic operating principles of the Harmonic Exciter device.
The Harmonic Exciter is used to add ringing or presence to a mix. This sound may have been familiar to many since the 80s, and it remains relevant to this day. Beginners could try to achieve the same “sound” by raising the high frequencies, but the result, unfortunately, will not be the same.
There are many Harmonic Exciter strategies available today, from waveforming and signal distortion to short band-level delays. Distortion “in small doses” is not necessarily a bad thing. Properly applied distortion, with care, can create harmonics that add ringiness to a mix.
Harmonic Exciter in Ozone is modeled after the lamp saturation effect. This phenomenon is now called saturation. Research has shown that when a tube is overloaded, it creates a certain kind of harmonic distortion in the original sound that gives it an amazing musicality. This distortion creates additional harmonics, adding presence or brightness to the sound while maintaining natural analog characteristics. Therefore, boosting the high frequencies with an EQ cannot create the same effect, since it will only raise the already existing harmonics, while the saturator creates them.
It’s very easy to go overboard in this matter. A mix may sound good at 3.0, and you might think bumping it up to 4.0 will make it even better. However, once you get used to this new sound, you may be tempted to push the harmonics up to 5.0, so be careful not to overload the mix:
As always, compare with commercial records. Yes, in some cases they may also love this effect, but it depends on the genre and sound you are working with. What sounds good in hip-hop may not be appropriate for a jazz group;
Try listening to the “excited” mix for a while. Listen to the Harmonic Exciter on its own first, then in the context of the entire mix with the effect. Perhaps after a while you may find that it sounds tiresome or even harsh and annoying.
Use of Harmonic Excitation Device in Ozone
This is likely one of the easiest effects to master, and we caution that its ease can lead to overuse.
There are two controls available on each of the four bands. In most cases you will be working with the “Amount control” knob. Additionally, Saturation is typically applied to the top one or two bands, although there are exceptions where this effect can be applied in small amounts to all four bands.
Let’s start by turning on your mix and gradually increasing the “Amt” slider in Band 3. After a certain point, you will clearly hear the effect, but there will definitely come a moment when the sound becomes sharp and annoying. Note the position of the slider and return it back to 0.0.
Then start moving the slider in Band 4. Your ear may be able to tolerate higher values better than Band 3. Take advantage of this when applying Exciting: High frequency regions tend to be more resistant to saturation.
The “Mix” slider can remain at 100. This parameter determines the level of the signal that is saturated and mixed with the original signal (similar to the Dry/Wet control for this effect). In other words, the “Mix” slider controls the amount of harmonics created, while the “Amount” controls their level.
Since you are working with multi-band processing effects, you can use the bypass function by clicking on the letter “B” (Bypass – turns off all effects for a given band). Please note that the actions of “Mute” and “Bypass” are not identical! Remember that in Ozone, “bypassing” a band means bypassing all processing steps for that band, including multiband harmonic excitation, stereo imaging, and multiband compression.
Although the multiband harmonic excitation device sounds good and has simple controls, keep the following tips in mind:
Often, saturating the high frequencies will produce the desired result. However, since Ozone simulates analog saturation, you can emulate this effect even at lower frequencies. In this case, try adding a little saturation to all the bands by keeping the “Amt” slider low and constant on each one;
If you want a dirty bass sound, experiment with low-end saturation. However, if you simply want to boost the bass, then it is better to use a multi-band compressor, as the harmonic excitation device can sometimes add the unwanted muddiness associated with bass harmonics;
By default, the multiband harmonic excitation device is located after the multiband compressor. Remember that each module, depending on the quality of your recording and the effects applied, can add additional noise to your mix. As saturation levels increase, unwanted noise may appear at high frequencies. In such cases, you can try moving the saturator in front of the dynamics module (click the “Graph” button), which we will talk about later.
MP stereo expander
During the development of Ozone, we spent many hours listening to songs, often unmastered, and analyzing them. Some of them were scaled beautifully, but there were also a lot of tracks that needed to be given that “Ozone” sound. We especially paid attention to the problem of stereo imaging in these independent projects.
Creating a high-quality stereo image is not an easy task. It’s difficult to achieve a balanced mix that also feels spatial. We always strive to enrich the sound of a mix using effects and processing, but this can reduce clarity and blur the soundscape. The second aspect, compared to many commercial recordings, is that they often have a wider stereo field or other enhancements. Just as you can’t achieve rich sound with an equalizer, expanding the stereo image can’t be achieved simply by setting the stereo position of individual elements of the mix.
We often emphasize not to overuse each effect when we start explaining how blocks work. Stereo widening is no exception. Modules in Ozone are designed using high-quality processing algorithms to maintain natural sound. Therefore, it is important to ensure that the effect is not overdone and does not go beyond the natural sound.
The multiband stereo imaging module in Ozone essentially combines two important principles in one module. The first of them is the expansion of the stereo base. This is a simple effect that increases the difference between the left and right channels by subtracting them from each other. The signals present in both channels are reduced. Since the same signals in both channels are perceived as the “center” of the sound field, this processing results in a wider stereo effect. This “channel subtraction” effect is easy to create, but Ozone’s real strength lies in its multi-band approach to stereo processing. Expansion of the stereo base over the full frequency range does not cause phase distortions and artifacts associated with signal summation.
However, if you are not careful when applying the stereo widening effect, it may lead to undesirable results. By increasing the difference between the left and right channels, we can lose the “middle”. In the midrange, this can create an impression of “emptiness” in the sound or an acoustic “hole” in the mix. Especially in the low frequencies, especially if the bass and kick drum are in the center, you can lose the low end. But don’t worry, we have a solution for this problem – a multi-band stereo expander that allows you to control the amount of expansion in each frequency range. It is not surprising that all these opportunities are available in Ozone.
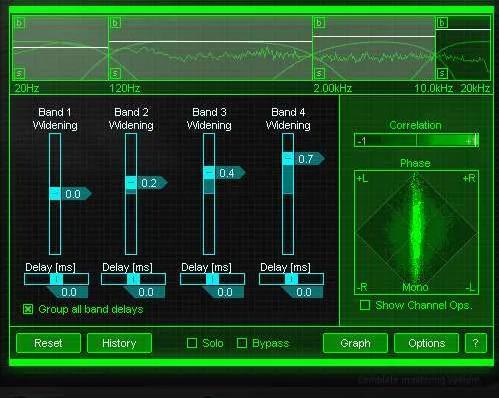
Using Stereo Enhancement in Ozone
This module is as simple as the harmonic excitation device.
Each frequency range has its own stereo expansion control. A level of zero indicates no extension in that frequency band. Positive values represent an increase in stereo effect, while negative values represent a “reverse” widening or moving the channels closer to the center.
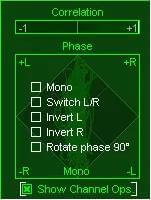
When working with the stereo expander, pay attention to the controllers on the right. The horizontal bar is a phase correlation indicator (or phase indicator), and below it is a radar-type window called a vector analyzer. Both elements are used to provide information about the channel separation width in your mix.
Phase Meter
The phase indicator shows the degree of similarity or “correlation” between the left and right audio channels.
When the sound in the left and right channels is identical, the indicator is located to the right of this scale. If the left and right channels are exactly the same, the correlation value is +1 and the indicator is at the rightmost position.
If the left and right channels do not match or are very different, the indicator moves to the left corner. In the case where the phases of the left and right channels do not match, the correlation is -1, and the indicator is in the extreme left position. Over time, the phase of the signal in the channels may change, but the indicator retains a trace to show the correlation history. A bright white color indicates that the indicator has spent more time in that area. Therefore, after listening to the mix, you will be able to quickly detect phase correlation extremes as well as the most common values.
Note that you can reset the indicator by clicking on the scale. Most music recordings have correlation values between 0 and +1. Momentary deviations to the left are not always a significant problem, but may indicate possible problems with monocompatibility. You can quickly check phase compatibility in mono by clicking the Show Channel Operations advanced options. This menu allows you to convert the signal to mono, invert the polarity of the left or right channels, and swap them.
Vectorscope
Vectorscope also provides visualization of the audio signal.
Typically, a vector indicator is used to display a stereo recording. It is usually taller than wide. Vertical shapes on the display mean that the left and right channels are identical (approaching a mono signal, which is represented by a vertical line). The horizontal shapes in the image indicate a large difference between the two channels, which makes the sound appear wider, but this can also cause problems with mono compatibility.
Options in vectorscope:
You can click on the phase meter to refresh the picture;
If you want to minimize this display, you can turn it off in the Options Screen menu.
Stereo delay
We saved the most exciting part of the stereo display module for the last section. Ozone includes a stereo delay control that allows you to adjust the delay between the left and right channels. At first glance, this delay may not seem to add much to the mix, but using a multi-band delay can create amazing stereo effects.
Of course, you know that in order for the sound to sound from the right, you must increase the volume of the right channel. This is true in the sense that sounds heard on the right side are louder in the right ear. However, there is another aspect. Sound coming from the right reaches the right ear faster than the left. There is a short delay before it reaches the left ear. By adding a delay of a few milliseconds, you can effectively move sections of the mix around the stereo field.
To experiment with stereo imaging using delays, try moving the delay control left or right. By default they are linked so they move in sync. You will hear how the mix reacts. If you’re mastering a live acoustic recording made with a pair of stereo microphones, this technique can be an effective tool for controlling the stereo image without changing the channel balance. Thus, delay can be very useful when mastering live recordings.
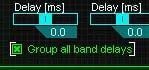
This isn’t the only creative way to use delay. Click on “Group all band delays” and ungroup the delays. You can now use the delay between the left and right channels for each band as you wish. By moving the delay control to the right you delay the right channel and to the left you delay the left channel.
If you expect to hear an “echo”, you won’t hear it. This delay is very short, ranging from 0 to 30 milliseconds. In this time range, you will not hear two different signals, the difference between which would be perceived as an echo.
So what can you do about the delay? Try moving the location of the bass using a delay in Band 1. You can change the bass experience without changing the stereo position. Or try shifting Band 3 to the right and Band 4 to the left to create a treble extension effect.
Useful recommendations for setting up the stereo field:
You can increase the expansion ratio for high frequency ranges;
Even applying “negative extension” to the low ranges can be helpful in keeping the bass and other instruments centered. Please note that frequencies below 200 Hz are poorly felt in space and their source is difficult to recognize by the human ear. This is why we usually only have one subwoofer rather than a pair;
Don’t rely solely on headphones, as they may give a distorted impression of the stereo effects in your mix. Be sure to check the sound on control monitors, as headphones will always have a wider stereo picture due to the lack of cross-sound between channels;
Consider using a delay for the low frequencies instead of adjusting their stereo position;
Remember that stereo widening and multi-band delay are two different effects, but changing one can affect the other. There are no hard and fast rules, but it’s important to know that different stereo widening settings can affect the perception of latency;
Regularly check mono compatibility of channels using the Ops menu.
MULTIBAND DYNAMICS
Mastering a mix using a compressor, limiter, and expander is probably one of the most inspiring parts of the mastering process, and it’s the transformation that sets apart a “basement recording” from the sound of a commercial mix. Learn carefully how multi-band dynamics processing works, and believe me, it’s worth it.
Dynamic effect is a very subtle thing, at least if it’s set up correctly. It can’t be clearly heard like a flanger or vocoder, for example, but its influence is felt in the mix;
The compressor usually does not run continuously. Most of the time you could listen to his action, or rather lack thereof. The histograms and compression controls offered in Ozone can be invaluable tools in this process;
Do not assume that all compressors are equal in their characteristics and parameters. Despite the simplicity of the concept and operating principle (reducing the signal level when exceeding a certain threshold), the quality of compression can vary significantly depending on the model.
Smart use of a quality compressor can even out volume peaks and valleys in your mix, making the sound tighter, smoother, or just evenly loud, if that’s your goal.
Compression Basics
Ozone has a feature-rich multi-band dynamics processor. Let’s look at the principle of its operation in the simplest case, namely the operation of a single-band compressor.
To get a more visual idea of how compressors work, let’s imagine a sound engineer whose hand is adjusting the volume level of an incoming signal, and whose eyes are watching the level indicator of this signal. When the level exceeds a certain value (threshold, as it is called in compressor terminology), the engineer begins to reduce the level.
The degree of reduction in level is called “ratio”. Larger values mean that the engineer (or compressor) reduces the volume more when the level exceeds the threshold, and this causes the signal level to fluctuate around the threshold. For example, if we set the ratio to 3:1, then if the signal level exceeds the threshold by 3 decibels, the engineer will reduce it so that the output signal rises above the threshold by only 1 decibel. Thus, even if the signal has exceeded the threshold, it will change much less without compression.
This comparison may help you better understand the use of visual dynamics controllers in Ozone.
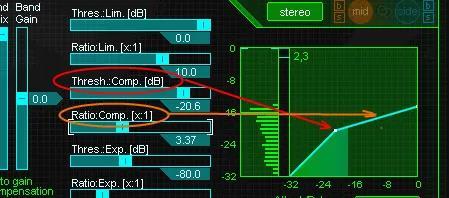
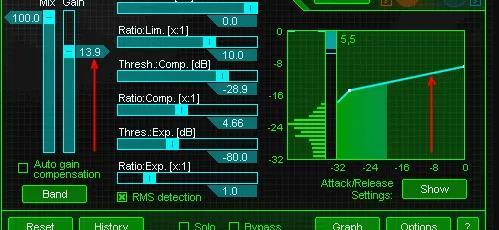
Currently the compression ratio is 10:1. If the input signal exceeds our threshold (-25.2 dB) by 10 dB, then we will receive only 1 dB at the output. The compression graph has become much less steep or more horizontal, indicating that the output signal (Y-axis) will not change much despite the increase in input level (X-axis).
Let’s look at what we got. Most software compressors measure compression in decibels (dB). But these are just raw numbers and don’t tell you much about how compression affects a particular mix, since every song is unique. Therefore, it is important to be able to set the threshold, taking into account the entire pattern of peaks and valleys in the signal level in the mix. In this context, the developers provide us with an additional tool for controlling compression.
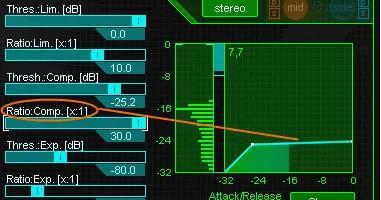
Ozone combines a histogram control, which shows the “history” of signal levels, and a compression curve, which reflects the process on a real scale. The histogram level shows you where to set the threshold, and the compression curve lets you know when compression is occurring.
We set the threshold at a certain point, and everything above this value will be compressed. Don’t worry about decibels and numbers, you can rely on your eyes (and ears) to set the threshold fairly accurately.
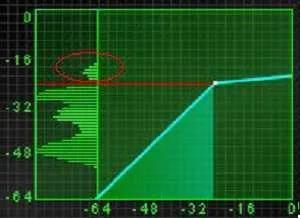
The histogram level is located on the left. Think of it as a signal strength indicator with memory. As the signal level changes, the histogram displays history, showing where what levels were, represented by wider lines. In this chart we can see that the signal level was high at -48 dB and ranged from -20 to -32 dB. The area highlighted with a red oval is our target for compression.
This illustration shows how the signal exceeded the threshold and began to be compressed. Simple, isn’t it?
We promised that you could increase the volume of your mix using a compressor. At first glance, a compressor essentially reduces the signal level by smoothing out its peaks. However, the added benefit here is that you can increase the overall signal level without the risk of distortion since the peaks have been softened. This can be done by increasing the compressor gain.
Now, by increasing the Gain level, we also raise the compression curve and observe how this affects the X and Y coordinate axes.
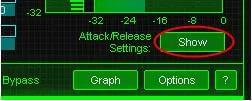
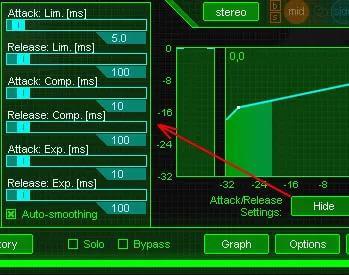
Let’s look at two parameters associated with our simple compressor. These are Attack and Release. You can adjust them by clicking the “Attack/Release Show” button. A group of controls for these values appears on the screen.
How to configure them? Unfortunately, this largely depends on the nature of the sound you’re working with. Let’s start with the “Attack” time. A shorter attack means a faster response to transients or short peaks in the sound. If you need to soften the drum’s impact, set the attack value to short. If you’re aiming for a pop sound, increase this time. It is recommended to start setting the attack at 10 ms. Decrease this value to make instruments have a softer attack, or increase this value to make the sound more dynamic.
On the other hand, be aware that too fast an attack time can cause distortion, especially in low-frequency signals, as the compressor tries to quickly adjust the level. Low frequency signals have long time cycles, and compression matched to these cycles can cause significant distortion.
Let’s move on to the “Release” time. As stated earlier, this parameter determines how long the compressor waits before “releasing” the signal and returning it to the “input” level. It is recommended to start with 100ms, although there are no clear rules. The key is to understand the concept of recovery time. A release time that is too short can cause distortion or a “pump” effect as the compressor returns the signal to normal levels too quickly. A longer recovery time allows the signal level to gradually return to its original values. However, too long a release time can result in over-compression even after loud peaks have passed, which can compress a lower level signal unnecessarily.
General Compression Strategy
The sequence of actions that you can apply when working with a compressor includes the following:
Set the compression ratio based on the nature of your material;
For a full mix: try values from 1.1 to 2.0;
For bass and kick drum: experiment with a range from 3.0 to 5.0, and in some genres up to 10;
For vocals: try to stay in the 2.0 to 3.0 range.
Of course, it should be remembered that these recommendations are relative. Your mix, your perception and taste, and your artistic vision can vary radically. Therefore, our advice is not strict rules, but only guidelines for action!
Gradually increase the compression threshold until it is above the average level of your mix. For clarity, you can observe this process using a histogram;
Adjust the level (Gain) if you see the need to strengthen the compressed signal;
Experiment with the Attack and Release parameters. There are no hard and fast rules here, but remember that a shorter attack time can smooth out signal variations and in some cases cause distortion. (Note that if you are looking to increase the overall volume of your mix, you should use the Loudness Maximizer).
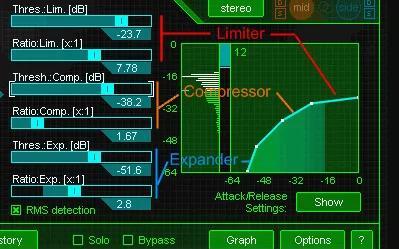
Limiter and expander
If you’ve mastered the basics of how a compressor works, it won’t be difficult to understand the functionality of the rest of the dynamics processing elements: the limiter and expander…
A compressor, an expander/gate module and a limiter are available in Ozone. These tools offer outstanding functionality, allowing you to simultaneously process mid-level signal levels, tightly limit the upper range of the mix, and expand (or suppress) weak signals.
In this image you will notice that instead of a single point or “elbow” of the compressor, we now have three segments where the compression pattern changes, indicating different compression ratios.
Author
Patrick Stevensen
Published
02 Feb 2024
mixing & mastering
Make Music Now.
No Downloads, Just
Your Browser.
Start creating beats and songs in minutes. No experience needed — it's that easy.