Home studio equipment

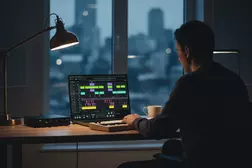
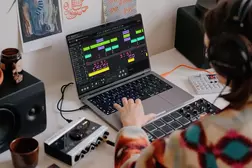
When music becomes more than just a hobby and turns into part of your daily life, it’s only natural to want to record your ideas right at home. Having a home studio lets you capture inspiration at any moment without worrying about booking time at commercial studios or dealing with extra expenses. A home studio gives you the freedom to experiment and full control over the recording process.
When music becomes more than just a hobby and turns into part of your daily life, it’s only natural to want to record your ideas right at home. Having a home studio lets you capture inspiration at any moment without worrying about booking time at commercial studios or dealing with extra expenses. A home studio gives you the freedom to experiment and full control over the recording process. You can work on projects whenever you want, revisit them as many times as needed, and not stress about paying for studio time. Thanks to modern technology, creating high-quality tracks is now possible even in an ordinary apartment.
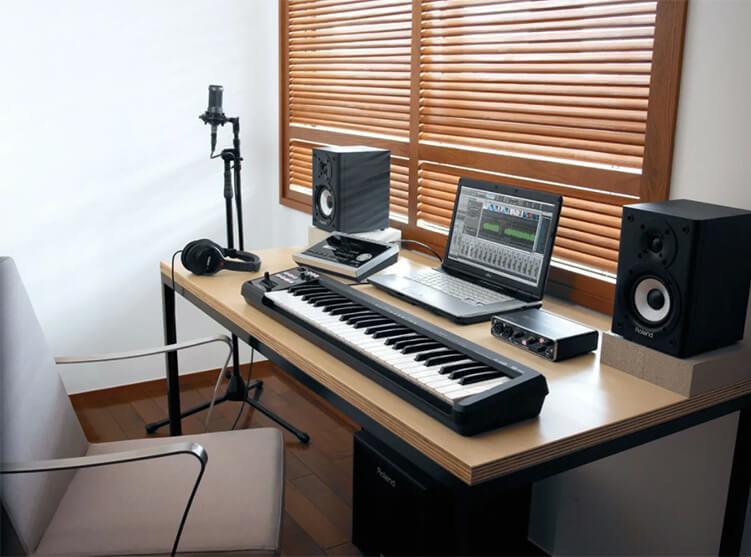
You don’t need huge investments or complex equipment to get started. The basic setup includes just a few key items. First, you’ll need a computer with a digital audio workstation (DAW) — this will be the heart of your studio. Next, an audio interface is essential for quality sound conversion. A microphone and headphones will help you record and monitor your material with minimal distortion. Don’t forget a mic stand and some acoustic panels to improve the sound in your room.
The equipment you choose depends on your goals and budget. If you’re recording vocals and acoustic instruments, consider a good condenser microphone. For beatmakers, a reliable MIDI controller and quality monitors are more important. The key is not to chase expensive gear right away. A basic setup is enough to learn the process and figure out what you really need as you grow.
Besides saving time and money, having a home studio lets you experiment without limits. You can re-record parts, change arrangements, and tweak the sound as much as you like. This creative flexibility helps you develop your recording and production skills. Setting up a home studio isn’t as complicated as it might seem at first. Start with the essentials and add new gear as your needs and experience grow.
These days, you don’t need to rent an expensive studio to record high-quality music. Many award-winning hits have been created right at home. Of course, if you’re recording live drums, a grand piano, or a string orchestra, a large acoustically treated room is irreplaceable. But for most tasks, a home studio is more than enough and comes with plenty of advantages.
- You don’t have to spend money on studio sessions;
- You can record your ideas anytime inspiration strikes;
- All your gear is within reach;
- No need to schedule sessions or coordinate with anyone;
- You’re in a cozy, familiar environment;
- You choose the equipment based on your needs, not someone else’s preferences;
- You can continuously improve your recording, editing, arranging, mixing, and mastering skills.
You get to decide what equipment is right for your studio. There’s no point in buying expensive gear if it doesn’t suit your workflow. This not only helps you save money but also gives you a deeper understanding of what you really need. In fact, having a limited budget can be an advantage—when you’ve got just one plugin or piece of gear, you’ll learn it inside out, discovering creative ways to make the most of it.
Of course, it’s not all smooth sailing. Professional studios offer a wide range of equipment: tons of microphones, amps, monitors, and fancy outboard gear. But do you really need all of that? In most cases, a compact setup will get the job done. Limitations can actually boost your creativity and help you focus on what truly matters.
The biggest challenges often come from the space itself. A home studio can mean dealing with outside noise, annoyed neighbors, and tricky room acoustics. It’s not just about the gear—you’ll also need to treat your space to get clean, balanced sound.
At the end of the day, building a home studio isn’t about having tons of equipment. It’s about making the most of what you’ve got. A comfortable atmosphere and the freedom to experiment will take you further than the most expensive gear ever could.
Why a Simple Home Recording Studio Is the Best Choice for Beginners
Setting up a simple home studio isn’t just a reasonable option—it’s often the smartest move for anyone starting out. When you’re new to recording music, the urge to buy loads of expensive, complex gear can backfire. Instead of feeling inspired, you end up overwhelmed trying to figure out endless settings and equipment. This usually leads to a few common issues:
- you quickly feel burned out from information overload;
- you lose motivation because progress seems slow;
- eventually, you put music on the back burner.
That’s why it’s important to keep things simple in the beginning. The less complicated your setup, the easier it is to grasp the basics and actually enjoy the process. A simple studio lets you focus on what truly matters—making music, not wrestling with gear.
Where’s the Line Between Saving Money and Sacrificing Quality?
Musicians often try to cut costs, especially when they’re just starting out. And that’s totally understandable—music can be an expensive pursuit. However, when it comes to home recording, being too budget-conscious can backfire. Sure, it’s technically possible to build a functional setup for $400–$500, but that usually comes with trade-offs in sound quality and workflow.
Cheap gear can limit your potential: poor audio quality, technical glitches, and clunky interfaces can waste time and drain your motivation. That’s why it’s better to view your equipment as an investment in your growth as a musician. This doesn’t mean you need to buy the most expensive gear out there. The key is finding a balance—choosing reliable tools that help you develop your skills without creating unnecessary obstacles.
How to Choose the Right Room for Your Home Recording Studio
Choosing the right room is a key step in setting up a home recording studio. The main focus should be on the room’s acoustic properties, although comfort and aesthetics also play a role. The more spacious the room, the easier it is to achieve clean, balanced sound. Ceiling height is especially important—the higher the ceilings, the better the sound disperses.
The biggest issues musicians face when recording in an untreated room are sound reflections off the walls and resonances, known as standing waves. Reflections can be somewhat controlled using acoustic panels, absorbers, and diffusers. But resonances are trickier. They occur when certain frequencies are amplified in one part of the room and diminished in another. In one spot, the bass might sound boomy, while in another, it could disappear almost entirely. This distorts how you hear your mix and makes it difficult to fine-tune the sound accurately.
Larger rooms help smooth out these acoustic inconsistencies. If you have the option, set up your home studio in the biggest room available. However, size isn’t the only factor—room shape also matters. A small square room with flat walls and a low ceiling is the worst-case scenario. It tends to create strong resonances, flutter echoes, bass buildup, and early reflections that interfere with the clarity of your recordings.
The ideal room for a home studio has the following features:
- high ceilings to reduce reflections;
- walls spaced far apart to minimize standing waves;
- uneven or textured surfaces that diffuse sound;
- a rectangular shape to avoid symmetrical acoustic issues;
- minimal parallel surfaces to prevent problematic resonances.
It’s also best if the room is located away from street noise and shared walls with neighbors. This minimizes external disturbances and lets you work without worrying about bothering others. In some cases, soundproofing can help, but it’s not always a simple or budget-friendly solution. High-quality soundproofing requires careful planning and can be costly, so for most home studios, focusing on acoustic treatment and choosing the right room will have a much bigger impact on your sound.
9 Essential Items for Your Home Recording Studio
If you’re setting up your first home recording studio, you don’t need to fill it with expensive gear right away. A basic setup is all it takes to get started, allowing you to dive into recording and gradually expand as your skills grow. Here are nine key items that will help you hit the ground running without breaking the bank.
- Computer: This is the heart of your studio. You don’t need the latest high-end model, but it should be powerful enough to handle audio processing smoothly. Focus on having enough RAM and reliable performance with audio software;
- DAW and Audio Interface: Many modern audio interfaces come bundled with basic recording software. This combo saves time and money, giving you the tools you need for quality recording and sound editing;
- Studio Monitors: Unlike regular speakers, studio monitors provide a flat, uncolored sound, helping you make accurate mixing decisions. You can start with a budget-friendly pair and upgrade later as your needs evolve;
- 1–2 Microphones: The type of mic you need depends on what you’re recording. Condenser mics are great for vocals and acoustic instruments, while dynamic mics work well for podcasts and live vocals. A small selection gives you flexibility without overwhelming you;
- Headphones: Essential for both tracking and mixing. Closed-back headphones are ideal for recording because they prevent sound bleed, while open-back models are better for mixing. To start, a versatile pair will do the job;
- Cables: Your gear won’t function without them. You’ll need a few XLR cables for microphones and TRS cables to connect your monitors to the audio interface;
- Microphone Stand: A stable stand keeps your mic in the perfect position during recording, which is crucial for capturing consistent vocals or acoustic instruments;
- Pop Filter: This simple tool reduces harsh plosive sounds that occur when pronouncing “P” and “B” sounds. It’s an inexpensive way to make your recordings sound cleaner and more professional;
- Ear Training Software: Great gear won’t make up for underdeveloped listening skills. Ear training software helps you improve your ability to detect subtle details in your mix, leading to better production quality.
With this basic setup, you’ll have a functional home studio ready to go. This approach lets you start recording right away while giving you the flexibility to add new gear as your skills and needs grow. The key isn’t having the most equipment—it’s focusing on creating quality sound with what you have.
Essential Equipment for a Home Studio
1. Computer or Laptop
The key element of any home recording studio is the computer. It’s the central hub of the entire system, responsible not just for performance but also for how smoothly you can work with audio projects. Whether you choose a laptop or a desktop, Mac or PC, isn’t as important as making sure the specs meet the demands of audio production.
The processor plays a crucial role. The more powerful it is, the better it can handle audio processing and run multiple plugins simultaneously. Modern quad-core processors like the Intel i7 offer excellent multitasking capabilities, but even a fast dual-core processor, such as a 2.9 GHz i5, can manage dense audio sessions effectively. RAM is equally important—16 GB is recommended for a smooth workflow. This ensures you can open complex sessions without lags or crashes.
Your hard drive affects how quickly projects load and software runs. Solid-state drives (SSDs) significantly outperform traditional hard disk drives (HDDs) in terms of speed. If you’re using an HDD, it should have a spin speed of at least 7200 RPM. A great setup would be using an SSD for your operating system, audio software, and active projects, while storing archived data on an HDD.
The computer will likely be the biggest investment in your home studio, and it’s not something you should skimp on. However, if you already have a powerful laptop or desktop, you can absolutely use that. A gaming laptop or a home PC with a solid processor and enough RAM will work just fine for getting started. The key is stability and the ability to handle audio tasks efficiently.
Fan noise from desktop towers can be a distraction during recording, especially when using sensitive microphones. This is where laptops have the edge—they’re generally quieter and more portable. A laptop allows you to create a compact studio setup that’s easy to take with you on the go. A basic mobile studio setup might include a laptop, a two-channel audio interface, quality headphones, and a compact MIDI keyboard. That’s more than enough to create and edit music anywhere you go.
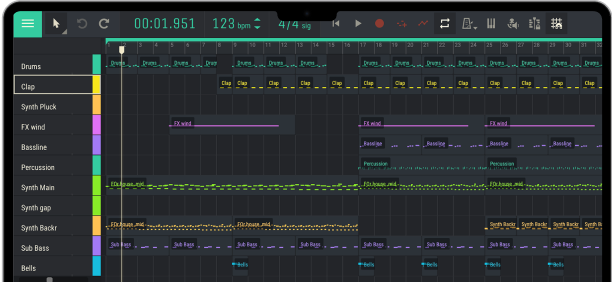
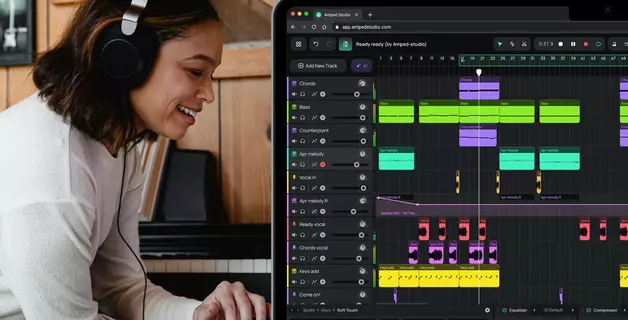
2. Digital Audio Workstation (DAW): The Heart of Your Home Studio
A Digital Audio Workstation, or DAW, is the software where your music comes to life. It’s where you record, edit, arrange, mix, and master your tracks. Think of it as your creative workspace—everything happens within the DAW, from the first rough idea to the final polished track. That’s why choosing the right DAW and mastering its features is essential.
There are plenty of DAWs on the market, each offering unique tools and workflows. Popular options include Pro Tools, Logic Pro X (Mac only), Ableton Live, Cubase, Reaper, and GarageBand. While they all perform similar tasks, their interfaces and feature sets differ. Pro Tools is considered the industry standard for audio recording and editing, while Logic Pro X is highly regarded for MIDI production and its extensive library of virtual instruments. If you’re a Mac user, Logic offers great value with a wide range of professional features. Windows users might prefer Ableton or Cubase for their versatility in both production and live performance.
If you prefer flexibility and don’t want to be tied to a single device, online DAWs are a great option. Amped Studio, for example, runs directly in your browser, allowing you to record and edit music anywhere with an internet connection. It’s beginner-friendly with an intuitive interface but also packed with powerful features like live instrument recording, beat-making, arranging, and track processing.
Most DAWs come with a built-in set of plugins—virtual effects and instruments that help shape your sound. Amped Studio, for instance, includes delay, reverb, distortion, compression, chorus, and other essential effects. These tools are crucial if you’re planning to work not just on recording but also on mixing, arranging, and producing your tracks.
In addition to effects, virtual instruments like samplers, synthesizers, and drum machines are key components of music production. Amped Studio offers a basic selection of these, but you can always expand your library by adding third-party VST plugins. This gives you access to a wider range of sounds and effects, making your music more dynamic and unique.
However, it’s important not to overload your setup with too many plugins right away. It’s more effective to purchase new plugins one at a time and thoroughly explore their features. This approach not only saves money but also helps you develop a deeper understanding of how each tool works. By mastering the plugins you have, you’ll be able to get the most out of your gear and improve your sound engineering skills.
Your DAW and plugins are the foundation of your home studio. Once you’ve mastered the basics, you can gradually expand your toolkit with new instruments and effects as your needs grow. The key isn’t having the most gear—it’s understanding how to use what you have to its fullest potential.
3. Audio Interface
An audio interface is the device that connects your recording gear to your computer, allowing you to capture and playback high-quality sound. It takes the analog signal from microphones or instruments, converts it into a digital format for processing in your DAW, and sends it back for monitoring through speakers or headphones. Simply put, without an audio interface, your home studio won’t function at a professional level.
For most home studios, an audio interface with two inputs is more than enough. It allows you to record, for example, vocals and guitar simultaneously. One of the most popular models is the Focusrite Scarlett 2i2, a compact device featuring two combo XLR/TS inputs that support both microphones and line-level instruments. It’s a reliable choice for beginners, offering ease of use and great sound quality.
However, choosing an audio interface isn’t just about the number of inputs. The technical specs—especially the quality of the preamps and analog-to-digital converters—play a crucial role. Preamps amplify the weak signal from your microphone to a level suitable for recording, while converters transform analog sound into digital audio, preserving its clarity and detail. A good audio interface delivers clean, transparent sound without distortion. But if you’re looking for something with more character, consider interfaces with preamps that add warmth or subtle color to your recordings.
For those ready to invest in advanced equipment, the Universal Audio Apollo Twin is a standout option. It offers top-tier conversion quality (24-bit/192 kHz), two built-in UAD DSP processors for real-time effects processing, and access to award-winning UAD plugins. This makes it perfect for producers and musicians handling complex projects who need maximum flexibility and professional-grade sound.
If you plan on recording multiple instruments at once, consider the number of inputs. An interface with four or more channels will allow for multi-track recording—ideal for drum kits, bands, or live sessions. Additionally, check for MIDI ports for connecting keyboards and controllers, as well as digital connections like ADAT or S/PDIF, which expand your setup’s capabilities.
When it comes to outputs, even a basic home studio can benefit from multiple monitor lines. If you’re running a single pair of studio monitors, two outputs will suffice. But if you want to connect a second pair of monitors or a subwoofer, you’ll need additional outputs. And don’t forget a dedicated headphone output, essential for tracking vocals or working in environments where you can’t rely on speakers.
An audio interface isn’t just a “connector” between your mic and computer. It’s the heart of your studio, directly impacting your recording quality and workflow. When choosing an interface, consider your specific needs and budget, but remember—it’s an investment that will determine how professional your music sounds.
4. Microphones for Your Home Studio
A microphone is the foundation of any recording studio because it captures every detail of sound, whether it’s vocals or instruments. When you’re just starting out, you don’t need a whole collection of microphones—one or two versatile models that fit your budget will be more than enough.
For beginners, large-diaphragm condenser microphones are a great choice. They capture detail and dynamics beautifully, making vocals sound rich and lively. A great example is the Rode NT1, known for its clean sound and low self-noise. It’s a classic option for vocal recording but also handles acoustic instruments with ease.
If you plan to record instruments with bright, high-frequency content, like acoustic guitars, pianos, or cymbals, a small-diaphragm condenser mic such as the AKG P170 is ideal. It delivers crisp, clear highs and excels at capturing the nuances of complex tones.
For drums, amps, or percussion, the legendary Shure SM57 is a must-have. This dynamic microphone can handle high sound pressure levels and reproduces midrange frequencies with clarity. Its versatility makes it a go-to for recording everything from guitar cabinets to snare drums.
When it comes to bass guitars and kick drums, the AKG D112 is a solid choice. It’s designed to handle low frequencies with power and precision, giving you punchy, detailed bass without muddying the mix.
Here’s a quick list of recommended microphones to get started:
- Rode NT1 – A large-diaphragm condenser mic, perfect for vocals and acoustic instruments;
- AKG P170 – A small-diaphragm condenser mic, great for capturing bright, high-frequency instruments like acoustic guitars and cymbals;
- Shure SM57 – A dynamic mic ideal for drums, guitar amps, and midrange-heavy instruments;
- AKG D112 – A dynamic mic designed for bass-heavy instruments, like kick drums and bass guitars;
- Audio-Technica AT2020 – A budget-friendly condenser mic, known for its role in Billie Eilish’s early recordings;
- Shure SM7B – A professional dynamic mic with a warm, smooth tone, suitable for vocals, drums, and amps;
- Neumann TLM102 – A high-end large-diaphragm condenser mic that delivers clear, detailed vocal recordings.
If you’re on a tight budget, consider the Audio-Technica AT2020. This mic gained fame thanks to Billie Eilish and her brother-producer Finneas, who used it to record early tracks, including the hit “Ocean Eyes.” It delivers impressive sound quality for its price and works well in most home studio setups.
For those ready to invest in more advanced gear, the Shure SM7B and Neumann TLM102 are excellent options. The Shure SM7B is a dynamic microphone with a warm, smooth sound that can handle high SPLs, making it perfect for vocals, drums, and guitar amps. It’s a staple in professional studios due to its ability to capture powerful performances without distortion. On the premium side, the Neumann TLM102 is a large-diaphragm condenser mic known for its clear, detailed vocal reproduction. It’s a favorite among producers worldwide, though it comes with a higher price tag.
No matter which microphone you choose, the quality of your recordings will largely depend on how well you know how to use it. Proper mic placement, setting adjustments, and understanding the recording environment are just as important as the gear itself. As you gain more experience, you’ll naturally expand your mic collection, selecting models tailored to specific recording needs.
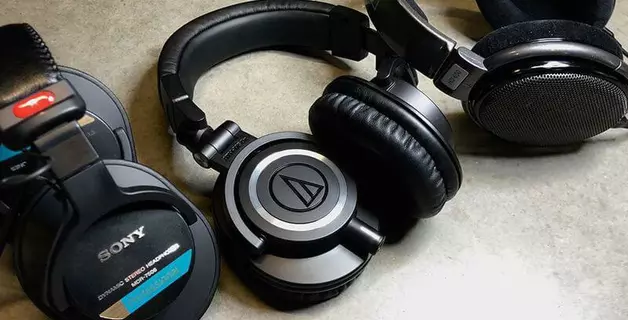
5. Headphones and/or Monitors for Your Home Studio
Headphones are often underrated, but for many people, they’re the primary tool for monitoring sound. In a home studio, it’s not always possible to crank up a pair of studio monitors, especially when creativity strikes in the middle of the night and you don’t want to disturb anyone.
Of course, when it comes to mixing, using monitors in an acoustically treated room is preferable. They provide a more accurate representation of frequency balance and mix details. However, when you’re just starting out, investing in monitors can wait. Headphones are great for tracking and can even handle basic mixing. They’re more affordable and won’t cause noise issues, making them a convenient choice for home recording setups.
In the early stages of building your home studio, headphones are a versatile option that lets you work anytime, anywhere. And when the time is right, you can always add a pair of quality monitors to your setup for more precise sound work.
In studio work, headphones aren’t just an accessory—they’re an essential tool for accurate sound monitoring. There are two main types of headphones: open-back and closed-back. Open-back models are sometimes used for mixing because of their natural sound and wide soundstage. However, for your first home studio, they’re not a necessity and are better suited as an additional tool for experienced producers.
What you really need are closed-back headphones. Their main advantage is excellent sound isolation, allowing musicians to clearly hear both the backing track and their own performance during recording without worrying about sound bleeding into the microphone. This design makes them ideal for situations where preventing audio leakage is crucial, especially when recording vocals or acoustic instruments.
Some reliable models to consider include:
- Sennheiser HD280 Pro — durable headphones with great noise isolation and a flat frequency response, perfect for both recording and basic mixing;
- Sony MDR-7506 — a studio classic known for its clarity in the midrange and rugged construction, making it a favorite among professionals.
For added convenience, it’s recommended to use an extension cable, as standard headphone cords are often too short for studio setups. However, it’s important to choose a high-quality cable since cheaper options can cause signal issues due to frequent bending and movement.
If you’re looking for a more budget-friendly option, check out the Audio-Technica M50x. These headphones deliver a balanced sound, provide good noise isolation, and are great for both tracking and monitoring. Their versatility makes them a popular choice for musicians working with limited budgets.
For those ready to invest more, the Sennheiser HD 650 is an excellent choice. Despite being open-back, they are widely used for critical listening and final mixing thanks to their exceptional detail and natural sound. They offer a spacious soundstage with outstanding clarity across all frequency ranges.
Regardless of your budget, headphones are an essential part of any home studio. They allow you to work in any environment, control every detail of your sound, and achieve the highest recording quality.
Studio Monitors for Accurate Mix Monitoring
Studio monitors aren’t just regular speakers—they’re designed to deliver audio as accurately and transparently as possible, without the tonal “enhancements” common in consumer speakers. Their main purpose is to reveal every detail of your mix, from EQ imbalances and frequency clashes to subtle artifacts that might go unnoticed on standard speakers.
However, even the best monitors don’t operate in a vacuum. Sound always interacts with the room, which can introduce distortions, especially in the low-frequency and low-mid ranges. Long sound waves in these frequencies often don’t have enough space to fully develop in small rooms. That’s why it’s important to treat your space acoustically or use room correction devices that help adjust the monitor’s performance to your environment.
In home studios, headphones can partially solve this problem. They provide a clear representation of bass since the sound goes directly to your ears without being affected by room acoustics. Closed-back headphones are ideal for recording to prevent bleed into the microphone, while open-back headphones are recommended for critical listening and mix analysis because they offer a more natural soundstage.
While high-end studio monitors can be expensive, there are plenty of affordable options that are perfect for home studios. One popular budget-friendly choice is the KRK Rokit 5 G4. These monitors offer balanced sound with good detail, making them a great option for beginners looking for reliable performance.
If you’re ready to invest in more professional gear, consider the ADAM Audio T5V. They feature a 5-inch woofer and a U-ART ribbon tweeter, delivering clean and transparent sound. With a frequency range of 45 Hz to 25 kHz, they provide accurate monitoring across various genres, making them a solid choice for producers who want high-quality sound without breaking the bank.
For advanced users and professionals, the Genelec 8351B monitors are a top-tier option. These three-way monitors feature dual 8-inch woofers and a coaxial driver, offering exceptional detail and clarity. They provide an impressive soundstage with precise frequency response, making them perfect for intricate sound design and critical mixing tasks.
6. MIDI Controller
If you plan to use virtual instruments in your projects, a MIDI controller is a must-have. Manually drawing MIDI data in your DAW isn’t just tedious—it takes away the creative spontaneity of making music. With a MIDI controller, you can play melodies, chords, and rhythms in real-time, making the process more intuitive and musical. Many modern controllers come equipped not just with keys but also with drum pads, faders, and knobs, allowing you to control various sound parameters on the fly. This is especially useful for beat-making and live performances.
7. Third-Party Plugins
When the stock plugins in your DAW no longer inspire you, it’s time to explore third-party options. Companies like Waves, Universal Audio, Native Instruments, and Slate Digital offer a wide range of effects and virtual instruments for all kinds of production needs. While stock plugins can cover most tasks when you’re starting out, you’ll likely want more flexibility and unique sound options as you grow. Third-party plugins give you access to digital emulations of classic analog gear—compressors, EQs, and reverbs—that are hard to replicate with built-in tools.
8. Comfortable Chair
Don’t underestimate the importance of a good chair. You’ll be spending long hours creating music, and an uncomfortable chair can lead to back problems and fatigue. An ergonomic chair with proper lumbar support and adjustable height will help you maintain good posture and reduce strain on your body. It’s an investment not just in comfort but also in your health. A comfortable workspace boosts productivity and allows you to focus on your music instead of dealing with physical discomfort.
9. External Hard Drive
The more you work with audio files, plugins, and projects, the faster your computer’s internal storage fills up. An external hard drive is a reliable solution for storing large sample libraries, project backups, and software installers. Regularly backing up your work is essential to ensure you don’t lose anything due to hardware failure. Ideally, your data should be stored in three places: your main drive, an external drive, and a cloud service. Hard drives are affordable these days, and considering the potential loss from data failure, it’s a small price to pay to safeguard your music projects.
10. Acoustic Treatment for Your Home Studio
Acoustic treatment is a crucial element for anyone planning to get serious about mixing in a home studio. Standard rooms, which aren’t designed for professional audio work, tend to distort sound due to reflections and resonances. The only way to make such a space suitable for accurate mixing is through proper acoustic treatment.
For a typical home studio, it’s especially important to treat first reflection points. This significantly improves sound clarity and helps achieve a more accurate mix. Acoustic panels can be made DIY-style—it’s affordable and fairly simple. From personal experience, denim insulation is a better choice than rigid fiberglass. It’s safer for your health, easier to handle, and has excellent sound-absorbing properties.
11. High-Quality Cables and Adapters for Your Home Studio
In the world of audio recording, there’s a golden rule: your signal chain is only as strong as its weakest cable. Even if you have expensive microphones, audio interfaces, and studio monitors, one poor-quality cable can degrade your sound. That’s why it’s worth investing in reliable cables from trusted brands to ensure a clean, stable audio signal.
The good news is that high-quality cables don’t have to be outrageously expensive. There are plenty of brands that offer excellent performance at reasonable prices. The key is to choose cables with durable insulation and sturdy connectors that will withstand regular use without becoming prone to breakage or interference. Keeping your studio cables organized—using cable ties or holders—can also help extend their lifespan by preventing tangles and unnecessary strain.
In addition to standard cables, it’s essential to have a few adapters on hand. For example, 1/8-inch to 1/4-inch adapters are commonly used for headphones. It’s also handy to keep a Lightning to 1/8-inch adapter for Apple devices in case a client wants to play something directly from their phone during a session.
For a basic home studio setup, you’ll typically need just three essential cables:
- One long XLR cable (such as the Mogami XLR, 25 feet) to connect your microphone to your audio interface;
- Two short XLR cables (Mogami XLR, 6 feet each) for connecting your audio interface to your studio monitors.
Before purchasing, double-check your audio interface’s output connections. Some interfaces use TRS outputs instead of XLR, in which case you’ll need Mogami TRS to XLRM cables (6 feet).
While high-quality microphone cables can be pricey, this is an area of your studio where you shouldn’t cut corners. Cheap cables tend to wear out quickly, are more susceptible to handling noise, and can easily pick up radio interference. Investing in well-made cables will ensure your gear performs reliably and your recordings stay crystal clear, session after session.
12. Sturdy Microphone Stands for Your Home Studio
A reliable microphone stand isn’t just an accessory—it’s an essential piece of equipment for any home studio. There’s nothing worse than dealing with a cheap, flimsy stand that can’t support the weight of your microphone. You spend time positioning it perfectly, only to watch it sag or tip over after a few seconds, ruining your setup. To avoid these headaches, it’s best to invest in a strong, stable stand right from the start.
While it might seem like all mic stands are the same, that’s far from the truth. A high-quality stand is an investment in the stability of your recording environment. It should be sturdy enough to stay upright even with slight movements and have durable clamps that won’t wear out over time.
If you’re on a budget, there are reliable mid-range options available. A great choice to start with is the DR Pro Boom stand. It’s known for its durability, stability, and ease of adjustment, allowing you to position your mic quickly and securely without any hassle.
13. Pop Filter: Protecting Your Recordings from Plosives
A pop filter is another crucial tool for clean vocal recordings. Its main purpose is to reduce plosive sounds—those harsh bursts of air caused by pronouncing letters like “P” and “B,” which can create unwanted popping noises in your recordings. Even if your microphone has a built-in windscreen, an additional pop filter can make a noticeable difference.
You’ve probably seen pop filters in recording studios, live performances, or music videos, but you might not have thought about what they actually do. Here’s the simple explanation:
A pop filter eliminates harsh vocal artifacts caused by strong air blasts hitting the microphone’s diaphragm directly.
While a pop filter isn’t an absolute necessity for beginners, it’s an inexpensive tool that significantly improves recording quality. This is especially true when working with sensitive condenser microphones that are prone to picking up plosives.
If you’re looking for a reliable option, consider the Stedman Proscreen XL. It’s known for its sturdy build, easy setup, and excellent performance in reducing plosive sounds. Having a quality pop filter on hand ensures your vocals sound clean, clear, and professional, without the distraction of unwanted noise.
14. Instruments for Your Home Studio
Every home studio setup is unique because it reflects the musician’s style and creative needs. Some artists can’t imagine working without acoustic or electric guitars, bass guitars, keyboards, or electronic drums. If you’re a producer or arranger who doesn’t play live instruments, a MIDI keyboard is a must-have. It’s an essential tool for composing melodies, arranging tracks, and controlling virtual instruments with ease.
When it comes to recording vocals or acoustic instruments, a microphone is indispensable. A single large-diaphragm condenser microphone is often enough when you’re just starting out. It’s perfect for capturing subtle details, which is crucial for vocals and acoustic sounds. However, if your recording space has poor acoustics and background noise is an issue, a dynamic cardioid microphone might be a better option. Its directional pickup pattern focuses on sound from the front, minimizing unwanted ambient noise. Keep in mind, though, that you’ll likely need to spend more time fine-tuning your EQ settings to get the desired sound with a dynamic mic.
15. Essential Gear for Your Home Studio
You don’t need high-end equipment racks, advanced monitor controllers, or bulky audio splitters to run an effective home studio. However, a basic set of cables is non-negotiable. To connect your studio monitors, you’ll need two XLR-to-TRS cables (or different types depending on your monitor and audio interface specs). For your microphone, a standard male-to-female XLR cable will do the trick.
Your workspace setup also plays a key role. A simple desk will work just fine, but investing in a comfortable chair with proper back support can make a big difference, especially during long recording or mixing sessions. For your monitors, it’s best to use isolation pads to reduce unwanted vibrations and sound distortion. In smaller rooms, compact monitors can sit directly on the desk using special stands, while floor stands are a great option if you have more space, allowing for better control over height and angle adjustments.
Acoustic Treatment for Beginners
When setting up a home studio, it’s important to understand the difference between soundproofing and acoustic treatment. While these two concepts can complement each other, they sometimes work in opposite directions. Soundproofing aims to prevent sound from leaving or entering the room, while acoustic treatment focuses on improving the sound quality inside the space by reducing unwanted reflections.
If you had plenty of space and an unlimited budget, you could build multi-layered walls with vibration mounts, fill them with mineral wool, install floating floors, and add suspended ceilings. However, this kind of setup is expensive and takes up a lot of space, making it impractical for most apartments. That’s why home studios typically rely on simpler solutions like dampening, which helps reduce both sound leakage and internal reflections.
The goal of dampening is to ensure you hear mostly the direct sound from your studio monitors without interference from room reflections. In professional studios, reflections are carefully controlled so they decay evenly across all frequencies, creating a balanced and accurate listening environment. While achieving this level of precision is challenging in a home setup, the key is to minimize reflections as much as possible without overdoing it—completely deadening a room can feel uncomfortable and unnatural.
What can help improve your room’s acoustics?
- Acoustic panels made from rock wool or mineral wool, wrapped in fabric and mounted on wooden frames;
- Foam panels for absorbing high frequencies;
- Bass traps to control low-frequency build-up, especially in corners;
- Heavy curtains or drapes to reduce window reflections;
- Soft furniture like couches and chairs, as well as bookshelves that act as natural diffusers;
- Textile elements such as pillows, blankets, rugs, and even mattresses to absorb sound;
- Diffusers to scatter sound waves and prevent flutter echoes.
The most effective solution for home studios is rock wool panels. They absorb high and mid frequencies effectively and can also tame some low-mids, especially if mounted with a small gap from the wall. Foam panels, despite their popularity, have limited capabilities—they mainly absorb high frequencies. If you cover an entire room with foam, you’ll end up with a dull, lifeless sound while mid and low frequencies remain uncontrolled.
How to Position Your Studio Monitors Correctly:
To get the most out of your acoustic treatment, it’s also crucial to position your equipment properly:
- Your monitors and your head should form an equilateral triangle for an accurate stereo image;
- The tweeters (high-frequency drivers) should be at ear level to ensure clear, detailed sound;
- The distance from each monitor to the side walls should be equal on both sides to avoid uneven reflections.
Unlike monitors, microphones can be placed wherever the sound feels best. To find the ideal spot, walk around the room while singing, talking, clapping, or playing music from a portable speaker. Listen carefully to how the sound changes in different areas. A popular addition in home studios is a reflection filter, which attaches to a microphone stand to reduce the impact of room reflections.
How Much Does Basic Home Studio Equipment Cost?
Defining Your Goals and Choosing the Right Space
Before buying any equipment, it’s important to understand the purpose of your home studio. If you plan to record live drums, you’ll need a separate, sound-isolated room. For commercial recording, having a dedicated space is also ideal. However, if you’re focused on recording vocals, producing electronic music, making beats, arranging, or mixing, you can easily set up a home studio in your bedroom.
Buying Equipment
Music equipment prices vary widely, offering plenty of opportunities to save money or invest in high-quality gear. It’s best to start with the essentials to avoid unnecessary expenses and figure out what you truly need.
- Computer — from $500 to $20,000. You can use your current laptop or desktop if it handles audio tasks efficiently;
- Audio Interface — from $100 to $3,000. For recording vocals or a single instrument, an interface with one or two inputs is enough. A decent interface can be found for around $150–$200;
- DAW (Digital Audio Workstation) — from $0 to $500. Some DAWs are free, and platforms like Amped Studio offer affordable subscription plans;
- Plugins — from $0 to limitless. Start with the stock plugins included in your DAW—they’re more than enough for beginners;
- Studio Monitors — from $200 to $12,000. You don’t need high-end monitors for a home studio. If your budget is tight, start with good headphones;
- Headphones — from $100 to $2,000. You can get excellent studio headphones for around $500, which are more budget-friendly than monitors;
- MIDI Keyboard — from $50 to $7,000. It’s not essential for recording live instruments or mixing, but it’s incredibly helpful for electronic music production, beat-making, arranging, and sound design;
- Microphone — from $50 to $11,000. You don’t need a $10,000 Telefunken. A solid dynamic mic for around $150 and a condenser mic for about $500 will cover most recording needs.
Alongside the core equipment, you’ll need a few basic accessories:
- Cables — at least two for your monitors and one for your microphone;
- Stands — for your microphone and monitors to ensure proper positioning;
- Power Conditioners — to protect your gear from voltage spikes;
- Furniture — a comfortable chair and a sturdy desk will make long sessions more productive.
Setting up a home studio doesn’t have to break the bank. The key is to make smart choices based on your actual needs. Start small, and as you grow, you can expand your setup with additional gear to enhance your workflow.
Budgeting for Acoustic Treatment
Calculating the exact budget for acoustic treatment in your home studio can be tricky because it largely depends on the solutions you choose. Acoustic panels can be DIY projects, custom-made to fit your space, or purchased pre-made. In some cases, everyday items can work surprisingly well. For example, a large, soft couch not only adds comfort but also effectively absorbs sound reflections.
For beginners, DIY panels are a great option, especially when placed in corners and on bare walls. However, you don’t need to cover every inch of your room. For example, on a 2.5 × 4-meter (8 × 13 ft) wall, four panels measuring 0.5 × 1 meter (1.6 × 3.3 ft) with equal spacing between them are sufficient. Placing a couple of absorbers above your desk can also help minimize early reflections from your workspace.
Optimizing Studio Monitor Placement
Once the basic acoustic treatment is in place, it’s time to set up your studio monitors. The key rule is to form an equilateral triangle with your monitors and your head, ensuring equal distances between all three points. This setup provides the most accurate stereo imaging.
If you notice excessive bass, try moving your monitors away from the back wall to reduce the impact of standing waves. Acoustic irregularities in the room can cause frequency response issues, so adjust the monitor placement—moving them forward, backward, up, or down—until you find the sweet spot. You can also fine-tune the stereo field by moving the monitors closer together or farther apart. Don’t forget to adjust your chair’s position to stay within the “sweet spot,” where the sound is balanced and clear.
Tuning Your Acoustic Design
To achieve optimal sound absorption, try this simple experiment: play a familiar track and add or remove different absorbent materials around the room. Listen carefully to the changes and settle on what sounds most comfortable to you. An ideal home studio should allow you to hear every detail of a mix—clear instrument separation, compression characteristics, tonal coloration, and subtle frequency nuances.
However, if the silence feels too overwhelming or unnatural, reduce the level of absorption. An overly dead room can cause ear fatigue and stifle creativity. It’s important to find the right balance between sound absorption and maintaining a natural, lively feel in the space.
Ear Training for Home Recording Studio Engineers
Ear training software is rarely included in the list of essential gear for a home recording studio. However, it’s arguably one of the most important long-term investments you can make. That’s because, more than any plugin or piece of equipment, the quality of your recordings depends on your ears.
Many people assume that having a good musical ear is enough. But the skills of a musician and a sound engineer are very different. Musicians learn to recognize notes, intervals, and chords. Sound engineers, on the other hand, train their ability to identify frequency ranges. Until you master this fundamental skill, you won’t be able to accurately judge whether your music sounds good or not.
If you start ear training from day one, your progress in working with sound will accelerate significantly. It will help you mix more effectively and make more precise audio decisions in your home studio.