Mastering compression
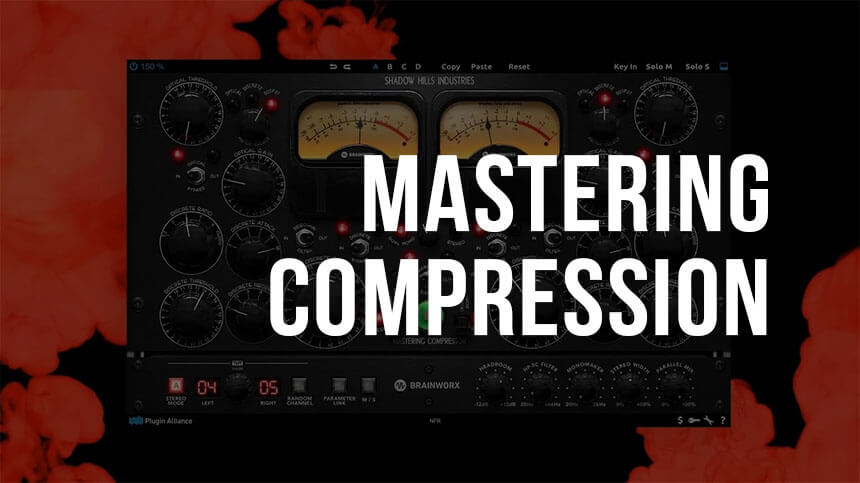
A good sound engineer knows that compression in mastering is not just “making it louder.” It’s a way to control dynamics so that the track sounds denser, smoother, and at the same time natural.
The main mistakes when working with a compressor are too much compression, incorrect attack or release. As a result, the drums are lost, the vocals become sluggish, and the mix becomes “squeezed” and inexpressive.
It is important to understand how the compressor parameters work. Threshold, attack, release, ratio, and output level all affect the result. For example, a fast attack can kill transients, and a slow release can make the sound “swinging.”
Understand the compressor until it becomes automatic. Then it will help, not hinder, on the home stretch of mastering.
What does a compressor do in audio
A compressor is a device or plugin that controls the dynamic range of an audio signal. It reduces the difference between loud and quiet moments, making the sound more even and controlled.
It can help you even out vocals, make drums tighter, or emphasize the attack of instruments. Compression allows music to sound more stable without sudden changes in volume, especially at the final stage of processing.
But it is important to remember: a compressor can easily cause harm if it is set up incorrectly. Too much compression will make a track flat, devoid of energy and dynamics. Therefore, it is important to understand how it works and select the parameters for a specific material.
How to balance sound with compression
A compressor is not a universal solution for every dynamic problem. If you immediately start compressing material with a large difference in volume, the sound will be unnatural: quiet fragments will remain unchanged, and loud ones will be excessively suppressed.
It is better to start with volume automation. Back at the mixing stage, you can manually equalize the level using gain or track volume automation. This will give a more organic result without sharp jumps and loss of character of the sound.
Once the balance is established, you can already connect the compressor – but now for artistic purposes. It will help to emphasize attacks, make the sound denser and add a sense of control without breaking the natural dynamics.
Compression at the mastering stage: why and how it works
When the mix is ready, the mastering stage comes – the final processing, where it is important to achieve coherence and integrity of the sound. Compression at this stage plays a significant role, although it is not required for every track.
The task of the compressor in mastering is not just to equalize the volume, but to make the mix more collected. It helps to smooth out dynamic jumps, emphasize the overall density and combine all the elements into a single sound. At the same time, it is important not to overdo it: too aggressive compression can destroy the structure and make the sound “locked”.
A compressor is often used in conjunction with other tools. A typical master chain may include an equalizer first, then a compressor, then multi-band compression, and a limiter finishes everything. In this sequence, each tool solves its own problem: it equalizes the spectrum, smooths out the dynamics, works with frequencies by zones and limits peaks. When set up correctly, compression in mastering adds transparency and “glue” that helps a track sound professional on a variety of devices.
Does every song need compression during mastering?
Not every track requires additional compression during mastering. If the mix is already balanced and compression was used on buses and individual channels during mixing, additional compression may be unnecessary.
Often, the mixes themselves arrive at the master with already-built dynamics. In such cases, a compressor may not improve, but, on the contrary, worsen the result if applied unnecessarily. The main thing is to listen to the material and evaluate whether it needs additional processing.
Nevertheless, compression is still present in one form or another in almost every mastering. Even if you do not use a regular compressor, a limiter at the end of the chain essentially performs a similar function – it limits peaks and smooths out dynamics. Therefore, we can say that compression during mastering is almost always present, but its form and role depend on the state of the original mix.
What is the difference between a compressor and a limiter
A compressor and a limiter work on the same principle, but with different degrees of impact. A compressor gently reduces the volume of a signal that exceeds the threshold, while a limiter strictly limits peaks, preventing them from going beyond the set limit.
The main difference is in the degree of compression. A limiter has almost infinite compression, while a compressor has adjustable compression. Therefore, a limiter is used where it is important to prevent overload, for example, at the end of a master chain, and a compressor is used for more subtle dynamic correction.
Which compression ratio to choose
The exact compression ratio depends on the material, but in most cases the goal is the same – to preserve energy and make the sound stable in volume. The compressor should work gently, without noticeably interfering with the character of the track.
For mastering, 1-2 dB of gain reduction is often enough. This helps to even out peaks without killing the dynamics. If you want to slightly compress transients or add density, you can play with the attack and release.
It is important to find a balance. Too much compression makes the sound boring and “locked”, especially if you set a high ratio and a low threshold. It is better to listen, and not rely only on numbers – sometimes small changes give a better result than aggressive processing.
How to Preserve Sound Character When Compressing
When working with a compressor, it is important not only to control the dynamics, but also to preserve the natural behavior of transient processes – attacks, decays, and nuances of the performance. Even if the compressor adds its own color, it should not mask the liveliness and expressiveness of the original.
Before adjusting the parameters, it is worth understanding why you are turning on compression. If the goal is to emphasize the attack, it is important not to crush the transients with too fast an attack. If the task is to smooth out the volume, do not sacrifice detail for the sake of an even level.
Pay attention to how the balance between quiet and loud sections changes. If compression makes everything too flat, it is worth weakening the parameters or revising the threshold. The approach to compression should be musical – so that the sound remains alive and recognizable, even after processing.
Compressor Setup: How to Work with Basic Parameters
Threshold
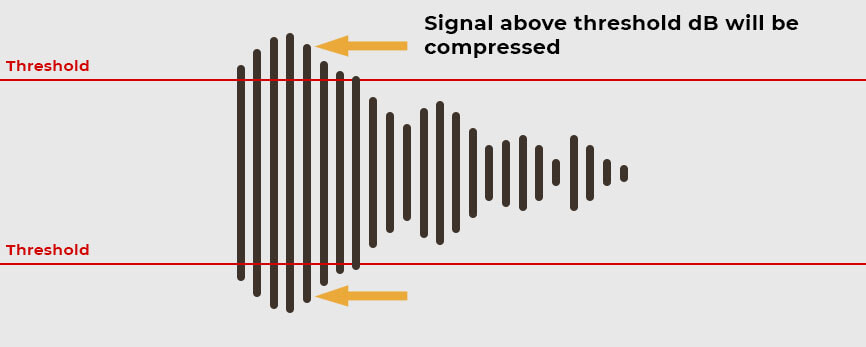
The threshold determines at what volume level the compressor will start working. If the signal peaks at -10 dB, and the threshold is set to -4 dB, the compressor simply will not turn on – it will not see the signal above the threshold. To react only to peaks, the threshold should be slightly below the loudest moment, for example, at -13 dB. And if you need tight compression, the threshold can be lowered so as to capture both the mid and quiet parts of the signal.
Ratio
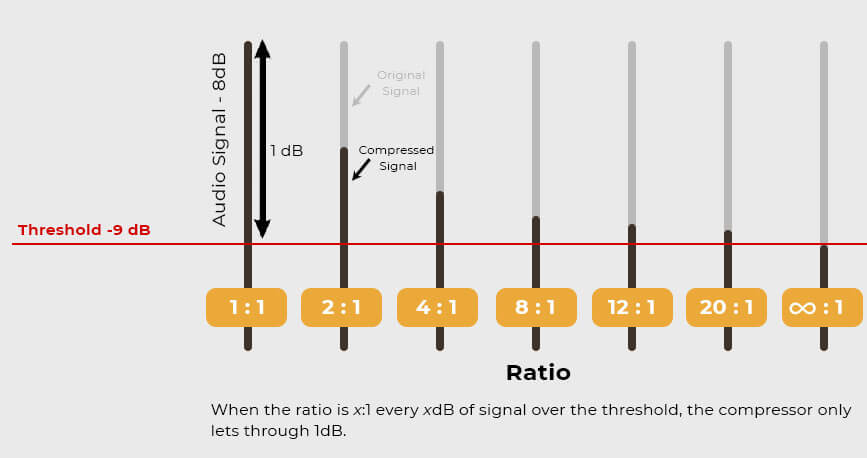
Compression ratio is how much the signal will be reduced when the threshold is exceeded. For example, at 3:1, every 3 dB over the threshold will be reduced to 1 dB. In mastering, 2:1 or 3:1 are often used – they smooth out peaks without making the sound too compressed. Ratios of 8:1 and higher are suitable for special tasks or limiting, but require a careful approach.
Attack & Release
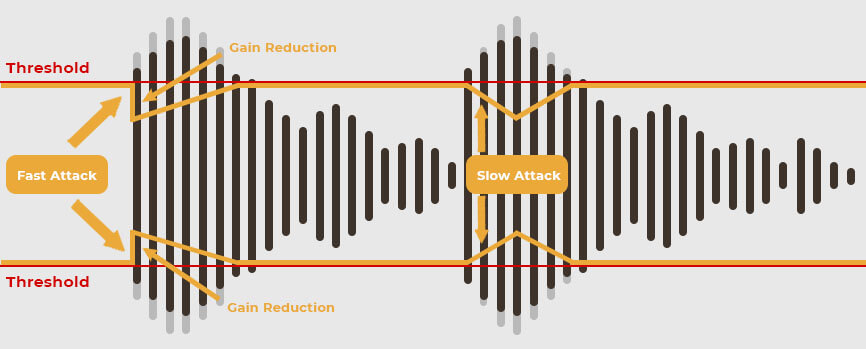
Attack is the time after the compressor starts to work after the threshold is exceeded. A fast attack (e.g. 5-10 ms) muffles transients and makes the sound softer. A slow attack (20-50 ms) allows transients to “break through” while maintaining sharpness and presence.
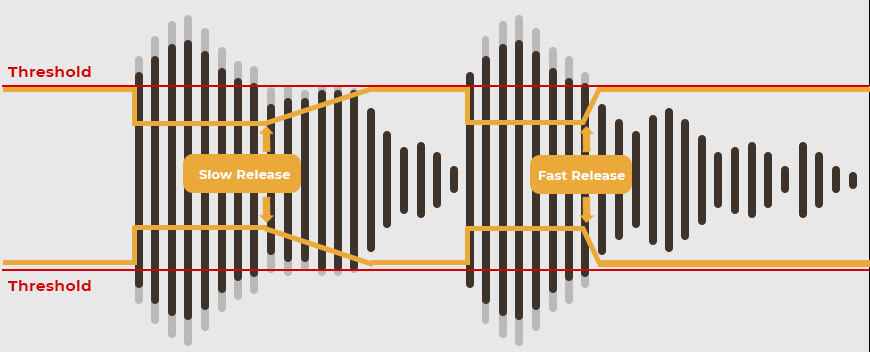
The release determines how quickly the compressor will return to its original state after the signal drops below the threshold. A short release is suitable for fast, lively dynamics, a long one – for smoother, pumping compression. Often the release is adjusted to the rhythm of the track so that it does not interfere with the overall movement of the sound.
Knee
The knee determines how smoothly the compression starts as it approaches the threshold. A hard knee starts working abruptly, a soft knee makes the transition smoother. For mastering, a soft knee is usually preferable, as it sounds more natural and does not introduce abrupt changes to the signal structure.
Types of compression: how to choose the right tool
Compression comes in different forms, and each type serves its own purpose. Depending on the purpose — be it mixing or mastering — the appropriate compressor type is selected.
Multiband compression. This type of compression allows you to divide the signal into frequency ranges and process them separately. For example, you can slightly compress the low frequencies without touching the mids and highs. This is convenient for mastering or for placing a compressor on the master bus. Multiband compression helps to make the frequency balance more accurate and avoid a situation where one area of the spectrum puts pressure on others.
Mid-side compression. Unlike regular stereo compression, mid-side allows you to separately process the central part of the signal (mid) and the side (side). This is useful when you need, for example, to slightly muffle the center and emphasize the width without affecting the entire mix. But you need to use this approach carefully: with incorrect settings, it is easy to get phase distortions, especially when listening in mono.
Parallel compression. The essence of this technique is to superimpose a highly compressed copy of the signal on the original. This approach gives a rich and dense result, while preserving the liveliness of the original sound. Parallel compression works well on drums, vocals and in situations where you need to keep the attack, but make the overall sound denser. Sidechain compression. Sidechain (or control signal compression) works like this: one signal controls the compression of another. The most common example is when the bass is compressed every time a kick sounds. This helps to avoid conflict in the lower register and makes the mix cleaner. This type of compression is actively used in electronic music, but is suitable for other genres if you need to free up space for key elements.
When and how to use compression in mastering
Compression in mastering is needed when the mix lacks coherence in dynamics – the track “jumps” in volume or sounds disjointed. The goal is to make the sound cohesive without killing its energy.
As in any other case, the compressor should not be used out of habit. Its purpose is to emphasize the finished mix, and not to correct mixing errors. Therefore, before activating the compressor, it is important to understand: does the track really sound too loose or unstable.
Here are basic settings to start with:
- Set the threshold high enough so that compression affects only the peaks. Optimally, about 2-3 dB of gain reduction;
- The initial ratio is about 1.25:1 or 1.5:1. This is enough to even out the mix without noticeable loss in dynamics;
- Use the bypass function to compare the sound with and without compression. If there is a difference, but it works to your advantage, leave it. If the track has become less lively, it is better to change the settings or do without a compressor altogether.
5 Tips for Mastering Compression
Working with a compressor during mastering requires care and understanding of the context. Here are some tips that will help you not to harm the mix and achieve a transparent and balanced sound.
- • There is no one-size-fits-all approach. Compression is not a must for every song. If the mix is already well balanced in dynamics, additional compression may not be necessary. Each track requires an individual approach – in some cases, a compressor emphasizes the overall density, in others, it makes the sound “locked in”. Focus on the sound, not on the habit of using compression;
- • The less, the better. At the mastering stage, you should not overload the track with processing. Start with minimal settings – high thresholds and a ratio of about 1.5:1. When used correctly, compression adds glue and control, but when overdone, it kills dynamics and makes the sound tiring. It is better to undercompress than to overcompress;
- • Compare with bypass. Use the bypass button to regularly check the effect of compression. Even small changes may seem imperceptible in the process, but when compared to the original, it becomes immediately clear whether it has become better. Be sure to pay attention to the lower range – this is where the compressor can make imperceptible but important changes;
- Give your ears time. Long-term work with a compressor dulls perception. After setting up, put the track aside, listen later with fresh ears. This will help you understand whether you have overdone it with processing, and make a more accurate decision. Often the best result is not achieved immediately, but after a couple of re-listenings and small edits;
- Don’t be afraid to delegate. If you feel that you can’t cope or are not sure of the result, give mastering to another engineer. External hearing and experience can give you what you no longer hear. This is especially important when working independently, when you both mix and master the track alone.
Final compression check before exporting the master
Before finalizing the master, it is important to re-evaluate how the compressor affects the transitions within the track. Particular attention should be paid to the moment when the verse changes to the chorus – here the dynamics should be felt, and not muffled. If the first hit of the chorus sounds sluggish or “fails”, the compressor may be working too aggressively. In this case, it is worth raising the threshold or revising the attack.
How to avoid compression overload
Over-compression is one of the most common mistakes at the mastering stage. It can remove all emotional accents and make the track tiresome. To preserve the feeling of a live sound, start with soft compression: a ratio in the range of 1.2:1 – 2:1 and a gain reduction of no more than 2–3 dB. This approach allows you to control dynamics without suppressing them.
Weak, almost imperceptible compression helps to “put together” the mix, preserving the percussive transitions and breath of the music. This is especially important for energetic tracks, where contrasts between parts of the composition are important.
For an accurate check, you can use analyzers such as LEVELS. If the visualization shows overload in dynamics, it is worth weakening the compression. Even a small reduction in the ratio can return transparency and expressiveness to the mix.
Whether compression is needed in mastering is up to the ear, not the rule
If a mix already contains enough compression on the stereo bus, there is no point in adding another compression stage on the master just for the sake of habit. One easy way to assess the need is to look at the waveform of the track. If you see a smooth shape without sharp peaks, perhaps the compression has already done its job. But the final decision should always be made by ear. If a compressor does not improve anything, it is not needed.
Compression in mastering: minimal interventions – the best result
When mastering, compression should be used carefully. As with the equalizer, the less processing – the more the character of the track is preserved. An overcompressed master immediately gives itself away: the sound becomes flat, and listening to such a recording quickly becomes boring. This is why most professionals limit themselves to light settings.
Usually, this is a high threshold and a ratio of no more than 1.5:1. With such parameters, the compressor works delicately, reducing the level by only 1-2 dB. The task is not to change the sound, but to slightly compress the peaks in order to glue the elements of the mix and add transparency. Good compression should be felt, not thrown into the ears.
Sound engineer Yoad Nevo notes: “I almost never use compression on the master. If I do, it is for the sake of color, not for the sake of controlling the dynamics.” This is an approach worth listening to. Music with a natural range sounds lively and expressive. On the contrary, a narrow dynamic corridor kills development and makes the track monotonous.
What range to keep is a matter of taste and genre. In dance music, more compression is appropriate, and in acoustic or orchestral recordings, on the contrary, it is desirable to leave more air and dynamics.
Why it’s important to set attack and release correctly when compressing
When using a compressor, attack and release settings determine how exactly it affects the sound. This is especially important when mastering, where each parameter can affect the overall character of the track.
Too fast an attack can cut off transients – short sharp bursts of sound that give the mix punch and energy. An example is a kick or click of a snare. If the compressor reacts instantly, it simply “eats” these peaks, making the sound sluggish. On the contrary, too slow an attack can give too much time for the peak to pass, and the compressor will no longer have time to adjust the dynamics.
The optimal start is an attack of about 30-40 ms. In some cases, it can be increased to 100 ms to preserve transients. But you should not adjust the attack separately from the release – only in combination they give the desired result.
Setting the release is a more subtle task. If it is too short, the compressor will release the signal too abruptly, creating a “breathing” or “pumping” effect. A release that is too long will cause the compressor to work constantly, even when it is not needed, and the mix will become flat.
To calculate the release for the tempo, you can use a simple formula: 60,000 divided by the BPM. This will give you the number of milliseconds in one bar. The idea is to have the compressor release the signal a little later than the next beat, so that the processing will follow the rhythm of the track. On average, values from 300 to 800 ms are suitable for mastering, depending on the speed of the track.
Attack and release settings are not universal. What works for one track can ruin another. But if you find the right combination, the compressor works transparently – it helps without giving itself away.
Why and how to use multiband compression in mastering
Unlike a regular compressor, which compresses the entire signal, a multiband compressor divides the frequency spectrum into zones — for example, low, mid, and high frequencies. Each of these bands can be processed separately, adjusting the parameters to the specific range.
This is useful when you need to compress, say, overly active cymbals without touching the vocals or bass. Or vice versa — tighten the lows without affecting the mids. This approach allows you to make targeted adjustments to the mix without drastically interfering with its overall balance.
Some plugins, like Linear Phase Multiband Compressor, provide even more flexibility: they offer up to five adjustable bands, an automatic volume compensation function, adaptive thresholds, and linear phase filters to avoid phase distortion.
However, powerful capabilities require a careful approach. If you strongly compress one band and leave others unchanged, you can easily upset the balance. It is better to start with the same coefficient for all ranges and then make minor adjustments.
Multiband compression is a great tool for mastering, but only in cases where regular compression is not enough. The main thing is not to get carried away, so as not to overload the track with unnecessary manipulations.
Cascade compression: why use two compressors in a row
Sometimes one compressor is not enough, especially if you want to achieve noticeable, but transparent control over dynamics. Instead of loading one plugin, it is better to use two in a row – this helps to preserve the natural sound and avoid artifacts.
For soft, almost imperceptible compression, start with the first compressor with a minimum ratio, for example 1.2:1 or 1.25:1. Set it to a slow attack – it will slightly smooth out sharp transients, removing only 1 dB of gain, and not all the time. Then add a second compressor with a slightly higher ratio and a slightly faster attack. It will pick up residual peaks, but do it gently, without destroying the dynamics of the track.
If the goal is to work on certain frequencies, the second compressor can be multiband. For example, Linear Phase Multiband Compressor will help to compress only the mids or highs, leaving the lows alone. This approach is especially useful when working with material where the problem is in a specific area of the spectrum.
To add a distinctive color, you can use a plugin that emulates analog equipment instead of a second digital compressor. A classic example is the CLA-2A, based on an optical compressor. It not only compresses, but also gives the signal softness, density, and slightly expands the stereo. Yoad Nevo notes that the CLA-2A may not be suitable for precise mastering, but its “slow” character adds a pleasant sense of depth and width.
By combining different types of compressors in a cascade, you can achieve both technical precision and musical color – and at the same time avoid harsh interventions in the track balance.
Before and after comparison is the key to fine-tuning compression
When working with a compressor, it is important to constantly monitor whether you are actually improving the sound. To do this, use the Bypass button – it helps you instantly compare the processed signal with the original. Every time you change the attack, release, threshold or ratio, turn off the compressor for a couple of seconds and listen: has it become better?
If the plugin supports A/B comparison, this is even more convenient. Set up two different options and quickly switch between them. This way, you can understand which setting sounds more musical without wasting time on manually adjusting the parameters.
This approach is especially useful in mastering, where compression must be as delicate as possible. Even small changes can affect the perception of the track, and it is the “before” and “after” comparison that allows you not to lose dynamics and expressiveness.
Precise Compression with FabFilter Pro-C2: Using the Sidechain EQ
1. Hit Frequency Compression
Using the sidechain EQ, you can set the compressor to react only to specific frequencies, such as the kick drum range. This allows the processor to “notice” the kick drum and react to it without affecting other elements. As a result, the kick drum becomes clear and readable even in a busy mix.
2. Low Frequency Control
Connect a sidechain from the kick to the bass and set the compressor to reduce the bass level with each hit. This creates a characteristic “sway” and frees up space for the kick, without the bass itself disappearing from the mix. This compression is especially relevant in electronic and pop music, where clarity and density in the low range are important.
3. Keeping the midrange natural
If you exclude the midrange from the sidechain signal, the compressor will stop responding to vocals, guitars, and other central elements. This helps to avoid unnecessary compression of important sounds and preserve their dynamics. The compression will only affect what really needs control.
4. Gentle high-end control
High-frequency elements – cymbals, hi-hats – often accidentally activate the compressor, causing unnatural dips in volume. To prevent this from happening, limit the sensitivity of the sidechain to high frequencies. This will protect the upper range from excessive compression and preserve its airiness and clarity.
5. Working with space through Mid/Side
Using the EQ in the sidechain, you can separately process the central and side components of the signal. For example, leave the center tighter, and the edges more “open”. This allows you to control the width of the mix and maintain a clear focus in the middle, while adding spaciousness due to the sides.
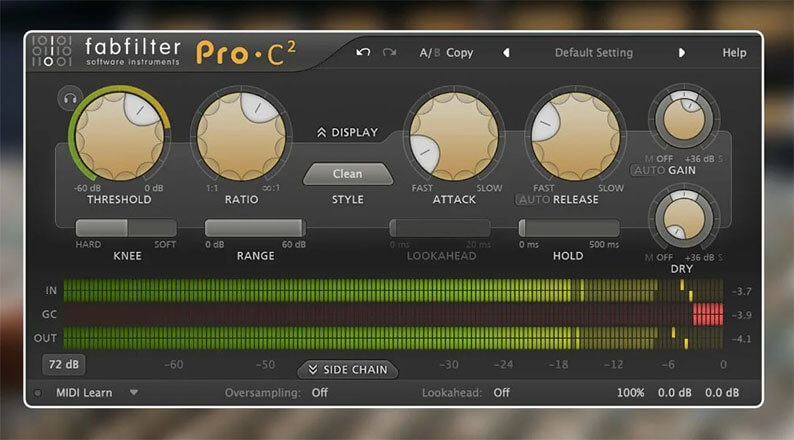
Using an equalizer in the FabFilter Pro-C2 input chain gives you fine control over what exactly triggers the compressor. This allows you to fine-tune the compression without over-processing and with maximum dynamics preservation. These techniques help you achieve a professional sound in which every detail is in its place.
Summary: How to achieve proper compression during mastering
For compression to really improve a track, rather than destroy its dynamics, you need to understand exactly how its parameters work. Threshold, ratio, attack, release, and knee — each of these elements affects the result. The right settings help to emphasize details, preserve the punch, and make the sound dense without losing life.
Compare with references, use level analyzers — for example, LEVELS — and don’t rely only on visual indicators. The final decision is always behind the ears: compression should work unnoticed, but effectively.
Frequently asked questions about compression in mastering
What is master bus compression?
This is compression applied to the final output of the entire mix. The goal is to tie the individual elements of the track together without destroying the natural dynamics. This approach is often used in mastering, but it is not required – it all depends on the material.
Do I need to compress the mix before mastering?
There is no hard and fast rule. If the track is already heavily compressed at the mixing stage, it may be difficult for the mastering engineer to make the necessary adjustments. It is better to leave a little dynamic headroom, especially if someone else is doing the mastering.
Should I compress every track?
There is no need to compress everything. Sometimes vocals or drums need compression, but not always – synths, background elements or fx may not need it at all. The main thing is to listen and understand what task the compressor solves in each specific case.
What to use first: an equalizer or a compressor?
The order of the equalizer and compressor depends on the task. If you need to remove sharp frequencies or dirty parts of the spectrum, it is better to start with equalization. For example, cutting resonances before the compressor helps the compressor work more stably and not “catch” unwanted peaks. This is especially important when working with vocals or guitar, where there are pronounced frequency problems. But there are situations when after compression the sound changes tone slightly – for example, low frequencies begin to sound stronger. Then after the compressor, you can put the equalizer to correct the final balance. Often both approaches are used together: first – corrective equalization, then compression, and finally – subtle final equalization.
When should you use compression?
A compressor is needed if you feel that the sound is jumping in volume or sounds uncertain. It helps to even out the amplitude and make the sound denser. Sometimes compression also adds a touch of color or saturation – especially when using analog emulations.
But it is easy to overdo it with compression. Too much compression kills dynamics and makes the sound flat. So it is important to monitor the level of gain reduction and rely on your ear, not just the numbers.
How does compression interact with an equalizer?
If the equalizer is placed before the compressor, the compressor amplifies the changes made by the equalizer. For example, if you raise the treble before compression, the compressor will react more strongly to high-frequency bursts. And vice versa – an equalizer after compression can muffle unwanted accents that appeared after compression.
The best way to understand how the order affects is to turn the compressor on and off and listen to how the sound changes. This approach allows you to accurately assess where in the chain it works best.
What does a compressor do in live sound?
On stage, a compressor helps control the volume of a source – be it vocals, bass or drums. It evens out the dynamics in real time so that the sound does not jump and does not overload the system. This is especially important for vocalists: a compressor smooths out sharp peaks, maintaining overall clarity, but it must be adjusted very carefully – too much compression can lead to clipping or loss of articulation.
Master Bus Compression: When and How to Use It?
Adding a compressor to the master bus is a common practice, especially when preparing a mix for mastering. This compression helps to “pull” the track together, smooth out peaks, and give an overall sense of density. However, it is important to keep an eye on the headroom level: if the signal is already overloaded, the compressor will have nowhere to work, and the result may be muddy or distorted.
Do you need compression on the drum bus?
Yes, especially if the drums play a key role in the arrangement. Compression on the drum bus makes the sound more collected, emphasizes the attack and adds drive. Parallel compression is also often used: a compressed version of the drums is mixed with the original, creating a powerful, but lively sound. This approach allows you to preserve the character of the drums while giving them additional energy.
What is the difference between a compressor and a limiter?
The principle of operation of a compressor and a limiter is similar – both tools reduce the signal level exceeding a set threshold. But a limiter is more strict: it literally does not allow a signal above a set level. This makes it indispensable for the final volume limitation in mastering. Unlike a compressor, a limiter is used at the very end of the chain and works almost unnoticeably if configured correctly.
Is a compressor always needed on a master?
Compression in mastering is not a rule, but a tool. Sometimes a well-mixed track already sounds quite balanced, and additional compression will only do harm. The main thing is to listen and analyze: does the compressor really make the sound better, or just make it different.
Honing mastering skills takes time. It happens that several attempts do not give the expected result – this is normal. Even experienced engineers do not always get it right the first time. Keep trying, comparing and learning. This is the path to a strong and accurate master.


