Over the past three decades, the way we access music has undergone radical changes. With the advent of digital streaming services and digital signal processing (DSP) technology, standard audio normalization has become an integral part of this process.
But what does audio normalization mean, and how can you go about this process with your own digital audio files? Let’s look at what sound normalization is and why it is a key stage in modern musical creativity.
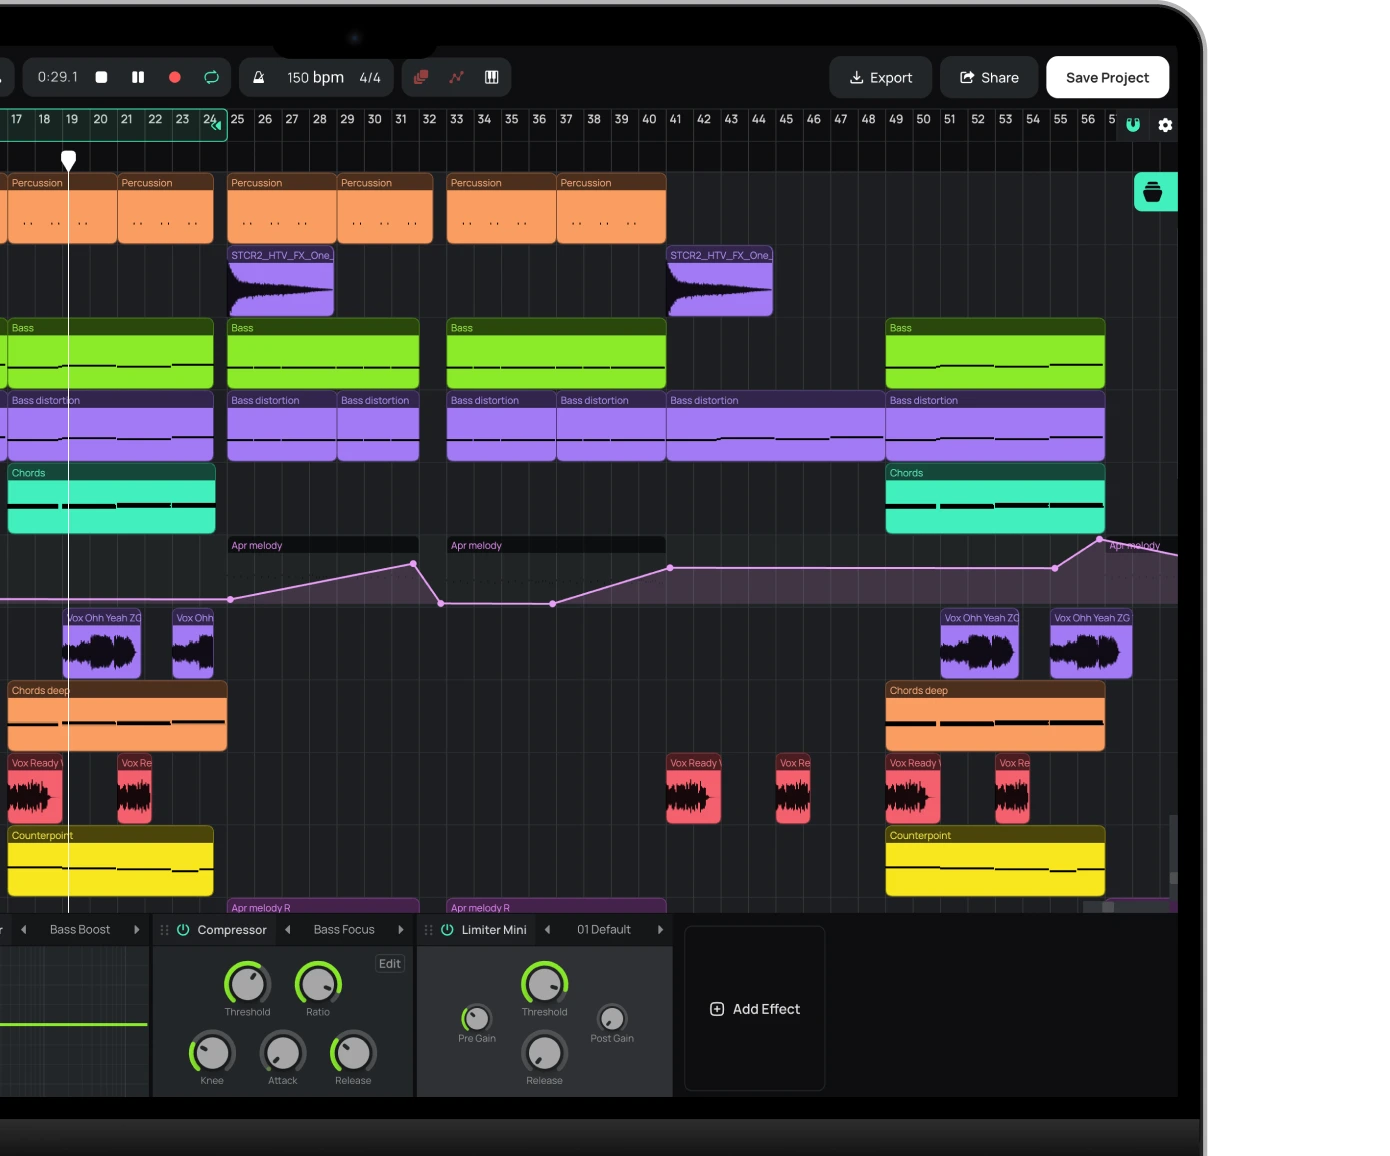
The online sequencer Amped Studio has a complete list of functionality for full audio normalization, which allows you to professionally process your tracks.
What is audio normalization?
During the audio normalization process, you apply a specific gain to a digital audio file, which brings it to a specific amplitude or loudness level while maintaining the dynamic range of the tracks.
Audio normalization is often used to maximize the volume of a selected audio clip and ensure consistency between different audio clips, such as in an album or EP that contains multiple tracks.
It’s important to note that compositions with a wide dynamic range can be more difficult to normalize effectively. Problems such as flattening or distortion of peak amplitude may occur during the normalization process.
Therefore, each audio clip requires an individual approach when normalizing. Audio normalization is an integral part of digital recording processing, but there is no one-size-fits-all approach to the process.
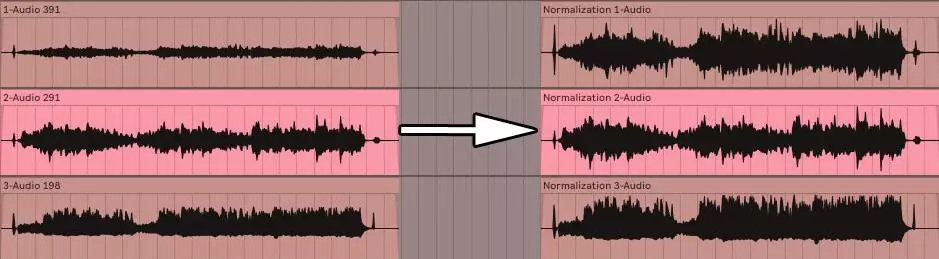
Before and after audio normalization
Why do you need to normalize the sound?
Why is it so important to normalize audio files? Here are a few scenarios in which volume normalization is a must:
Preparing to work with streaming services
Streaming services automatically set a standard volume level for all tracks in their libraries, preventing the need to adjust the volume as you listen. Each platform has its own target LUFs to ensure a consistent sound:
• Spotify: -14 LUFS;
• Apple Music: -16 LUFS;
• Amazon Music: от -9 до -13 LUFS;
• Youtube: от -13 до -15 LUFS;
• Deezer: от -14 до -16 LUFS;
• CD: -9 LUFS;
• Soundcloud: от -8 до -13 LUFS.
While each audio engineer may have a different approach to determining the target volume level for mastering, these standards are important guidelines for ensuring consistent music playback across platforms.
Reaching Maximum Volume
Using audio normalization helps you achieve the maximum volume level for each audio file. This is especially useful when importing tracks into audio editing programs or for increasing the volume of an individual audio file.
Creating a single layer between multiple audio files
It is also possible to condition audio files to the same volume level, which is important for processes such as mastering where it is necessary to set appropriate audio levels for subsequent processing.
Additionally, after completing a music project such as an album or EP, you can normalize and edit the audio files. Because you want the ambience and sound of the entire recording to be consistent, you may need to go back and adjust the volume levels to suit all songs.
Two types of sound normalization
For different purposes of using audio recordings, different sound normalization methods are used. This usually comes down to two main types: peak normalization and loudness normalization.
Peak normalization
The peak normalization process is a linear method in which a uniform increase is applied to the audio signal to achieve a level corresponding to the maximum amplitude of the audio track. The dynamic range remains the same, and the new audio file sounds approximately the same, except that the volume level may be higher or lower. This process determines the highest PCM value or pulse code modulation value in an audio file. The essence of peak normalization is to process audio based on the upper limit of a digital audio system, which typically corresponds to a maximum peak at 0 decibels. The peak normalization effect is based solely on peak audio levels and not the perceived loudness of the track.
Volume normalization
The loudness normalization process is more complex because it takes into account the characteristics of human sound perception. The human ear is capable of distinguishing different levels of volume and amplitude of individual sounds, subject to certain subjective limitations. This processing is often referred to as EBU R 128 loudness determination.
For example, sounds that are played for a long time at the same volume level may seem louder than sounds that are played intermittently or momentarily, even if the volume levels are the same. This occurs due to the way the human ear perceives sound. Therefore, when normalizing loudness, it is necessary to take these perceptual features into account.
Some people find that louder music sounds more attractive. It was this notion that gave birth to the “loudness wars” before the advent of streaming services, with musicians seeking to maximize the peak volume of their recordings to create a more prominent and colorful sound. However, thanks to sound normalization, this phenomenon is a thing of the past, and now the transition between tracks is not accompanied by sudden changes in volume.
LUFs are used to measure loudness levels to more closely match the human perception of sound. This standard is widely used in film, television, radio and streaming services. As with peak normalization, 0 dB remains the standard.
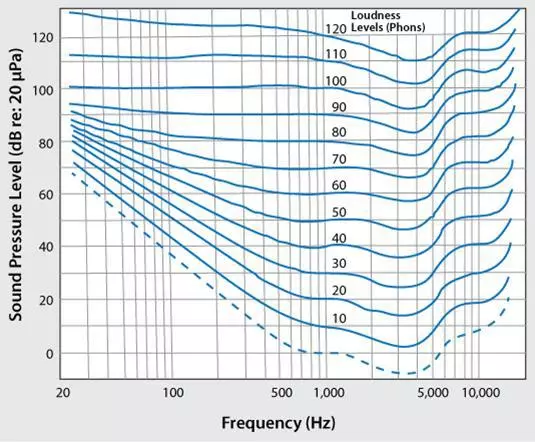
The Fletcher-Munson curve, as stated above, can help explain the differences taken into account when loudness normalization in LUFs.
Volume standards vary by region and application
24 LUFS: ATSC A/85 (American television), NPRSS, PRX radio broadcast;
23 LUFS: translation of EBU R 128;
-19 to -16 LUFS: PRX podcasts;
14 LUFS: Spotify, YouTube and other streaming platforms.
Determination of root mean square volume
If you’re not going to normalize stereo channels using peak level normalization, you’ll probably use loudness normalization, but it’s also worth mentioning another loudness processing technique, RMS loudness.
The normalization process is similar to loudness normalization in LUFs, but RMS levels are used instead. Root Mean Square (RMS) measures the average loudness of a section or entire duration of a clip.
However, just like normalization based on the highest peak, RMS normalization does not take human hearing into account. This is why mastering engineers typically work with LUFs and normalization processes as a standard. Mastering isn’t just about making sure the volumes are consistent throughout the entire project. It’s also important to take a step back and consider the dynamics, human perception and balance between each track.
When to Use Normalization
Now that you understand what audio normalization is, let’s discuss when and how it should be used.
Mastering your music
Audio normalization is a key tool in the track mastering process.
During mastering, it is important to maintain a constant volume level on your tracks.
This allows your listeners to enjoy their music without having to constantly adjust the volume.
By normalizing your tracks, such as when creating a post-mix/master for your album, you can achieve a professional, polished sound.
One that meets commercial release standards and is ready for distribution.
Speaking of mastering, if you’re looking for the best mastering plugins, we’re here to help you find them.
Preparing for Streaming Services
Streaming services have specific volume requirements that must be taken into account when downloading music.
Normalization can help you meet these requirements, providing excellent audio quality on these platforms.
By normalizing files to match the streaming service’s target level, you ensure consistent playback quality for your fans.
However, if you don’t go through this process yourself, streaming services can do it for you using compression, limiting, and other techniques.
This can lead to serious problems with audio quality.
Always remember to check the volume recommendations for each specific streaming service, as requirements may vary.
Working with various audio files
When working with multiple audio files in a project, it is important to keep the volume level the same for all.
This is especially important if the audio files have different sources or are recorded at different volumes.
This is especially important if the audio files have different sources or are recorded at different volumes.
This is especially important if the audio files have different sources or are recorded at different volumes.
Common Misconceptions About Audio Normalization
I think it’s very important to consider some common misconceptions before moving forward, especially for those just starting out.
1. Sound normalization and compression are two different things
Some people confuse normalization and compression, but they have completely different purposes.
While normalization adjusts the overall volume level of an audio file, compression reduces the dynamic range of the file.
Compression can help create a more stable volume level within an audio file, but it does not necessarily increase the overall volume level of the new audio file.
Unless that’s your goal, of course.
Compression is typically used for dynamic correction and sound enhancement, while normalization is more of a utilitarian function.
If you’re looking for the best compressor plugins for this process, look no further.
2. Sound normalization doesn’t fix everything
It is important to remember that peak normalization does not solve all audio problems.
If you have problems with signal-to-noise ratio, distortion, or other audio artifacts, normalization alone will not solve those problems.
In such cases, you need to address the root causes of the problem and use other audio processing techniques such as equalizer or noise reduction to achieve the desired sound.
If such a situation arises, we have the best equalizer plugins of 2023.
3. Sound normalization does not increase power reserves
When normalizing audio files, it is important to maintain sufficient volume headroom in your mixes and recordings.
Headroom is the difference between the loudest point in your audio file and the maximum volume level your digital audio system can handle.
If you normalize your audio too aggressively, you risk distortion and clipping, which can negatively impact the quality of your music.
Remember that no matter what DAW or system you use, it is important to monitor anything above the 0 dB mark.
This is because avoiding the restriction and having sufficient margin avoids distortions.
For example, I like to consider -16dB as my headroom target, and for anything above that I use a limiter (just to maintain adequate headroom).
This also helps compensate for any necessary volume changes during the mastering stage.
Sound normalization process
Now that we’ve covered the most common misconceptions about audio normalization, let’s dive deeper into the process itself.
Analyze your audio files
Before normalizing audio files, it is important to analyze them and determine the current volume levels.
This analysis can be done using tools built into your DAW or using dedicated audio analysis software.
By understanding the current volume levels of your files, you can make informed decisions about the audio normalization process.
Selecting an Audio Normalization Target
After analyzing the files, you can choose the normalization target that best suits your needs.
Factors to consider when choosing a normalization method include:
Type of audio material;
Desired volume level;
Type of processing performed;
Destination platform for your music.
Each level of normalization has its own strengths and weaknesses, so it is important to choose the one that will provide the best results for your specific situation.
In mixing situations. Stay in the low double digits, ideally -18 to -12 dB;
For mastering purposes. A safe option would be any value between -8 and -3 dB.
In some streaming services and situations there may be a situation where -0 dB is guaranteed, so just make sure it doesn’t exceed this value as it is right on the edge of the limit.
Note. During the mixing process, it is important to pay close attention to the gain settings as well as determining the RMS volume to determine the amount of gain needed for each track.
Using the clip’s gain control can help you achieve precise control over volume levels, ensuring a well-balanced mix.
Sound normalization
After selecting the appropriate normalization target, you can edit the audio files using a DAW or dedicated audio editing software.
Most DAWs and audio editing software have built-in normalization tools that make them easy to use.
Typically, this is as simple as highlighting the audio and pressing command, or simply selecting “Normalize” from the drop-down menu.
Be sure to monitor the results of the normalization process to ensure that the new volume levels meet your expectations and do not cause unwanted artifacts or problems.
Compression vs Normalization
When it comes to normalization, it is most often compared to the compression process. Understanding the differences and choosing the right audio processing method are key skills for a music producer, so let’s take a closer look at this.
Compression and normalization are two separate audio processing techniques, each with their own unique goals.
Normalization is aimed at adjusting the overall volume level of an audio file;
Compression, in turn, reduces the dynamic range within the file.
It’s important to remember that compression makes quieter parts of an audio file louder and louder parts quieter. While both methods can be used to achieve a more consistent volume level, they affect the sound differently and may have different effects on your material.
Yes, compression can make the sound louder, but its main purpose is something else.
When to use compression
Normalization is a process that comes in handy when you need to equalize the overall volume level of an audio file or group of files. As we discussed earlier, this is especially useful when mastering your audio track or preparing music for streaming services. Unlike compression, normalization does not affect the dynamic range of an audio file, making it a more transparent and less intrusive processing method. Moreover, it also does not imply any dynamic, corrective or improving goals, meanings or properties.
When to Use Volume Normalization
Normalization is a tool that should be used when you want to equalize the overall volume level of an audio file or group of files. As discussed previously, this is especially important when mastering your audio track or preparing music for streaming services. Unlike compression, normalization does not change the dynamic range of the audio file, making it more neutral and less intrusive to the sound. In addition, it is not intended to correct or improve the dynamic characteristics of an audio file.
Dynamics and the human ear
The human auditory system is a complex mechanism that responds to a variety of frequencies and volume levels. Our perception of sound is nonlinear: changes in volume levels and frequencies are perceived differently.
This non-linear nature of perception is important to consider when normalizing audio files, as it can affect how listeners perceive music.
Equal loudness curves, or Fletcher-Munson curves, depict how the human ear responds to loudness at different frequencies. They show that hearing is more sensitive to certain frequency ranges, especially from 2 to 5 kHz, and less sensitive to very low and high frequencies.
Knowing these curves can help make informed decisions about human perception and when normalizing audio files, providing more consistent audio across different frequencies.
What is dynamic range?
Dynamic range is defined as the difference between the quietest and loudest parts of an audio file, and plays a key role in music production, shaping the overall impact and emotion of a piece.
A larger dynamic range helps create a sense of space and depth in the recording, while a smaller dynamic range makes the sound feel richer and more revealing.
There is a balance to be found between maintaining a constant volume level and maintaining the dynamics of your audio material. Too much normalization or over-compression can result in a loss of dynamic range, making your music sound flat and lacking in emotion.
To maintain dynamics, it is important to choose peak normalization methods and settings that respect the natural dynamics of your material while maintaining the desired loudness (peak amplitude).
Loudness War
There is an interesting trend in the modern music industry called the “loudness war.” This term describes the trend of increasing overall volume levels of recorded music over the past few decades. It is believed that louder songs may attract more listeners’ attention or sound better.
If you’re looking for the best audio samples to incorporate into your music, it’s important to take a look at the best free sample packs of 2023. This will allow you to select the most suitable sound elements for your creativity.
However, increasing the volume of audio recordings has its negative consequences. This may result in loss of dynamic range and poor sound quality of the music. Many artists, sound producers and listeners are pushing back against this trend, calling for more dynamic and natural sound recordings.
Given these concerns, many streaming services such as Spotify and Apple Music have begun to implement volume normalization. This allows you to maintain consistent sound quality while listening and reduces the need for excessive volume when creating music. This shift emphasizes preserving dynamic range and prioritizing sound quality over volume.
Normalization vs Compression: What’s the Difference?
Many people mistakenly believe that normalization and compression are the same thing, but this is far from true. Compression aims to raise the minimum volume level of a track and lower the maximum volume level, creating a more even overall volume level. In contrast, normalization sets the highest point as the peak of the audio track.
Proportional amplification is then applied to the rest of the sound, maintaining dynamics, that is, the difference between the loudest and softest sounds. This effectively increases perceived volume based on peak level while maintaining natural sound quality.
Disadvantages of Audio Normalization
It’s important to note that audio normalization has its drawbacks. Usually it is used only at the last stages of creating audio material. This is because normalization often pushes the audio level to a peak within the digital limit, limiting subsequent editing options.
It is not advisable to normalize individual audio tracks that have yet to be mixed in the context of a multi-track recording. If each component is already leveled to the digital ceiling, they may begin to clip when played back together.
Additionally, audio normalization can have some damaging consequences. When you normalize audio, the digital processing is baked into the audio track, making the changes permanent. Therefore, it is important to apply normalization in the right context and at the right time – usually after the audio files have already been processed as desired.
Author
Patrick Stevensen
Published
20 May 2024
DAW techniques
Make Music Now.
No Downloads, Just
Your Browser.
Start creating beats and songs in minutes. No experience needed — it's that easy.