
Normalization

Normalization of an audio is the process of adjusting the amplitude of an audio signal to a specific level to ensure that it is consistent and optimized for playback across various devices.
Why normalization is essential, when to use it, and how it can help you achieve better audio quality?
Why Use Normalization for Audio?
The primary reason for using normalization is to improve the overall loudness of the audio. When you normalize an audio file, you are essentially raising the amplitude of the waveform to its maximum without causing any distortion. This process increases the volume of the audio without compromising the sound quality.
Normalization is also essential for ensuring that all tracks in your mix have consistent volume levels. When tracks are recorded at different volumes, it can be challenging to achieve a balanced mix. Normalizing the tracks can help you level them out and bring them to the same volume level, making it easier to achieve a cohesive and polished sound.
Audio normalization is a vital process in any digital audio workstation (DAW). Use normalization of an audio with Amped Studio. You can normalize each individual audio clip or all audio in the project.
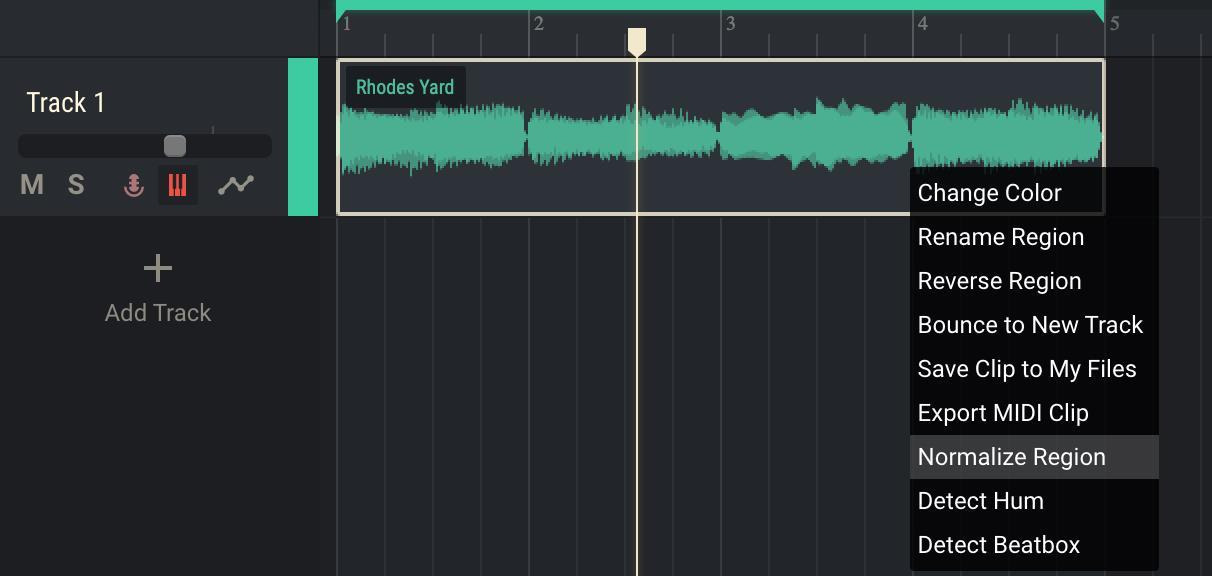
For individual clip normalization:
- select an audio clip;
- right mouse click;
- from drop down menu select “Normalize Region”.
Then you will see a normalization level slider. 100% normalization means that after the process Max True Peak Level of your audio will up to 0 db.
To normalize all audio in the project:
- select Master Track;
- select Master Unit (M) next to Device Chain;
- Normalize all tracks.


When Should Use Normalization?
Normalization can be used in various scenarios, depending on your requirements. Here are some of the most common situations where normalization is useful:
1. Mastering Audio for Distribution
When you’re preparing your music for distribution, you want to ensure that the volume is optimized for playback across different devices. Normalizing your tracks to a specific level, ensures that they are consistent in volume and optimized for playback. Level of normalization depends on specific requirement of the online platform such as You Tube, Spotify, iHeart Radio and others where you track going to be distributed or specific of the physical media such as CD, Vinyl, Audio Tape..
2. Balancing Volume Levels
If you’re working with multiple tracks or layers, it can be challenging to achieve a balanced mix. Normalizing each track can help you level them out and bring them to the same volume level, making it easier to achieve a cohesive and polished sound. By bringing all audio to the same volume level later is more convenient to set and balance the mix.
3. Correcting Volume Imbalances
If you have a recording with volume imbalances, such as one part of the audio being too quiet or too loud, normalization can help you correct it. By raising the volume of the quiet parts and lowering the volume of the loud parts, you can achieve a more balanced sound.
In conclusion, normalization is a critical process in any digital audio workstation. It can help you achieve better audio quality by increasing the loudness, reducing noise, and balancing volume levels.

In the low register of sound, the bass clef is used to record notes. The bass clef is used for notes that are below the first octave ...

Compared to the 2000s era, today's producers are faced with an abundance of resources available to them ...

A diminished chord is a harmonic structure consisting of notes spaced a minor third apart ...

In the process of digital mastering, professionals often prefer iZotope Ozone. This tool is one of the most preferred for the final processing of tracks and is compatible with various digital audio workstations (DAW) ...

Sound engineers, producers and arrangers have many virtual instruments in their arsenal that can improve the songs...

Proper EQ practices matter. Parametric EQ is the next type of equalizer we want to pay attention to. As it is said in previous articles equalization is...

Polyrhythm is a combination of various rhythmic patterns within the same musical signature ...

Songwriting is a very useful skill that can come in handy in many areas such as the music industry, television, advertising, and others ...

Like the continuous vibrations of an endlessly multiplying tape, delay plug-ins are a vast collection of tools that seem endless in the variety available to modern music producers ...