
How to eq drums

Equalizing the drum section and drums
The statement that drums and kick drums from a sample library do not need equalization is incorrect. Despite the careful processing of drums in quality sample packs, this does not make them universal and does not guarantee that a particular sample will fit perfectly into your mix. Without proper EQ, the drum section can sound washed out and unsteady, hiding behind other instruments and giving the impression of low-quality music. EQing the drums can correct this situation.
The online beat maker Amped Studio is equipped with all the necessary tools for correct and professional equalization and mixing of drums to form the correct musical mix.
The conflict that causes the sound to be jumbled is due to differences in the spectral characteristics of the samples. Drums from two different libraries will look completely different on the spectrogram: they will have their own frequency range, dynamics and harmonic distribution. Because of this, a particular sample may not fit with the rest of the instruments in the mix, making it neither universal nor interchangeable.
The problem is partly solved by using specialized packs created for a specific style. In such packs, the drums are pre-processed and have the desired character, which does not conflict with other instruments typical for this musical genre. However, for this, the mix must strictly correspond to a certain style, which is not always possible for beginning musicians. Strict adherence to style is usually maintained only by experienced and commercial musicians who write music for labels or audio stocks.
Equalizing drums is the most important stage of mixing. Without it, it is impossible to achieve a “branded” sound: the tracks will be similar to hundreds of others created by beginners using the same libraries. An experienced listener will easily be able to tell if the drums were simply thrown into the mix or if additional work was done on them. The methods described in the article and video tutorial can also be used to work with other low-frequency instruments that are not related to the drums and rhythm section.
EQing the snare allows you to move the instrument in depth and height, while panning allows you to move it laterally. For example, by cutting off the low-frequency component of a snare, we will raise it higher and make room for the bass line and kick. By reducing the level across the spectrum, the volume will become lower, and the sound will subjectively appear to have moved into the background, deeper into the mix.
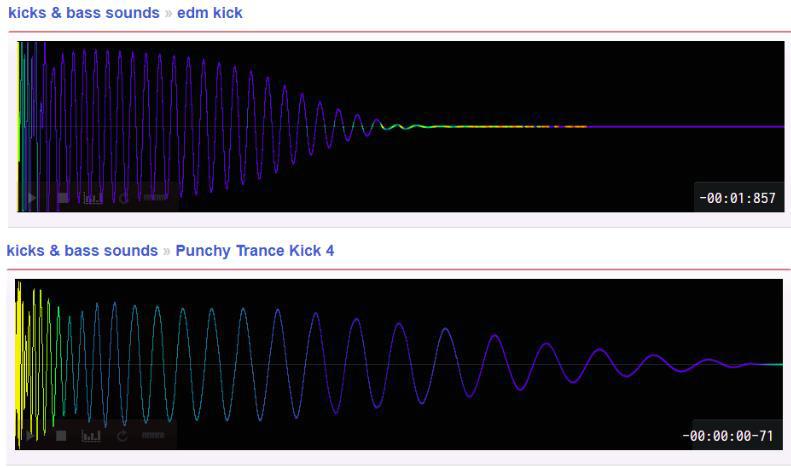
You should start with a barrel. In sample packs that are not specific to a specific style, the kicks are usually made to have a wide range.
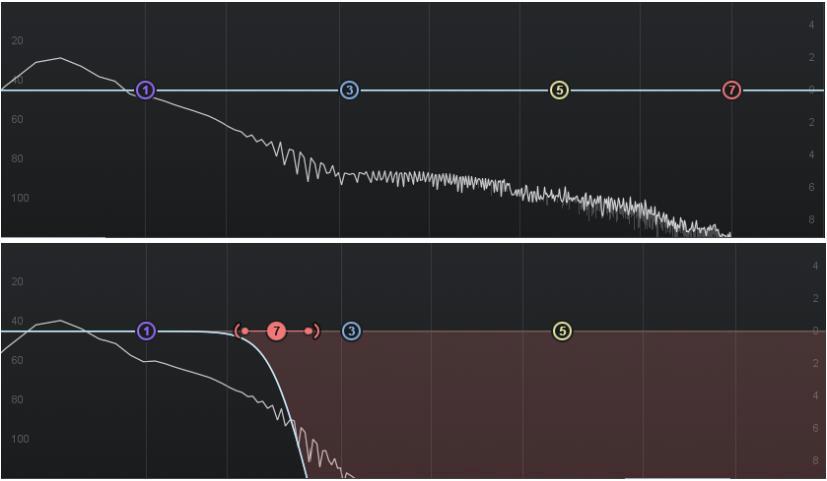
Kick is often calculated to be played during pauses between parts or used as an SFX effect. In such cases, the upper range should not be cut, as full-range sound becomes appropriate. However, if the goal is to fit the kick into the mix, the top end of the range may be superfluous. To do this, use a low-pass filter, which is present in any parametric equalizer, including free ones. By adjusting the slope or quality factor of the cut, you can change the character of the sound, making the roll-off softer or rougher. This way, the kick will be clearly localized in the lower part of the spectrum, and its upper frequencies will not interfere with other instruments. Panning the kick is usually not used, as it traditionally sounds centered.
Bass-kick conflict is a broad and nuanced topic. Briefly: the carrier frequency of the bass line and kick are usually the same, which is about 50 Hz. None of them can be cut by a hi-pass filter. The optimal solution is side chain compression, in which the bass’s carrier frequency of the kick is cut off only at the moment of its impact, and the rest of the time the line sounds without filtering.
At the equalization stage, you can slightly cut the low frequencies of the bass line for kick. This won’t be a permanent solution, but it may help. If attenuating one of these elements suits the style of the track, you can dispense with side chain compression and simply cut off enough of the frequency range.
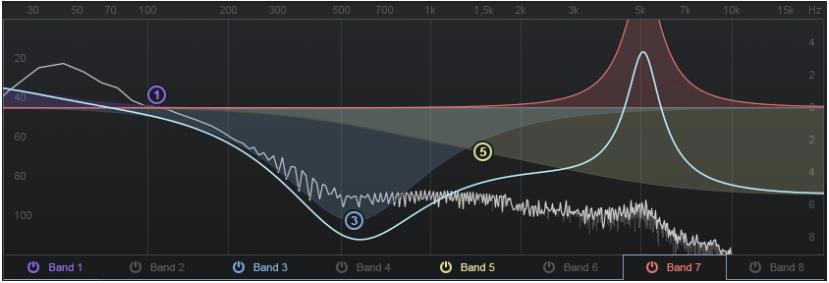
If you want to add extra emphasis to a kick in a mix, you don’t have to make it louder. It would be better to attenuate the mid frequencies and create a peak in the high frequency zone where the click sounds. This will create the right frequency contrast and lift the low-frequency region without overloading. In addition to highlighting the kick, this will free up the midrange for other parts.
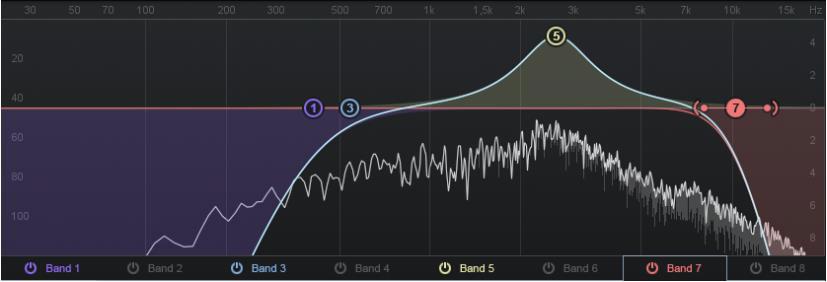
Other drum instruments, such as snare, clap and hat, are highlighted in the mix in a similar way: their fundamental frequency is emphasized, and the unnecessary part of the spectrum is cut off. The spectrogram clearly shows that the clap invades the low-frequency region.
After fairly tight filtering of the low frequencies and a slight cut of the high frequencies, the clap will not interfere with the kick, bass and hi-hats. However, its sound will remain unchanged.
This model of the spatial distribution of instruments and the reduction method can be considered classic. Gibson wrote about them in his book “The Art of Mixing,” which is recommended to all aspiring musicians. However, simply placing tools so that they do not overlap each other does not always give an ideal result. Even if a spectrum analyzer shows that there are no frequency conflicts between samples, the sound picture may still be far from ideal.
The reason lies in the peculiarities of psychoacoustics. Our hearing is not linear, and the exact formulation of ideal rules for creating a sound space is not yet possible, since the result will be perceived differently due to many factors beyond the musician’s control. The solution is to approach the process creatively and trust your hearing more than the instruments. For example, experimenting with reverb EQ on a snare can provide a new auditory experience and additional variation in the sound of the mix.
Tips for working with spectrum and equalizer
- Don’t get stuck on one channel or sample: It’s important to consider how the drums sound together in the final mix rather than in a separate listen;
- Avoid “blurring” your hearing: Beginners are not recommended to work with the equalizer for more than one or two minutes at a time, otherwise the perception may be distorted. The reason is that there are too many sound options in a short period of time, and the ear does not have time to analyze them. The solution is to turn off the sound during equalization;
- Listen the next day: Before the final render, be sure to listen to the track the next day to refresh your perception and see (or rather, hear) it from a new point of view.
Tips for equalization and frequency ranges
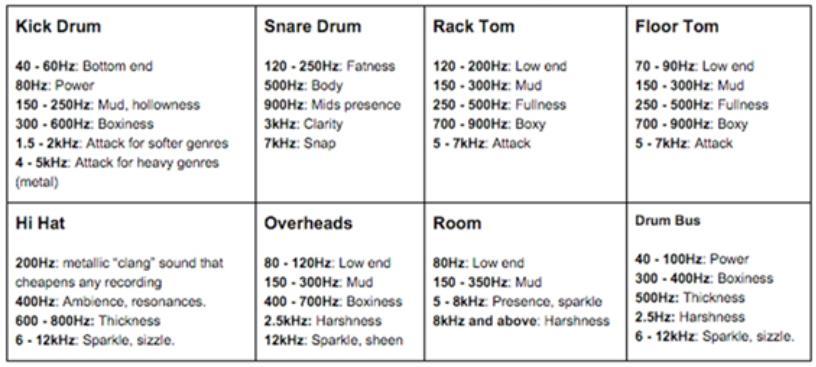
Every mix is unique, but there are some problems that crop up regularly: dirty sound remains dirty, harshness remains harsh, and each of these qualities corresponds to a specific frequency range. EQ cheat sheets will help you move in the right direction. For example, if the cheat sheet says “cut at 300 Hz to get rid of dirt,” that value might be appropriate for your mix, or at least close to what you need. The cheat sheet will tell you where to start.
Please remember that the frequency ranges given here are guidelines and are suitable for most situations. Don’t be afraid to make small changes to the frequency ranges, as this can significantly improve the results.
Balance is the key to a successful mix
The balance of all the tracks in the mix is the foundation of your sound. Everything you do is equalization, compression, spatial effects, saturation, etc. — is based on how you balance the mix. Superstar mix engineer Billy Decker said: “I do everything with balance in mind. If something is out of balance, everything is out of balance.”
Remember that every little change you make affects the tone of your mix. When working on equalization, first focus on eliminating problem frequencies (usually resonances), and then do whatever is necessary to improve the tracks. Only after you have a clean tone figured out can you begin the final steps of equalization.
Stay away from the Solo button
The lead vocal is the only element of your mix that makes sense to EQ in a solo. EQing individual tracks of closely spaced drum mics can bring out a lot of resonant frequencies, but removing them can kill the energy of your tracks. Although individual sounds may become clearer, the overall sound of the drums will lose its power. Your drums should sound like they’re knocking down a door, not knocking politely and asking permission to enter.
What’s the matter, honey?
Before you start EQing, think about the root of the problem. Often one frequency range masks another. If the snare drum sounds dull and lifeless, there may be a lot of resonance in the midrange, distracting attention from the high-frequency details. Cut out that resonance and you’ll likely hear the snare drum come to life.
Another classic example is the barrel that “has no body” (ghost barrel?). The problem is likely excessive energy in the lower mids, which masks the low frequencies. By removing the low mids, you suddenly open up the kick drum’s powerful low-frequency spectrum.
Please check the phase before equalization
Make sure all drum tracks are in optimal phase (polarity) relationship with each other. Otherwise, EQ will be a nightmare and the end result will still sound weak.
Select one mic (or pair of mics), such as overheads, and listen to them along with each close mic in the setup, one at a time. Switch the phase on each close mic and see what phase setting allows it to “match” with the overheads, creating a full and powerful sound. Close mics that are out of phase with the overheads will usually cause the drums to sound weaker or more distant compared to properly phased mics.
Also make sure that any two mics on the same drum, such as the top and bottom snare mics, stack together for optimal phase response. This usually results in more powerful low frequencies.
Find unpleasant frequencies
When it comes to subtractive and additive equalization, use the principle: “Cut out the bad and bring out the good.” Here’s an easy way to determine which frequencies to cut: Create a narrowband EQ and increase the gain. Then move slowly through the spectrum until you hear something unpleasant, and cut that frequency to make it sound better. Don’t be afraid to increase the gain by 9 or 10 dB to find resonant frequencies.
Start with a wide Q to locate the problem area, then narrow the Q to fine-tune the problem frequency. Be sure to monitor the volume of your monitors or headphones, as resonant frequencies can suddenly become very loud during this process.
We jump onto the tire
A great way to achieve the perfect tone for your drums is to group them into a bus or subgroup. Insert a stereo EQ into the group fader and get creative. This way you can easily remove dirt from all drum tracks or add some shine and attack. Remember that in this case you are affecting all the reels at the same time.
Once you’ve finished EQing the entire drum group, consider individual tracks for further tone adjustments. It’s important to remember that the overall balance and tonality of the entire drum kit will affect the sound much more than the individual tracks. So make sure you have a good balance before you start EQing.
Basic Drum Tone Techniques
Drum tire
- Tune the low frequencies using a high-pass filter, and also slightly increase the range around 50-100 Hz. This will provide resonant amplification without overloading the subwoofers;
- Boxiness is usually in the 300 to 400 Hz range, so trim it carefully if necessary;
- 500Hz will add a bit of body to the overall setup;
- Reduce the 2.5 kHz frequency to remove excess harshness and make room for guitars and vocals.
Kick
- • Filter the bass drums with a high-pass filter around 30 Hz. Anything below this level is rumble and should be avoided to achieve clear low frequencies. Be careful with electronic drums such as 808s, which may have a fundamental frequency below 30 Hz;
- • Cut the lower mids around 300-600 Hz to get rid of the boxy sound. Find the most problematic frequency and eliminate it. This will improve the sound significantly;
- • Boost the highs for attack. For metal music, add high frequencies in the 4-8 kHz range to create a click, while for indie, rock and pop music, it is better to boost the frequencies in the 1.5-2.5 kHz range for a little punch;
- • If you want to reduce the sound of other drums (especially cymbals) leaking into the bass drum track, use low pass filtering of 5 kHz and higher. But be careful not to lose the snap or snap of the kick. A gate can be more effective in this situation than a simple equalizer at reducing noise.
Snare drum
- If the kick drum penetrates the snare mic too much, it can create an unpleasant low end in the mix. To combat this, you can filter the snare track below 100 Hz with a steep slope (the SSL high-pass filter is 18 dB per octave);
- Strengthen the body of the snare drum by increasing frequencies in the 100-250 Hz range to add power;
- To increase the attack of the snare drum, increase the frequencies in the range of 1.5-3 kHz;
- Add more “rattle” to the bottom of the snare at 5 kHz;
- If the snare clicks are too loud, but the snare itself is not bright enough, use a high-shelf gain at 9-10 kHz. This will brighten the drum without emphasizing the clicks;
- Snare drums are prone to unpleasant resonances, so review all frequencies and get rid of them.
Hi-Hat
- Hi-hats can contain a lot of sound leakage from the snare drum or toms, so they can be filtered out with a high pass filter at 300-400 Hz;
- Thickness can be added from 600-800 Hz, and clarity and openness can be added from 6 kHz to 12 kHz;
- Cleaning up the range from 800 Hz to 2 kHz can remove the nasality of some hi-hats.
Cymbals/Overheads
- Different genres use overhead microphones in different ways. For example, in metal they serve solely to record cymbals, while in blues and rock overheads can be the main source of the drum sound. Genres that require a full drum sound require softer high-pass filtering (or no filtering at all) compared to genres that use overheads primarily for cymbals;
- Cymbal sharpness is at 2.5 kHz. Explore this area to find the frequencies that create the harsh, unpleasant sound. Cutting in this area will not make the plates look dull; on the contrary, they will sparkle in the mix without burning your ears.

Create your own unique music beats with the powerful functionality of Amped Studio ...

Remixes allow musicians and producers to express their individuality by reimagining existing compositions ...

There are now more opportunities than ever before for independent musicians to start their own careers without the backing of big companies or big budgets ...

Sooner or later any guitar player will find it necessary to record his music. Some do it just for themselves, others put their creations on the internet ...

During the audio normalization process, you apply a specific gain to a digital audio file, which brings it to a specific amplitude or loudness level while maintaining the dynamic range of the tracks ...

Looking for the perfect laptop for music production? You've come to the right place ...

MIDI Editor – is a software that lets you create, edit, and save MIDI tracks. Midi is a universal format most suitable for high-quality storage of music tracks...

Arranging music has existed for many years and is an essential characteristic to any musical style or genre. Some of the greatest musicians have arranged parts ...

Proper EQ practices matter. Parametric EQ is the next type of equalizer we want to pay attention to. As it is said in previous articles equalization is...